Cross compiling OpenCV 4 for Raspberry Pi Zero
Posted on August 7, 2019 by Paul
In this article I will show you how to cross compile the latest version of OpenCV for Raspberry Pi Zero. If you want to build OpenCV for Raspberry Pi 2, 3 or 4 please check this article for a much faster procedure.
Unfortunately the crossbuild-essential-armhf from Debian will not generate working binaries for Raspberry Pi Zero, so we can’t use the cross compilation procedure I’ve presented in my previous article about cross compiling OpenCV for Raspberry 2 and up.
In order to cross compile OpenCV, we are going to use a slightly more involved procedure, in which we’ll basically emulate an ARM processor on a more powerful x86-64 Debian. The approach presented in this article will work with all versions of Raspberry Pi, but it is much slower than the approach presented in my previous article because of the emulation part. Please note that, even with an emulated ARM architecture, cross compiling OpenCV is much faster than building directly on a Raspberry Pi Zero where it could take days, assuming that the build doesn’t fail because of the limited amount of RAM on the Pi Zero.
As a side note, I’ve cross compiled OpenCV for Raspberry Pi Zero on a Debian 10 x86-64 machine with 8GB of RAM. In theory, the same approach should work with a Debian virtual machine or with a Docker container, just be sure that you have plenty of RAM.
First, make sure your Debian Buster system is updated:
1 sudo apt update
2 sudo apt upgrade
Next, we are going to install Raspbian, in a chroot, on the host Debian x86-64 system:
1 sudo apt install qemu-user-static debootstrap
2 mkdir raspbian
3 sudo debootstrap --no-check-gpg --foreign --arch=armhf buster ~/raspbian http://archive.raspbian.org/raspbian
4 sudo cp /usr/bin/qemu-arm-static ~/raspbian/usr/bin
5 sudo chroot ~/raspbian /debootstrap/debootstrap --second-stage
6 sudo chroot ~/raspbian apt update
7 sudo chroot ~/raspbian apt upgrade
8 sudo chroot ~/raspbian
At this point you should be running on Raspbian on an emulated ARM system.
If you need to go back to your host Debian system, write exit. If you want to restart the emulated Raspbian system use:
1 sudo chroot ~/raspbianIf, at a later time, you decide that you want to remove the emulated Raspbian system, simply erase the raspbian folder from your host system, e.g.:
1 cd ~
2 rm -rf raspbian
For the next part of the article, I’ll assume that you are on the emulated Raspbian system.
Start by installing the build tools necessary for compiling OpenCV:
1 apt install build-essential gfortran
2 apt install cmake git pkg-config wget
Since Raspberry Pi comes with both Python 2 and Python 3 installed, we are going to build OpenCV with support for both versions of Python.
1 apt install python-dev python-numpy python3-dev python3-numpyNext, we are going to install two graphical libraries required if you want to run OpenCV with GUI support:
1 apt install libgtk-3-dev libcanberra-gtk3-devLet’s also install a couple of image and video libraries that are used by OpenCV:
1 apt install libtiff-dev zlib1g-dev
2 apt install libjpeg-dev libpng-dev
3 apt install libavcodec-dev libavformat-dev libswscale-dev libv4l-dev
4 apt install libxvidcore-dev libx264-dev
Next, we can download the current release of OpenCV. I will show you how to install the full OpenCV (default and contrib libraries):
1 mkdir opencv_all && cd opencv_all
2 wget -O opencv.tar.gz https://github.com/opencv/opencv/archive/4.1.0.tar.gz
3 tar xf opencv.tar.gz
4 wget -O opencv_contrib.tar.gz https://github.com/opencv/opencv_contrib/archive/4.1.0.tar.gz
5 tar xf opencv_contrib.tar.gz
6 rm *.tar.gz
Create a build folder:
1 cd opencv-4.1.0
2 mkdir build && cd build
At this point, we can use Cmake to generate the OpenCV build scripts:
1 cmake -D CMAKE_BUILD_TYPE=RELEASE \
2     -D CMAKE_INSTALL_PREFIX=/opt/opencv-4.1.0 \
3     -D OPENCV_EXTRA_MODULES_PATH=/opencv_all/opencv_contrib-4.1.0/modules \
4     -D OPENCV_ENABLE_NONFREE=ON \
5     -D BUILD_TESTS=OFF \
6     -D BUILD_DOCS=OFF \
7     -D BUILD_OPENCV_PYTHON2=ON \
8     -D BUILD_OPENCV_PYTHON3=ON \
9     -D BUILD_EXAMPLES=OFF ..
If you want to build OpenCV without GUI support, a headless build, use the next command:
 1 cmake -D CMAKE_BUILD_TYPE=RELEASE \
 2     -D CMAKE_INSTALL_PREFIX=/opt/opencv-4.1.0 \
 3     -D OPENCV_EXTRA_MODULES_PATH=/opencv_all/opencv_contrib-4.1.0/modules \
 4     -D OPENCV_ENABLE_NONFREE=ON \
 5     -D BUILD_TESTS=OFF \
 6     -D BUILD_DOCS=OFF \
 7     -D BUILD_OPENCV_PYTHON2=ON \
 8     -D BUILD_OPENCV_PYTHON3=ON \
 9     -D WITH_GTK=OFF \
10     -D BUILD_EXAMPLES=OFF ..
Assuming that you had no errors, you should have a Makefile in the build folder. We can start the actual build:
1 make -j16Once the build phase is done, we can install the library:
1 make install/stripA final step:
1 cd /opt/opencv-4.1.0/lib/python3.7/dist-packages/cv2/python-3.7/
2 cp cv2.cpython-37m-arm-linux-gnueabihf.so cv2.so
Next, compress the library in order to deploy it on a real Raspberry Pi Zero device:
1 cd /opt
2 tar -cjvf /opencv_all/opencv-4.1.0-pizero.tar.bz2 opencv-4.1.0
You should end up with the library archived inside the emulated Raspbian system, e.g.:
1 cd /opencv_all
2 ls
If you exit from the emulated Raspbian, the archive should be in:
1 cd ~/raspbian/opencv_all
2 ls
Copy the archive opencv-4.1.0-pizero.tar.bz2 to your Pi Zero device.
For the next part of the article, I’ll assume that you are on a Raspberry Pi Zero.
Make sure your RPi has all the development libraries we’ve used. Like before, if you don’t plan to use GTK+, ignore the first line from the next commands. Most of these libraries should be already installed if you are using the full version of Raspbian:
1 sudo apt install libgtk-3-dev libcanberra-gtk3-dev
2 sudo apt install libtiff-dev zlib1g-dev
3 sudo apt install libjpeg-dev libpng-dev
4 sudo apt install libavcodec-dev libavformat-dev libswscale-dev libv4l-dev
5 sudo apt-get install libxvidcore-dev libx264-dev
6 sudo apt install python3-numpy
7 sudo apt install python-numpy
Uncompress and move the library to the /opt folder of your RPi:
1 tar xfv opencv-4.1.0-pizero.tar.bz2
2 sudo mv opencv-4.1.0 /opt
Optionally, you can erase the archive:
1 rm opencv-4.1.0-pizero.tar.bz2In order for the OS to find the OpenCV libraries we need to add them to the library path:
1 echo 'export LD_LIBRARY_PATH=/opt/opencv-4.1.0/lib:$LD_LIBRARY_PATH' >> .bashrc
2 source .bashrc
Log out and log in or restart the Terminal.
Next, let’s create some symbolic links that will allow Python to load the newly created libraries:
1 sudo ln -s /opt/opencv-4.1.0/lib/python2.7/dist-packages/cv2 /usr/lib/python2.7/dist-packages/cv2
2 sudo ln -s /opt/opencv-4.1.0/lib/python3.7/dist-packages/cv2 /usr/lib/python3/dist-packages/cv2
Next, install git if necessary:
1 sudo apt install gitWe’ll clone a simple config file useful if you want to be able to use OpenCV from C++:
1 git clone https://gist.github.com/sol-prog/ed383474872958081985de733eaf352d opencv_cpp_compile_settings
2 cd opencv_cpp_compile_settings/
3 sudo cp opencv.pc /usr/lib/arm-linux-gnueabihf/pkgconfig
4 cd ~
5 rm -rf opencv_cpp_compile_settings/
At this point, you should be able to use the OpenCV library from C++ or Python.
On the repository for this article you can find a few C++ and Python test programs. You can download the code on your Pi with:
1 git clone https://github.com/sol-prog/raspberry-pi-opencv.git
2 cd raspberry-pi-opencv/tests
There are two headless tests that you can use even if you don’t have a display connected to your RPi: cli_cpp_test.cpp and cli_python_test.py. I’ve also included two graphical tests that require a display: gui_cpp_test.cpp and gui_python_test.py.
You can build and run the C++ tests like this:
1 g++ cli_cpp_test.cpp -o cli_cpp_test `pkg-config --cflags --libs opencv`
2 ./cli_cpp_test
or, if you have a display connected to your RPi:
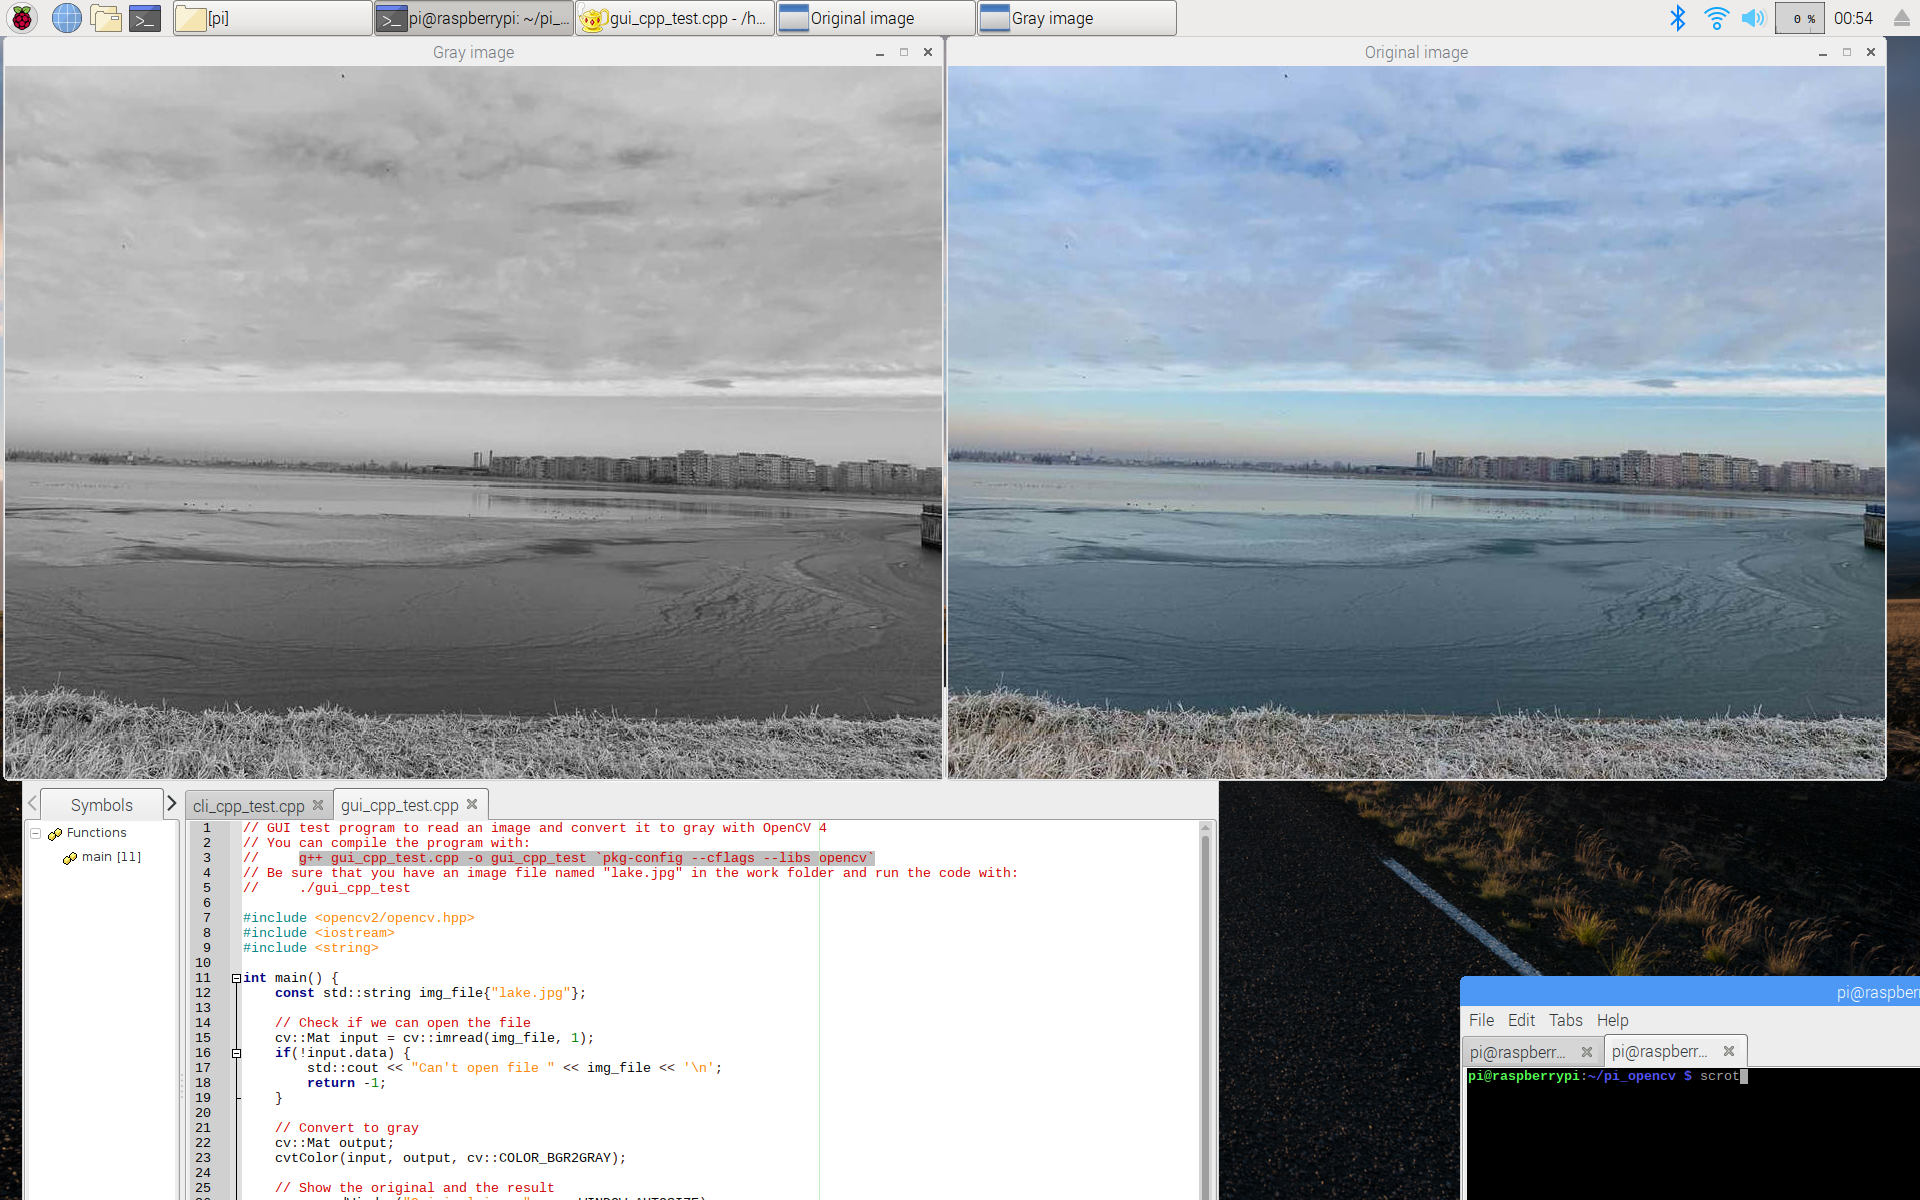
1 g++ gui_cpp_test.cpp -o gui_cpp_test `pkg-config --cflags --libs opencv`
2 ./gui_cpp_test
Here is a screenshoot of the C++ GUI test running on my Pi:
For the Python tests, use:
1 python3 cli_python_test.pyor
1 python3 gui_python_test.pyIf you want to learn more about programming on the Raspberry Pi, a very good book is Exploring Raspberry Pi by Derek Molloy: