C++ Implementing a Chaos Game simulator
Posted on November 13, 2019 by Paul
In this article, I will show how to implement in C++ the classical Chaos Game. We start with a regular polygon and a random initial point inside the polygon. Next, we randomly select one of the polygon vertices and add a new point at a fraction of the distance between the initial point and the polygon vertex. We take as initial point the newly generated point and iterate for a large number of steps. Following the above process can, in some cases, produce a fractal shape.
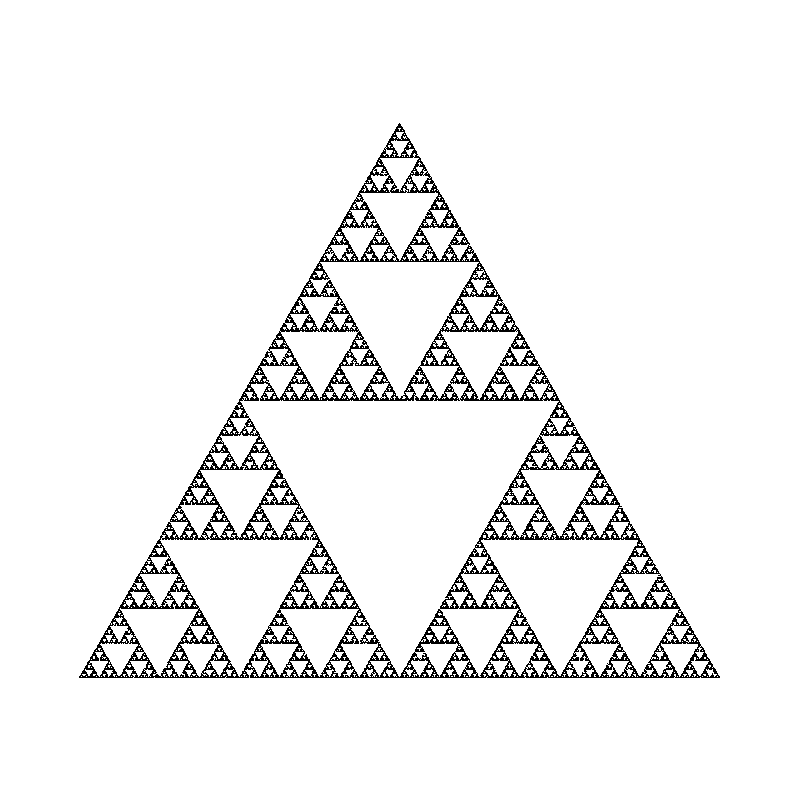
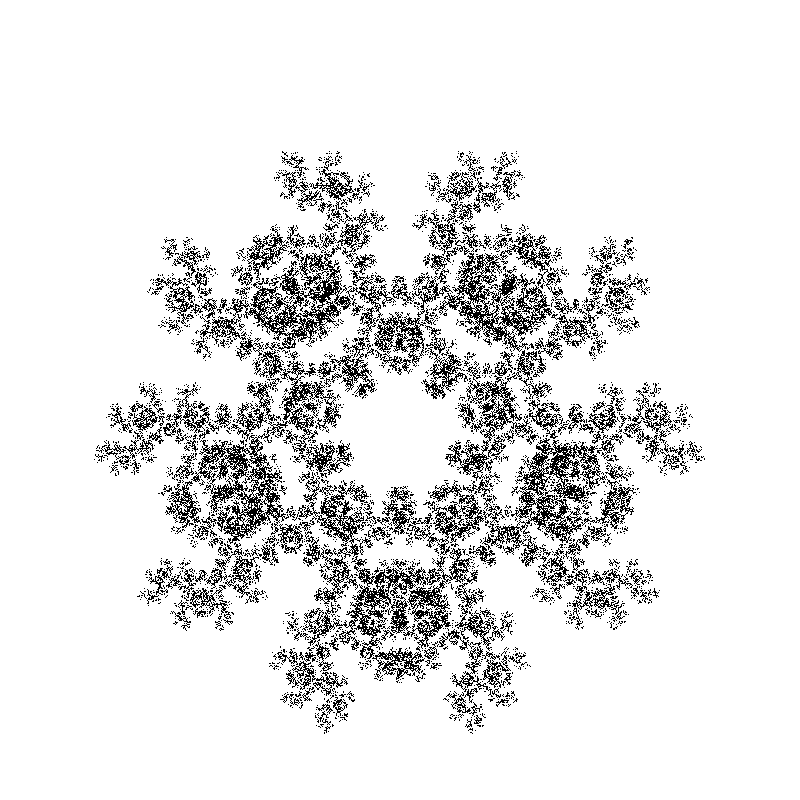
In the next image you can see various fractal shapes generated with the program we are going to write in this post:
Before writing the actual code, we need to decide how we are going to visualize the results of our simulation. In the first version of this code, I’ve saved the points in a text file and visualized the results using a separate Python and Matplotlib script, but this was slow and cumbersome to use, especially in the debugging phase.
A better approach is to save the result of a simulation directly as an image from the C++ program. This makes the code easier to share with other people and it is also faster to iterate during development. An even better approach will be to use a library like SDL2 to visualize a result as soon as it is generated. In this article, we are going to implement two graphical backends for the simulator - one based on a saving the result as a BMP image and one based on drawing the generated points using SDL2.
Another problem that we need to solve is how to map the points from the world, or the real space, to the 2D screen space of our computer. For our simulator, the world space is contained by the [-1, 1] x [-1, 1] square. Another element to keep in mind is that different graphical libraries or image formats have different conventions about how the Y axis is oriented. For example, most image formats will have the Y pointing down - the BMP image format we are going to use can have Y pointing down or up, but it is typically used with Y pointing up and the origin in the lower left corner. SDL2, on the other hand, uses the convention that the Y axis points down with the origin in the upper left corner.
A linear mapping between the world space and the screen space can be defined by the next relations:
\[x_{screen\_space} = A \cdot x_{world} + C\] \[y_{screen\_space} = B \cdot y_{world} + D\]where:
\[A = {(S_{right} - S_{left}) \over (W_{right} - W_{left})}\] \[B = {(S_{top} - S_{bottom}) \over (W_{top} - W_{bottom})}\] \[C = S_{left} - A \cdot W_{left}\] \[D = S_{bottom} - B \cdot W_{bottom}\]You can find the complete code in the GitHub repository for this article.
In order to implement the above relations, we need a way to represent 2D points and rectangles:
 1 // File "geometry.h"
 2 #pragma once
 3
 4 struct Point2D {
 5     double x;
 6     double y;
 7 };
 8
 9 struct Rectangle2D {
10     double left;
11     double bottom;
12     double right;
13     double top;
14
15     Rectangle2D(double left, double bottom, double right, double top)
16     : left{left}, bottom{bottom}, right{right}, top{top} {}
17 };
Now, we can implement the mapping from the world to the screen space:
 1 // File "geometry.h"
 2 #pragma once
 3
 4 struct Point2D {
 5     // ...
 6 };
 7
 8 struct Rectangle2D {
 9     // ...
10 };
11
12 // ...
13 // Note: The mapping holds even when the screen space has the Y axis pointing down
14 // (in which case top = 0 and bottom = height).
15 struct World_to_ScreenSpace {
16     double A;
17     double B;
18     double C;
19     double D;
20
21     World_to_ScreenSpace(const Rectangle2D &world, const Rectangle2D &screen_space) {
22         A = (screen_space.right - screen_space.left) / (world.right - world.left);
23         B = (screen_space.top - screen_space.bottom) / (world.top - world.bottom);
24         C = screen_space.left - A * world.left;
25         D = screen_space.bottom - B * world.bottom;
26     }
27
28     Point2D mapping(const Point2D p) const {
29         Point2D sp;
30         sp.x = A * p.x + C;
31         sp.y = B * p.y + D;
32         return sp;
33     }
34
35     Point2D mapping(double x, double y) const {
36         Point2D sp;
37         sp.x = A * x + C;
38         sp.y = B * y + D;
39         return sp;
40     }
41 };
Let’s test the above transform by writing a driver test for our two backends. I want to chose between the two backends at compile time, this will let other people build the program even when they don’t have the SDL2 library installed. For the BMP backend I will use the code from my previous article.
For this test, we are going to define a world space [0, 800) x [0, 800) and a square, screen space, with an 800 x 800 pixels surface. The test will consist in drawing 11 points diagonally from (0, 0) to (799, 799):
 1 // File "backend_test.cpp"
 2
 3 #include <iostream>
 4 #include <vector>
 5
 6 #include "geometry.h"
 7
 8 #ifdef USE_SDL2_BACKEND
 9     #include "backend_sdl2.h"
10 #else
11     #include "backend_bmp.h"
12 #endif
13
14 constexpr int width = 800;
15 constexpr int height = 800;
16
17 int main(int argc, char **argv) {
18     Rectangle2D world{0, 0, 800, 800};
19     std::vector<Point2D> points{ {0, 0}, {10, 10}, {20, 20}, {30, 30}, {40, 40}, {50, 50}, {60, 60}, {70, 70}, {80, 80}, {90, 90}, {799, 799} };
20
21 #ifdef USE_SDL2_BACKEND
22     Rectangle2D screen_space{0, static_cast<double>(height - 1), static_cast<double>(width - 1), 0};
23     backend_sdl2(width, height, world, screen_space, points, 5);
24 #else
25     Rectangle2D screen_space{0, 0, static_cast<double>(width - 1), static_cast<double>(height - 1)};
26     backend_bmp("chaos.bmp", width, height, world, screen_space, points, 5);
27 #endif
28 }
For the remaining of this article, I’ll assume that you have the code from my C++ reading and writing BMP images in your working folder. Specifically, you’ll need at least cpp-bmp-images/BMP.h.
The BMP backend header file will define a backend_bmp function that will take as arguments the output BMP file name, the width and height of the image, the world and screen_space, a vector with points to be drawn and a so called point radius which is the size in pixels of a point. The last parameter is useful only for debugging purposes in order to better see what it is actually drawn on the image, by default a point will be drawn as 1 x 1 pixel.
 1 // File "backend_bmp.h"
 2
 3 #pragma once
 4
 5 #include <vector>
 6 #include "geometry.h"
 7
 8 void backend_bmp(const char *file_name, int width, int height,
 9                  const Rectangle2D &world,
10                  const Rectangle2D &screen_space,
11                  const std::vector<Point2D> &points,
12                  int point_radius);
The implementation of the BMP backend starts by creating a width x height BMP surface and fill it with white. Next, we convert the points to be drawn to the screen space using the above mapping. We draw every point from the input vector in black on the BMP image. If point_radius is larger than 0 a crude filled “circle” is drawn around the point. Finally, we save the image to the disk.
 1 // File "backend_bmp.cpp"
 2
 3 #include "backend_bmp.h"
 4 #include "cpp-bmp-images/BMP.h"
 5
 6 // Transform/Map/Convert the points elements to the screen space
 7 static std::vector<Point2D> points_to_screen_space(int width, int height, const Rectangle2D &world, const Rectangle2D &screen_space, const std::vector<Point2D> &points) {
 8
 9     // ... See the code on the Github repo for this article
10 }
11
12 // Draw a "crude" circle around the point p
13 static void drawPointWithSize(BMP &bmp, int width, int height, const Point2D &p, int radius) {
14
15     // ... See the code on the Github repo for this article
16
17 }
18
19 void backend_bmp(const char *file_name, int width, int height, const Rectangle2D &world, const Rectangle2D &screen_space, const std::vector<Point2D> &points, int point_radius) {
20     BMP bmp(width, height, false);
21     bmp.fill_region(0, 0, width, height, 255, 255, 255, 255);
22
23     std::vector<Point2D> p = points_to_screen_space(width, height, world, screen_space, points);
24
25     if(point_radius == 0) {
26         for(size_t i = 0; i < p.size(); ++i) {
27             bmp.set_pixel(p[i].x, p[i].y, 0, 0, 0, 255);
28         }
29     } else {
30         for(size_t i = 0; i < p.size(); ++i) {
31             drawPointWithSize(bmp, width, height, p[i], point_radius);
32         }
33     }
34
35     bmp.write(file_name);
36 }
You can build the above code on Linux, macOS, WSL or Windows with MSYS2 like this:
1 clang++ -std=c++17 -stdlib=libc++ -Wall -pedantic backend_bmp.cpp backend_test.cppor, with g++:
1 g++ -std=c++17 -Wall -pedantic backend_bmp.cpp backend_test.cppIf you are using MSVC on Windows, build it with:
1 cl /std:c++17 /W3 /permissive- /EHsc backend_bmp.cpp backend_test.cpp /Fe:backend_test.exeThis is what you should see, if you run the above code:

The SDL2 backend is similar with the BMP, except that instead of saving the result in a BMP image a window is shown in which you can see the points drawn. Here is a snipped from backend_sdl2.cpp, remember to define USE_SDL2_BACKEND if you want to be able to build the SDL2 backend.
 1 // File "backend_sdl2.cpp"
 2
 3 #include <SDL2/SDL.h>
 4 #include "backend_sdl2.h"
 5 #include <iostream>
 6
 7 // Transform/Map/Convert the points elements to the screen space
 8 static std::vector<SDL_Point> points_to_screen_space(int width, int height, const Rectangle2D &world, const Rectangle2D &screen_space, const std::vector<Point2D> &points) {
 9     // ... See the code on the Github repo for this article
10 }
11
12 // Draw a "crude" circle around the point p
13 static void drawPointWithSize(SDL_Renderer *renderer, int width, int height, const SDL_Point &p, int radius) {
14     // ... See the code on the Github repo for this article
15 }
16
17 void backend_sdl2(int width, int height, const Rectangle2D &world, const Rectangle2D &screen_space, const std::vector<Point2D> &points, int point_radius) {
18     // Initialize SDL
19     SDL_Init(SDL_INIT_VIDEO);
20
21     // Create a SDL window
22     SDL_Window *window = SDL_CreateWindow("Chaos Game", SDL_WINDOWPOS_UNDEFINED, SDL_WINDOWPOS_UNDEFINED, width, height, SDL_WINDOW_SHOWN);
23
24     // Create a renderer (accelerated and in sync with the display refresh rate)
25     SDL_Renderer *renderer = SDL_CreateRenderer(window, -1, SDL_RENDERER_ACCELERATED | SDL_RENDERER_PRESENTVSYNC);
26
27     // Convert points to SDL2 window and axis orientation
28     std::vector<SDL_Point> p = points_to_screen_space(width, height, world, screen_space, points);
29
30     bool running = true;
31     SDL_Event event;
32     while(running) {
33         // Process events
34         while(SDL_PollEvent(&event)) {
35             if(event.type == SDL_QUIT) {
36                 running = false;
37             } else if (event.type == SDL_KEYDOWN) {
38                 switch(event.key.keysym.sym) {
39                     case SDLK_q:
40                     running = false;
41                     break;
42                 }
43             }
44         }
45
46         // Clear screen
47         SDL_SetRenderDrawColor(renderer, 255, 255, 255, 255);
48         SDL_RenderClear(renderer);
49
50         // Draw
51         SDL_SetRenderDrawColor(renderer, 0, 0, 0, 255);
52
53         if(point_radius == 0) {
54             SDL_RenderDrawPoints(renderer, &p[0], p.size());
55         } else {
56             for(const SDL_Point &e : p) {
57                 drawPointWithSize(renderer, width, height, e, point_radius);
58             }
59         }
60
61         // Show what was drawn
62         SDL_RenderPresent(renderer);
63     }
64
65     // Release resources
66     SDL_DestroyRenderer(renderer);
67     SDL_DestroyWindow(window);
68     SDL_Quit();
69 }
You can build the above code with the SDL2 backend on Linux, macOS, WSL or Windows with MSYS2 like this:
1 clang++ -std=c++17 -stdlib=libc++ -Wall -pedantic backend_sdl2.cpp -DUSE_SDL2_BACKEND backend_test.cpp `pkg-config --cflags --libs sdl2`or, with g++:
1 g++ -std=c++17 -Wall -pedantic backend_sdl2.cpp -DUSE_SDL2_BACKEND backend_test.cpp `pkg-config --cflags --libs sdl2`If you are using MSVC on Windows, I recommend to install SDL2 globally with vcpkg and use Visual Studio to create a project. You can also build from the command line, but it is more tedious and you’ll need to manually link with the library and instruct the compiler where to find the header files.
As mentioned at the beginning of the article, we are going to use regular polygons to contain the generated set of points. In order to do this we need a way to define a regular polygon.
Remember that a regular polygon is a polygon that is equiangular (all angles are equals) and equilateral (all edges are equals).
For simplicity, we’ll consider regular polygons inscribed in a circle with radius 1.0 and center at (0, 0). This means that all vertices of the polygon will be on this circle.
The center angle of a polygon is the angle made at the center by any two adjacent vertices of the polygon. For a regular polygon the center angle is:
\[\alpha = {360^{\circ} \over no_{edges}}\]For example, for an equilateral triangle a center angle is 120 degrees, for a square it is 90 degrees, for a regular hexagon it is 60 degrees and so on.
This means, that we can calculate the position of every vertex of a regular polygon using the parametric equation of a circle with radius 1 and center at (0, 0). We just need to add the center angle for every vertex.
Say that we want to calculate the vertices of an equilateral triangle. If we start with the first vertex from (0, 1), the second vertex will have the coordinates:
\[x = 1 \cdot cos(90^{\circ} + 120^{\circ}) = cos(210^{\circ}) = -0.866\] \[y = 1 \cdot sin(90^{\circ} + 120^{\circ}) = sin(210^{\circ}) = -0.5\]for the third vertex:
\[x = 1 \cdot cos(210^{\circ} + 120^{\circ}) = cos(330^{\circ}) = 0.866\] \[y = 1 \cdot sin(210^{\circ} + 120^{\circ}) = sin(330^{\circ}) = -0.5\]We can implement the above considerations in a struct named RegularPolygon:
 1 // File "geometry.h"
 2
 3 #pragma once
 4 #include <cmath>
 5 #include <vector>
 6
 7 struct Point2D {
 8     // ...
 9 };
10
11 struct Rectangle2D {
12     // ...
13 };
14
15 struct RegularPolygon {
16     int nr_edges = 3;
17     double radius = 1.0;
18     double start_angle = 90.0;
19     double angle = 120.0;
20     std::vector<Point2D> points;
21
22     // default create an equilateral triangle
23     RegularPolygon() {
24         points.resize(nr_edges);
25         init_points();
26     }
27
28     RegularPolygon(int nr_edges, double radius = 1.0) : nr_edges{nr_edges}, radius{radius} {
29         points.resize(nr_edges);
30         angle = 360.0 / nr_edges;
31         // We change the start_angle in order to have the lower edge
32         // of every polygon parallel with the horizontal axis
33         if(nr_edges % 2 == 0) {
34             start_angle += angle / 2.0;
35         }
36         init_points();
37     }
38
39     void init_points() {
40         // in C++20 and up replace with std::pi from <numbers>
41         const double PI = acos(-1.0);
42         const double deg_rad = PI/180.0;
43
44         double current_angle = start_angle * deg_rad;
45         double min_y = 2.0;
46         for(int i = 0; i < nr_edges; ++i) {
47             points[i].x = radius * cos(current_angle);
48             points[i].y = radius * sin(current_angle);
49             if(min_y > points[i].y) min_y = points[i].y;
50             current_angle += angle * deg_rad;
51         }
52
53         // Center the points vertically
54         double offset = (2.0 - (1.0 - min_y))/2.0;
55         if(nr_edges % 2 != 0) {
56             for(int i = 0; i < nr_edges; ++i) {
57                 points[i].y -= offset;
58             }
59         }
60     }
61 };
62
63 struct World_to_ScreenSpace {
64     // ...
65 };
We can test the above code with the polygons_test.cpp driver. This is basically, backend_test.cpp slightly modified to use a different world [-1, -1] x [1, 1] and to draw the polygon vertices:
 1 // File "polygons_test.cpp"
 2
 3 // ...
 4
 5 int main(int argc, char **argv) {
 6     Rectangle2D world{-1.08, -1.08, 1.08, 1.08};
 7     RegularPolygon pp(8);
 8
 9 #ifdef USE_SDL2_BACKEND
10     Rectangle2D screen_space{0, static_cast<double>(height - 1), static_cast<double>(width - 1), 0};
11     backend_sdl2(width, height, world, screen_space, pp.points, 5);
12 #else
13     Rectangle2D screen_space{0, 0, static_cast<double>(width - 1), static_cast<double>(height - 1)};
14     backend_bmp("chaos.bmp", width, height, world, screen_space, pp.points, 5);
15 #endif
16 }
If you build and run the above code, you should see the vertices of an octagon:

At this point, we are ready to implement the rules for the game of chaos:
- Generate the vertices of a regular polygon.
- Take a random point inside the above polygon. For simplicity, we’ll take this as the first vertex of the polygon.
- Pick a random vertex of the polygon.
- Take the next point at a ratio between the last point and the random polygon vertex. Here, you can add more rules, for example that the last and the next vertex randomly selected from the polygon should be different. If they are the same, simply reject the generated point.
- Repeat the above steps for a large number of iterations.
When you plot the generated points, drop the first couple of them.
We can implement the above rules as ChaosGame:
 1 // File "ChaosGame.cpp"
 2
 3 #pragma once
 4 #include <random>
 5 #include <functional>
 6 #include "geometry.h"
 7
 8 struct ChaosGame {
 9     static const int max_iterations = 100'000;
10     static const int ignore_first_iterations = 10;
11
12     Point2D last_point;
13     int last_vertex;
14     RegularPolygon polygon;
15
16     std::uniform_int_distribution<int> uniform_dist;
17     std::mt19937_64 engine;
18
19     ChaosGame(const RegularPolygon &poly) {
20         polygon = poly;
21
22         last_point = polygon.points[0];
23         last_vertex = 0;
24
25         std::random_device r;
26         std::mt19937_64 eng(r());
27         std::uniform_int_distribution<int> distr(0, polygon.nr_edges - 1);
28         uniform_dist = distr;
29         engine = eng;
30     }
31
32     Point2D get_next_point(const std::function<bool (int, int, int)> &func, double ratio = 0.5, int dist = 0) {
33         Point2D point;
34         bool running = true;
35         int remove_iter = 0;
36         while(running) {
37             int random_vertex = uniform_dist(engine);
38             if(func(random_vertex, last_vertex, dist)) {
39                 point.x = (last_point.x + polygon.points[random_vertex].x) * ratio;
40                 point.y = (last_point.y + polygon.points[random_vertex].y) * ratio;
41
42                 last_vertex = random_vertex;
43                 last_point = point;
44                 remove_iter++;
45                 if(remove_iter >= ignore_first_iterations) {
46                     running = false;
47                 }
48             }
49         }
50         return point;
51     }
52 };
53
54     // ...
In the above code, we chose to run for 100000 iterations and drop the first 10 generated points. Next, we pick as the last point the first vertex of the polygon and as the last vertex the same. We initialize a random generation engine and an uniform distribution to pick a random vertex of the polygon.
The get_next_point member function picks a random vertex and checks if this vertex can be used, than it takes a new point at a fraction of the distance between the last point and the vertex. The function also drops the first couple of points generated.
Next, we implement a free function that generates the points. The full code has 14 rules for generating 14 different fractal shapes. In the next snippet, we present the first two rules, or selections:
 1 // File "ChaosGame.cpp"
 2
 3 #pragma once
 4 #include <random>
 5 #include <functional>
 6 #include "geometry.h"
 7
 8 struct ChaosGame {
 9     // ...
10 };
11
12 inline int generate_points(std::vector<Point2D> &points, int selection = 0) {
13     // wrap the values for selection values larger than the number of implemented selections
14     if(selection > 14) {
15         selection = 0;
16     }
17
18     // default selection = 0 settings
19     int nr_edges = 3;
20     double ratio = 0.5;
21     int distance = 0;
22     std::function<bool (int, int, int)> func = [] (int random_vertex, int last_vertex, int dist) -> bool {return true;};
23
24     if(selection == 1) {
25         func = [] (int random_vertex, int last_vertex, int dist) -> bool {return (std::abs(random_vertex - last_vertex) != dist);};
26         nr_edges = 4;
27         ratio = 0.5;
28         distance = 0;
29     }
30
31     // ... See the code on the Github repo for this article
32
33     RegularPolygon polygon(nr_edges);
34     ChaosGame chaos(polygon);
35
36     for(auto &p : points) {
37         p = chaos.get_next_point(func, ratio, distance);
38     }
39
40     return selection;
41 }
If you call generate_points with the default selection = 0 it will generate the Sierpinski triangle.
We can modify polygons_test.cpp in order to use the ChaosGame.h and draw the generated points.
 1 // File "main.cpp"
 2
 3 #include <iostream>
 4 #include <vector>
 5 #include <string>
 6
 7 #include "geometry.h"
 8 #include "ChaosGame.h"
 9
10 #ifdef USE_SDL2_BACKEND
11     #include "backend_sdl2.h"
12 #else
13     #include "backend_bmp.h"
14 #endif
15
16 constexpr int width = 800;
17 constexpr int height = 800;
18
19 int main(int argc, char **argv) {
20     Rectangle2D world{-1.08, -1.08, 1.08, 1.08};
21
22     std::vector<Point2D> points(ChaosGame::max_iterations);
23
24     int selection = 0;
25     if(argc >= 2) {
26         int sel = std::stoi(argv[1]);
27         selection = sel >= 0 ? sel : 0;
28     }
29
30     generate_points(points, selection);
31
32 #ifdef USE_SDL2_BACKEND
33     Rectangle2D screen_space{0, static_cast<double>(height - 1), static_cast<double>(width - 1), 0};
34     backend_sdl2(width, height, world, screen_space, points, 0);
35 #else
36     Rectangle2D screen_space{0, 0, static_cast<double>(width - 1), static_cast<double>(height - 1)};
37     std::string fname = "chaos_" + std::to_string(selection) + ".bmp";
38     backend_bmp(fname.c_str(), width, height, world, screen_space, points, 0);
39 #endif
40 }
When you run the above program, you can pass your selection of the rule to use from 0 to 14. If you pass a wrong number the program will try to correct the value. Running the program without a numeric parameter will use the first selection and generate the Sierpinski triangle.
Here is an example of building and running the program with the BMP backend:
1 clang++ -std=c++17 -stdlib=libc++ -Wall -pedantic backend_bmp.cpp main.cpp -o main
2 ./main 3
This is what you should see if you pass the number 3 to the program:
The code repository for this article contains a folder interactive that uses the SDL2 backend to let you go back and forth in the available shapes selections. Hint - use the left/right arrow keys to navigate.
If you want to learn more about C++17 I would recommend reading C++17 in Detail by Bartlomiej Filipek:
or, C++17 - The Complete Guide by Nicolai M. Josuttis: