Getting started with GSL - GNU Scientific Library on Windows, macOS and Linux
Posted on January 26, 2020 by Paul
In this article, I will show you how to install GSL - the GNU Scientific Library on Windows, macOS and Linux, and how to compile and run a simple GSL program. GSL is a C library for numerical computations. You can use GSL for example to solve a linear system of equations, to fit a curve to a set of points, for numerical integration, statistical calculations and so on. You can find a detailed description of GSL capabilities in the GSL reference manual.
This article is split in a few parts:
- Install GSL on Windows
- Install GSL on macOS
- Install GSL on Linux
- GSL usage example - solving a linear system of equations
- Create a C++ GSL CMake based project
I recommend that you read the install part for your OS and the part that shows how to use GSL to solve a linear system of equations.
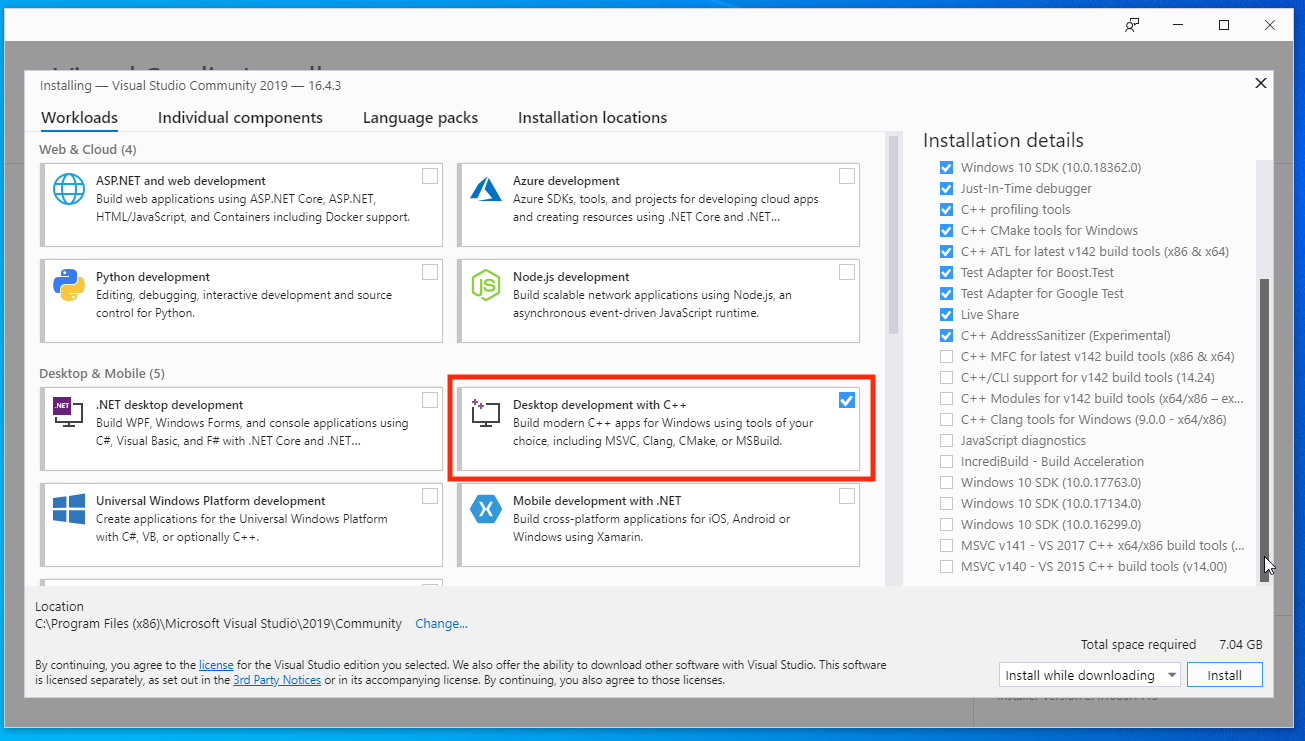
For Windows, I recommend that you first install Visual Studio 2019. Make sure that you install the proper Visual Studio and not Visual Studio Code which is an entirely different product. Once the Visual Studio installer starts, check the Desktop development with C++ workload:
Next, install git for Windows from https://git-scm.com/. If you are not familiar with git, just accept the defaults suggested by the installer.
Finally, we are going to install vcpkg which is a C++ library manager that will let us install GSL. I will install vcpkg in a folder on my C drive, feel free to install it in a different location, just avoid paths with empty spaces. Open a PowerShell window (PowerShell is already installed on Windows, you can find it in the Start menu):
1 cd C:\
2 mkdir DEV
3 cd DEV
Next, we are going to use git to get the latest vcpkg version:
1 git clone https://github.com/microsoft/vcpkg.gitAfter the above command finishes, go to the vcpkg folder, bootstrap and integrate vcpkg:
1 cd vcpkg
2 .\bootstrap-vcpkg.bat
3 .\vcpkg integrate install
At this point, you can use the vcpkg command to install any of the available C++ libraries. You can find the complete list of available libraries in the ports folder from the vcpkg installation. Once you use vcpkg to install a library, it will be available in your Visual Studio C++ projects.
Let’s install GSL with vcpkg:
1 .\vcpkg install gsl gsl:x64-windowsThe above command will build and install GSL for 32 and 64 bits Visual Studio projects.
Next time when you want to install a C++ library that is available in the vcpkg ports, remember to open a PowerShell window and navigate to the where you’ve installed vcpkg. vcpkg is not added to the system path, so you need to be in the vcpkg folder in order to be able to use it.
As a side note, a library installed with vcpkg is directly available in your msbuild projects (the ones created by default by Visual Studio). If you want to create a CMake project, you will need to add the include folders and libraries to the CMake project.
Now, that you have GSL installed, start Visual Studio and create a new C++ console project. You can remove the hello world C++ code that is generated by the compiler and write your C++ GSL program, see the GSL usage part of the article for an example.
On macOS, I recommend that you install the Command Line Tools which will give you the Clang C++ compiler and also installs a bunch of useful utilities like make, git, vim and so on. Open a Terminal and write:
1 xcode-select --installjust follow the installer suggestions to get the Command Line Tools.
Once the Command Line Tools are installed, we need to install the Homebrew package manager which will let us install GSL:
1 /usr/bin/ruby -e "$(curl -fsSL https://raw.githubusercontent.com/Homebrew/install/master/install)"At this point, you should be able to use the brew command to install GSL and CMake:
1 brew install gsl cmakeNow, that you have GSL installed, open your preferred C++ editor (if you don’t have one, a good suggestion is Visual Studio Code) and write a C++ GSL program, see the GSL usage part of the article for an example.
For Linux, I will exemplify the installation part on a Debian based system.
Let’s start by installing a C++ toolchain. Open a Terminal and write:
1 sudo apt install build-essential gdb cmake pkg-configNext, install GSL with:
1 sudo apt install libgsl-devBy default GSL will use a GSL built version of BLAS which is a library for basic vector and matrix operations. If you have access to a a highly tuned BLAS version, like the one provided with MKL, I suggest to use it. Alternatively, you can install libatlas, which is not as fast a MKL, but it is usually faster than the BLAS version that is include with GSL. You can install libatlas with:
1 sudo apt install libatlas-base-devNow, that you have GSL installed, open your preferred C++ editor (if don’t have one, a good suggestion is Visual Studio Code) and write a C++ GSL program, see the GSL usage part of the article for an example.
GSL usage example - solving a linear system of equations:
In this part of the article, I will show you how to use GSL to solve a linear system of equation:
\[A \cdot x = b\]Let’s start by including the necessary header files and filling the above A matrix and b vector with some values. For simplicity, we are going to use some random hard coded values. I will leave it as an exercise for the reader to discover how to use GSL to fill A and b with random numbers:
 1 // File "gsl_test.cpp"
 2 #include <iostream>
 3 #include <gsl/gsl_linalg.h>
 4
 5 int main() {
 6     double A_data[] = {
 7         0.57092943, 0.00313503, 0.88069151, 0.39626474,
 8         0.33336008, 0.01876333, 0.12228647, 0.40085702,
 9         0.55534451, 0.54090141, 0.85848041, 0.62154911,
10         0.64111484, 0.8892682 , 0.58922332, 0.32858322
11     };
12
13     double b_data[] = {
14         1.5426693 , 0.74961678, 2.21431998, 2.14989419
15     };
16
17     // ...
18
19 }
Next, we are going to use GSL views to access the data from the above two arrays:
 1 // ...
 2
 3 int main() {
 4     double A_data[] = {
 5         // ...
 6     };
 7
 8     double b_data[] = {
 9         1.5426693 , 0.74961678, 2.21431998, 2.14989419
10     };
11
12     // Access the above C arrays through GSL views
13     A = gsl_matrix_view_array(A_data, 4, 4);
14     b = gsl_vector_view_array(b_data, 4);
15
16     // ...
17
18 }
You can, optionally, print the vector and matrix values using gsl_vector_fprintf and gsl_matrix_fprintf, e.g.:
 1 // ...
 2
 3 int main() {
 4
 5     // ...
 6
 7     // Access the above C arrays through GSL views
 8     A = gsl_matrix_view_array(A_data, 4, 4);
 9     b = gsl_vector_view_array(b_data, 4);
10
11     // Print the values of A and b using GSL print functions
12     std::cout << "A = \n";
13     gsl_matrix_fprintf (stdout, &A.matrix, "%lf");
14
15     std::cout << "\nb = \n";
16     gsl_vector_fprintf (stdout, &b.vector, "%lf");
17
18     // ...
19
20 }
Please note, that a matrix is printed in the order that is stored in memory, row by row.
In order to solve the above system with GSL we first need to decompose the matrix A into the LU form and pass the decomposed matrix to the GSL linear solver:
 1 // ...
 2
 3 int main() {
 4
 5     // ...
 6
 7     // Print the values of A and b using GSL print functions
 8
 9     // ...
10
11     // Allocate memory for the solution vector x and the permutation perm:
12     gsl_vector *x = gsl_vector_alloc (4);
13     gsl_permutation *perm = gsl_permutation_alloc (4);
14
15     // Decompose A into the LU form:
16     int signum;       // Sign of the permutation
17     gsl_linalg_LU_decomp (&A.matrix, perm, &signum);
18
19     // Solve the linear system
20     gsl_linalg_LU_solve (&A.matrix, perm, &b.vector, x);
21
22     // Print the solution
23     std::cout << "\nx = \n";
24     gsl_vector_fprintf (stdout, x, "%lf");
25
26     // Release the memory previously allocated for x and perm
27     gsl_vector_free(x);
28     gsl_permutation_free(perm);
29 }
Please note that we allocate memory for the solution vector x and a permutation of the rows of the matrix A during the LU decomposition. Since GSL is a C library, we need to release the allocated memory manually when it is not needed. Another observation is that the original values of the matrix A are destroyed during the decomposition and replaced with the values of the decomposition.
Here is entire program:
 1 #include <iostream>
 2 #include <gsl/gsl_linalg.h>
 3
 4 int main() {
 5     double A_data[] = {
 6         0.57092943, 0.00313503, 0.88069151, 0.39626474,
 7         0.33336008, 0.01876333, 0.12228647, 0.40085702,
 8         0.55534451, 0.54090141, 0.85848041, 0.62154911,
 9         0.64111484, 0.8892682 , 0.58922332, 0.32858322
10     };
11
12     double b_data[] = {
13         1.5426693 , 0.74961678, 2.21431998, 2.14989419
14     };
15
16     // Access the above C arrays through GSL views
17     gsl_matrix_view A = gsl_matrix_view_array(A_data, 4, 4);
18     gsl_vector_view b = gsl_vector_view_array(b_data, 4);
19
20     // Print the values of A and b using GSL print functions
21     std::cout << "A = \n";
22     gsl_matrix_fprintf (stdout, &A.matrix, "%lf");
23
24     std::cout << "\nb = \n";
25     gsl_vector_fprintf (stdout, &b.vector, "%lf");
26
27     // Allocate memory for the solution vector x and the permutation perm:
28     gsl_vector *x = gsl_vector_alloc (4);
29     gsl_permutation *perm = gsl_permutation_alloc (4);
30
31     // Decompose A into the LU form:
32     int signum;
33     gsl_linalg_LU_decomp (&A.matrix, perm, &signum);
34
35     // Solve the linear system
36     gsl_linalg_LU_solve (&A.matrix, perm, &b.vector, x);
37
38     // Print the solution
39     std::cout << "\nx = \n";
40     gsl_vector_fprintf (stdout, x, "%lf");
41
42     // Release the memory previously allocated for x and perm
43     gsl_vector_free(x);
44     gsl_permutation_free(perm);
45 }
This is how you can compile the above program on a Linux machine:
1 g++ -std=c++17 -Wall -pedantic gsl_test.cpp -o gsl_test -lgsl -lgslcblasand on a macOS machine:
1 clang++ -std=c++17 -Wall -pedantic gsl_test.cpp -o gsl_test -lgsl -lgslcblasHere is an example of what I see on a Linux machine when I build and run the above program:
1 ~$ g++ -std=c++17 -Wall -pedantic gsl_test.cpp -o gsl_test -lgsl -lgslcblas
2 ~$ ./gsl_test
3 A =
4 0.570929
5 0.003135
6 0.880692
7 0.396265
8 0.333360
9 0.018763
10 0.122286
11 0.400857
12 0.555345
13 0.540901
14 0.858480
15 0.621549
16 0.641115
17 0.889268
18 0.589223
19 0.328583
20
21 b =
22 1.542669
23 0.749617
24 2.214320
25 2.149894
26
27 x =
28 0.864758
29 0.945630
30 0.799511
31 0.862723
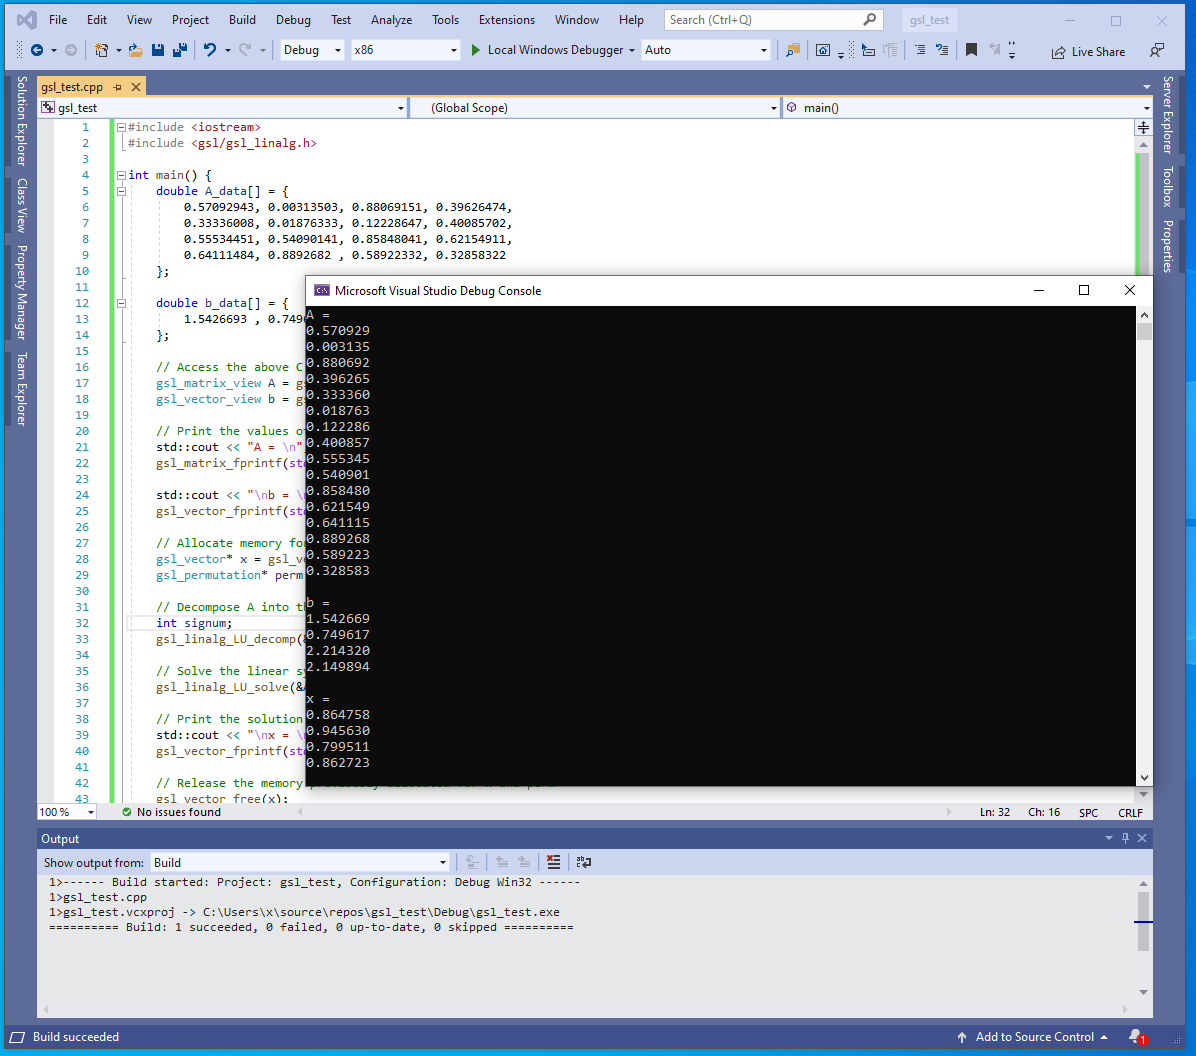
32 ~$For Windows, create a new C++ console application and replace the C++ code generated by Visual Studio with the above C++ program. Since we’ve installed GSL with vcpkg, Visual Studio knows where to find the include files and with what library to link the project, all you have to do is build and run the program.
Here is an example of what I see on a Windows machine:
Create a C++ GSL CMake based project:
In the last part of the article, I will show you how to create a portable C++ and GSL CMake based project that can be used on Windows, macOS and Linux. This is useful if you are interested in running the same project on multiple operating systems.
I will assume that you have a folder named gsl_tests with a C++ program named gsl_test.cpp that contains the code presented in the previous section. In the same folder create a new file named CMakeLists.txt with the next content:
 1 cmake_minimum_required(VERSION 3.10)
 2
 3 project(gsl_demo)
 4
 5 set(CMAKE_CXX_STANDARD 17)
 6 set(CMAKE_CXX_STANDARD_REQUIRED True)
 7
 8 if(MSVC)
 9   add_compile_options(/W4)
10 else()
11   add_compile_options(-Wall -Wextra -pedantic)
12 endif()
13
14 find_package(GSL REQUIRED)
15 link_libraries(GSL::gsl GSL::gslcblas)
16
17
18 add_executable(gsl_demo gsl_test.cpp)
For Linux and macOS, open a Terminal and navigate to the gsl_tests folder:
1 mkdir build && cd build
2 cmake -CMAKE_BUILD_TYPE=Release ..
3 make
You should end up with an executable named gsl_demo in the build folder.
For Windows, go to the Start menu, find the Visual Studio 2019 menu and from it start x64 Native Tools Command Prompt for VS 2019. From the above Command Prompt navigate to where you’ve placed the gsl_tests folder. Here, I will assume for simplicity, that you have the folder gsl_tests in C:\DEV and that your vcpkg installation is also in C:\DEV:
1 cd \
2 cd DEV\gsl_tests
3 mkdir build && cd build
4 cmake -DCMAKE_TOOLCHAIN_FILE=C:/DEV/vcpkg/scripts/buildsystems/vcpkg.cmake -DCMAKE_BUILD_TYPE=Release ..
At this point, you can build the project from the same Command Prompt with:
1 msbuild gsl_demo.sln /property:Configuration=Releaseand you should end up with an executable named gsl_demo.exe inside the Release folder.
Alternatively, open C:\DEV\gsl_tests\build in Windows Explorer, right click on gsl_demo.sln and chose to open it with Visual Studio 2019. You should see a list of projects, right click on the one named gsl_demo and make it the default one than build it. At this point, you can run the code as usual with CTRL + F5, F5 or from the Debug menu.
As a side note, latest Visual Studio installer should install cmake for you. If you get an error when trying to use cmake with the above instructions, first check that you are using a proper Visual Studio command prompt. If you still can’t find cmake, you can install it from https://cmake.org/, just be sure to add it to the Windows path.
If you need to learn about Linear Algebra, I would recommend reading Linear Algebra and Learning from Data by Gilbert Strang:

If you want to learn more about C++17 I would recommend reading C++17 in Detail by Bartlomiej Filipek: