Getting started with Armadillo a C++ Linear Algebra Library on Windows, Mac and Linux
Posted on March 24, 2017 by Paul
In this article, I will give you a quick introduction in how to get started with Armadillo, a C++ Matlab like Linear Algebra Library on Windows, Mac and Linux. Armadillo is particularly interesting for Matlab users that want to port their code to C++ for speed. Please note that Armadillo is not a drop in replacement for all Matlab functionality. If your code uses some specialized Matlab toolbox, you will need to find another library to complement Armadillo or implement the missing functionality from scratch.
Armadillo uses BLAS and LAPACK for matrix operations. It is recommended that you install an optimized version of the above libraries on your system and not the reference implementations from Netlib. I will guide you on how to install accelerated versions of BLAS and LAPACK for your operating system, in the install sections of this article.
Simple Armadillo test program:
Let’s start with a simple example of using Armadillo. Please note the Matlab like high level syntax:
1 #include <iostream>
2 #include <armadillo>
3
4 int main(int argc, const char **argv) {
5 // Initialize the random generator
6 arma::arma_rng::set_seed_random();
7
8 // Create a 4x4 random matrix and print it on the screen
9 arma::Mat<double> A = arma::randu(4,4);
10 std::cout << "A:\n" << A << "\n";
11
12 // Multiply A with his transpose:
13 std::cout << "A * A.t() =\n";
14 std::cout << A * A.t() << "\n";
15
16 // Access/Modify rows and columns from the array:
17 A.row(0) = A.row(1) + A.row(3);
18 A.col(3).zeros();
19 std::cout << "add rows 1 and 3, store result in row 0, also fill 4th column with zeros:\n";
20 std::cout << "A:\n" << A << "\n";
21
22 // Create a new diagonal matrix using the main diagonal of A:
23 arma::Mat<double>B = arma::diagmat(A);
24 std::cout << "B:\n" << B << "\n";
25
26 // Save matrices A and B:
27 A.save("A_mat.txt", arma::arma_ascii);
28 B.save("B_mat.txt", arma::arma_ascii);
29
30 return 0;
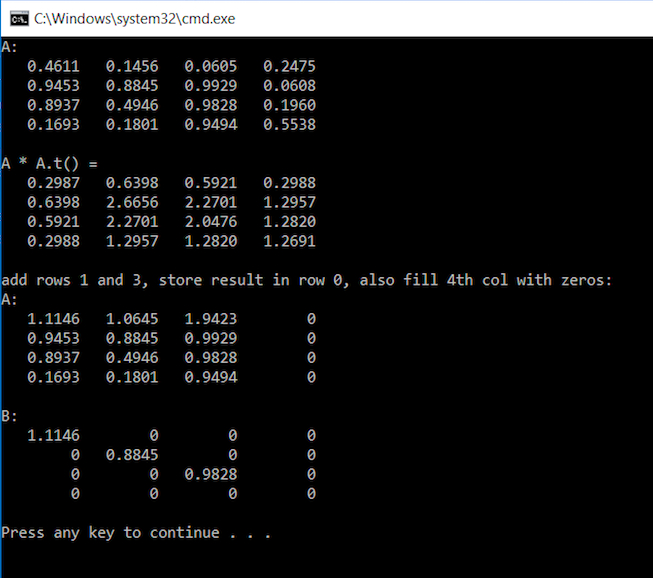
31 }This is the result of the above code on my machine:
 1 A:
 2    0.8014   0.0455   0.6745   0.0752
 3    0.8795   0.0962   0.8912   0.4586
 4    0.2497   0.6405   0.1736   0.7043
 5    0.9363   0.4145   0.9103   0.1549
 6
 7 A * A.t() =
 8    1.1050   1.3449   0.3993   1.3949
 9    1.3449   1.7875   0.7589   1.7458
10    0.3993   0.7589   0.9987   0.7663
11    1.3949   1.7458   0.7663   1.9012
12
13 add rows 1 and 3, store result in row 0, also fill 4th col with zeros:
14 A:
15    1.8159   0.5107   1.8016        0
16    0.8795   0.0962   0.8912        0
17    0.2497   0.6405   0.1736        0
18    0.9363   0.4145   0.9103        0
19
20 B:
21    1.8159        0        0        0
22         0   0.0962        0        0
23         0        0   0.1736        0
24         0        0        0        0
If you need to transfer data between Matlab and Armadillo check my other Armadillo article.
If you want to have a taste of how elaborate is to directly use functions from BLAS or LAPACK, check the documentation for the reference implementation of SGEMM which performs matrix-matrix multiplication. Alternatively, you can check Intel’s documentation page for their C wrapper for SGEMM.
Next, go to the section that matches your OS: Windows, Mac or Linux.
I assume that you have latest stable version of Visual Studio installed, currently this is 2017, and that you can create, compile and execute a simple C++ code from the IDE. If you can’t find the C++ project template when you open VS, make sure to install the C++ support. In the latest versions of VS, this is not installed by default.
On Windows, I would recommend using Intel MKL if you have an Intel processor or OpenBlas which works on both Intel and AMD processors. Both alternatives provide Windows binaries and the usage is similar, you need to link the libraries to your compiled code. I will exemplify the process using Intel MKL, which I personally prefer.
Intel MKL can be freely obtained from the above link, by creating an Intel account. After registration, you will be able to download an installer which will copy the libraries, typically in C:\Program Files (x86)\IntelSWTools. Open IntelSWTools and find the mkl folder. For example, on my machine, I found mkl in IntelSWT → compilers_and_libraries_xxxxx → windows.
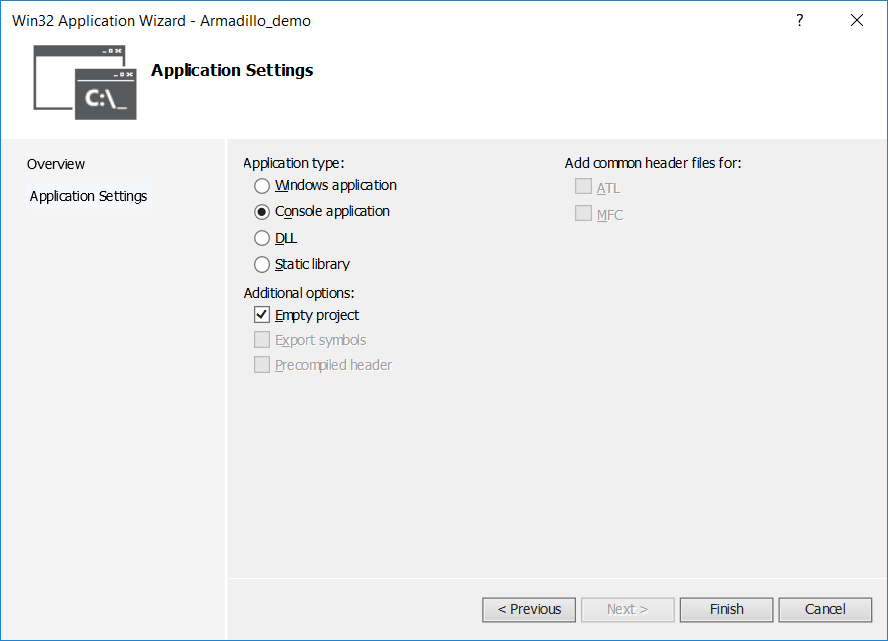
Next, create a new Visual C++ → Win32 Console Application project. Be sure to select Empty Project, like in the next image:
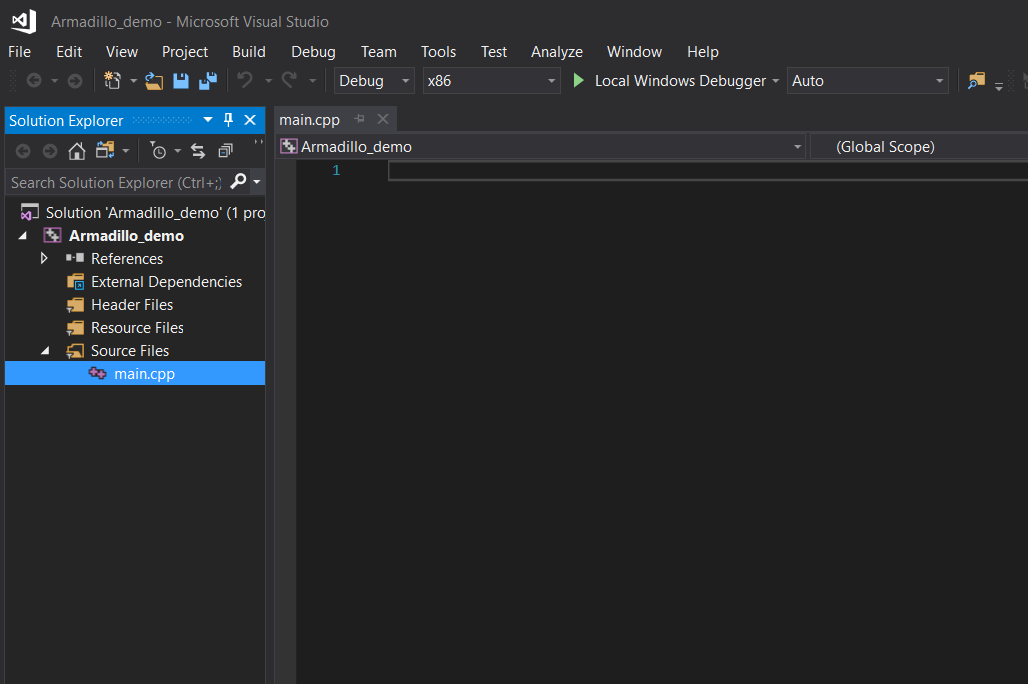
Right click on the Source Files line and add a C++ source file. I named this main.cpp, but you can use any name you want:
Now, open the project folder. By default, VS will save new projects in Documents → Visual Studio 2xxx → Projects. I’ve named my project Armadillo_demo, so I will open this folder. Copy the mkl folder in your project folder.
Download the stable version of Armadillo from http://arma.sourceforge.net/download.html, at the time of this writing this is armadillo-7.800.2.tar.xz. Extract the archive, I’ve used 7zip for this. Once the archive is extracted. open the armadillo-xxx folder and copy the include folder in your project folder, like you did with mkl. I’ve put the include folder in my project folder inside a new folder named armadillo.
If you’ve followed my instructions, you should have something like this in your project folder:
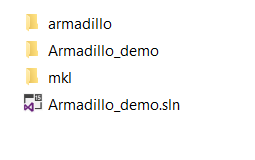
Please note that armadillo from the above image contains the include folder from armadillo-xxx.
You can fine tune Armadillo, by modifying config.hpp from armadillo → include → armadillo_bits. For the purposes of this tutorial, we’ll keep the defaults. As a side note, config.hpp is a header file, so you can modify it at any time, preferably when you have more experience with Armadillo.
The reason I’ve directed you to copy the above folders in your project folder, is to have a self contained project. Basically, you will be able to move the project on a different computer that has VS installed and use the project as it is.
In the future, if you need/want to update Armadillo, simply replace the files from the above include folder.
First open the project in VS, if it is not already opened. Right click on the project name and select Properties. Unfold the C/C++ list and select General → Additional Include Directories, double click and select Edit. Use the yellow button to insert a new line and browse for mkl\include in your project folder and press Select folder. Click on the path line and replace everything until \mkl\include with two dots. You should have something like ..\mkl\include. Repeat the above steps for armadillo\include. You should end up with something like:
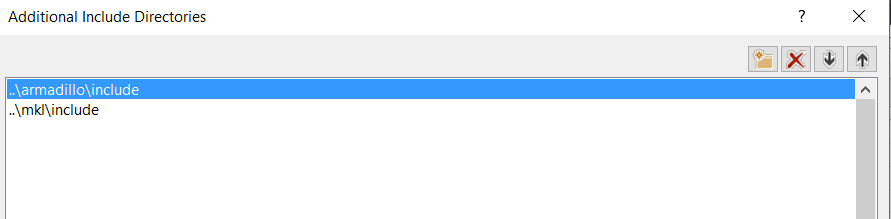
Press OK.
Next, click on Linker → General → Additional Import Library and select mkl\lib\intel64_win. In the unlikely case that your computer or Windows is 32 bits, use mkl\lib\ia32_win. Like before, erase the first part of the path and replace it with two dots. You should end up with something like:
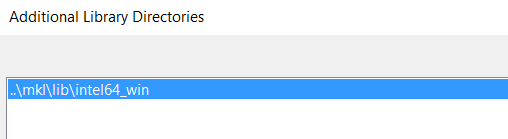
Press OK.
Now, click on Linker → Input → Additional Dependencies, click on the existing line and select Edit. Add three new entries: mkl_core.lib, mkl_sequential.lib, mkl_intel_lp64.lib:
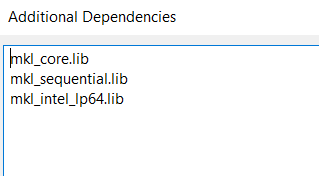
Press OK on the above window. Press Apply and OK on the Properties window.
Now, copy the Armadillo example from the beginning of this article, in your main.cpp file.
Change the compiler to x64:
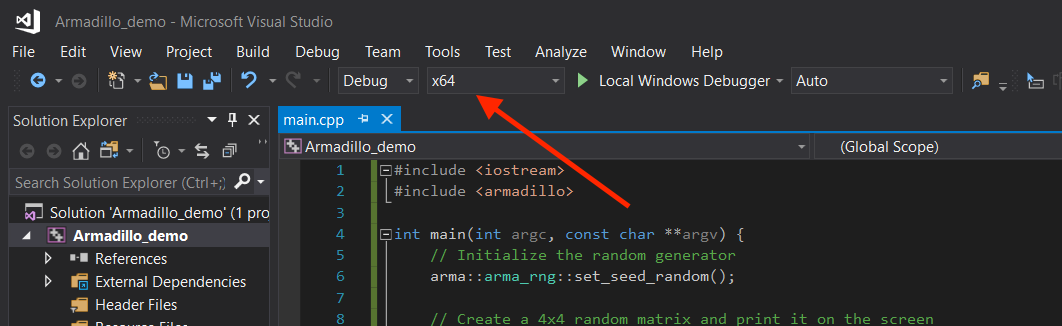
Now, build and run the code by pressing Debug → Start Without Debugging. You should see something like this:
On Mac, first make sure that you have the latest versions of Xcode and Command Line Tools installed. You can install Xcode from the AppStore application. If you don’t have the Command Line Tools installed, open a Terminal and type:
1 xcode-select --installwhich will guide you through the installation process.
Once Xcode is installed, open the application and accept the license (without this, some people reported strange errors).
Next, install Homebrew, which is a nice package manager that will let you install various software from your Terminal. Just follow the installation instructions from their web page and accept the defaults.
Go to the Armadillo web page and check the version number of the stable version. Usually, Homebrew has the latest version of Armadillo available. If this is not the case you can install from sources.
Open a Terminal and type:
1 brew tap homebrew/science
2 brew info armadillo
If the version number for Armadillo reported by Homebrew, corresponds to the stable version from the library web page, all is good. You can install the library with:
1 brew install cmake pkg-config
2 brew install armadillo
If the Hombrew version is older than the latest stable version of Armadillo, download the library and extract the archive in your Downloads folder. In order to compile Armadillo from sources, open a Terminal and write:
1 brew install cmake pkg-config
2 cd Downloads/
3 cd armadillo-*
4 cmake .
5 make
6 sudo make install
At this point, you should have Armadillo installed on your machine. On Mac, there is no need to install BLAS and LAPACK, the system already provides accelerated versions of these libraries and Armadillo will use them.
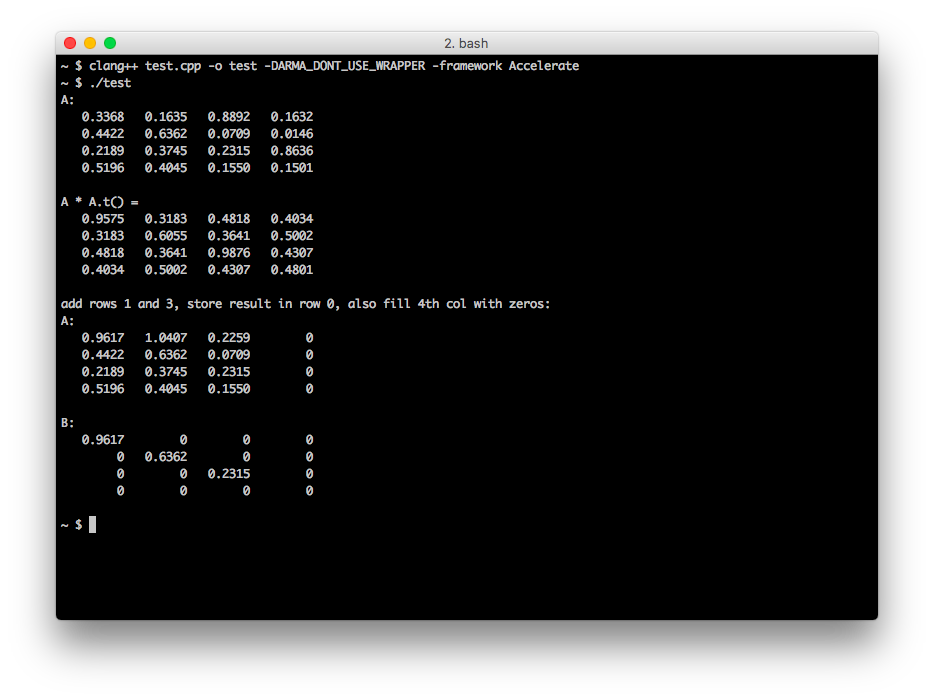
First, I will show you how to compile the example from the beginning of this article, using the Terminal. Copy the code in a file named test.cpp and write:
1 clang++ test.cpp -o test -DARMA_DONT_USE_WRAPPER -framework Accelerate
2 ./test
Running the above commands on my machine:
Next, open Xcode and create a new macOS, Command Line Tool project. Give the project a name, something like Armadillo_demo. Make sure that you select C++ for the Language:

press Next and accept the defaults for the remaining options.
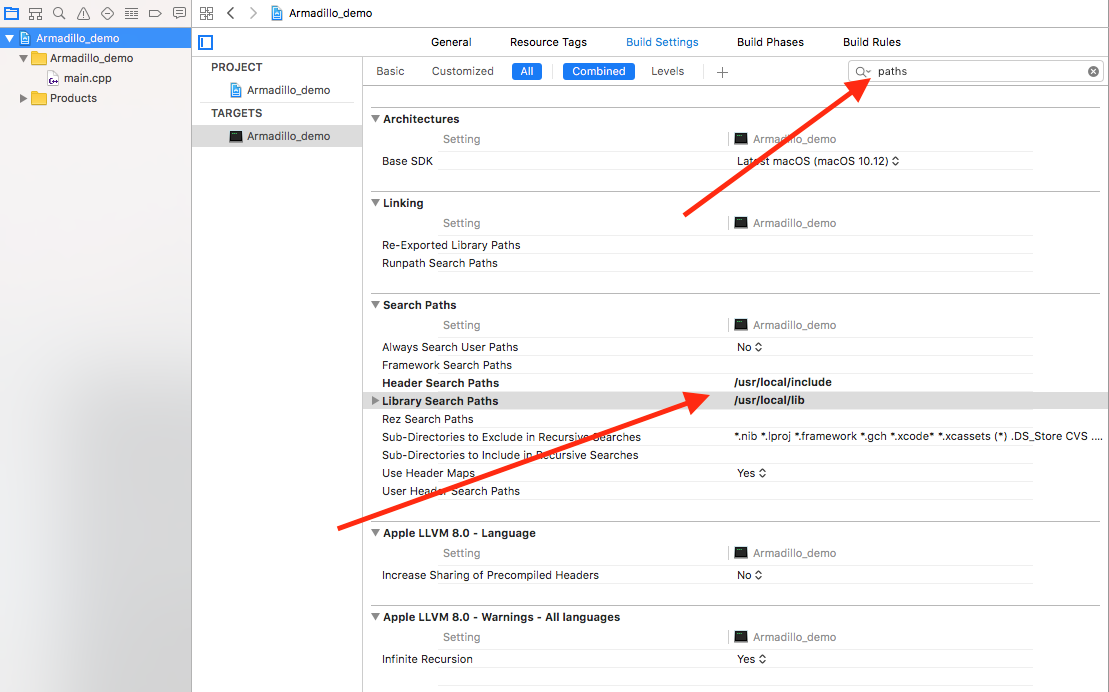
In the left panel, click on the project name and select the Build Settings tab. Next, use the search box to find the compiler search paths for headers and libraries. Click on the Header Search Paths and add /usr/local/include. Repeat for the Library Search Paths and add /usr/local/lib:
Next, select the Build Phases tab → Link Binary With Libraries, press + and select Add Other. Now, press Command + Shift + G which will open a search text box, write /usr/local and press Go. Select the lib folder and libarmadillo.dylib. Press Open to finish:
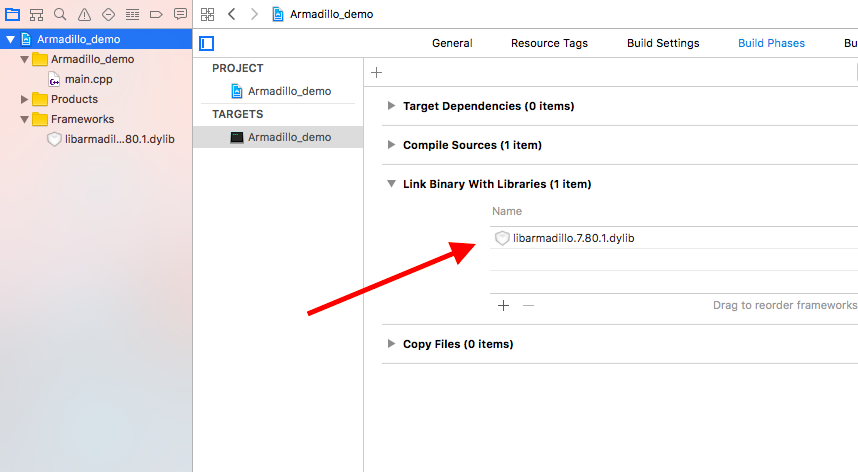
An alternative approach to add the library, is to use the Terminal to navigate to /usr/local/lib. Open Finder directly in /usr/local/lib and simply drag the library file libarmadillo.dylib in Xcode:
1 cd /usr/local/lib
2 open .
Now, copy the Armadillo example from the beginning of this article, to your main.cpp file and press the run button:

I will use Ubuntu 16.04 LTS to exemplify the Linux installation.
Open a Terminal and make sure that your system is updated:
1 sudo apt update
2 sudo apt upgrade
Next, we’ll install Armadillo prerequisites:
1 sudo apt install cmake libopenblas-dev liblapack-devTheoretically, you can install Armadillo using the apt package manager, but this is not recommended because the version provided by apt is really old. I suggest to download and extract the latest stable release of Armadillo. Once you have Armadillo extracted in your Downloads folder, you can build and install the library with:
1 cd Downloads/
2 cd arma*
3 cmake .
4 make
5 sudo make install
Now, copy the Armadillo example from the beginning of this article, to a file named test.cpp. You can compile the code using:
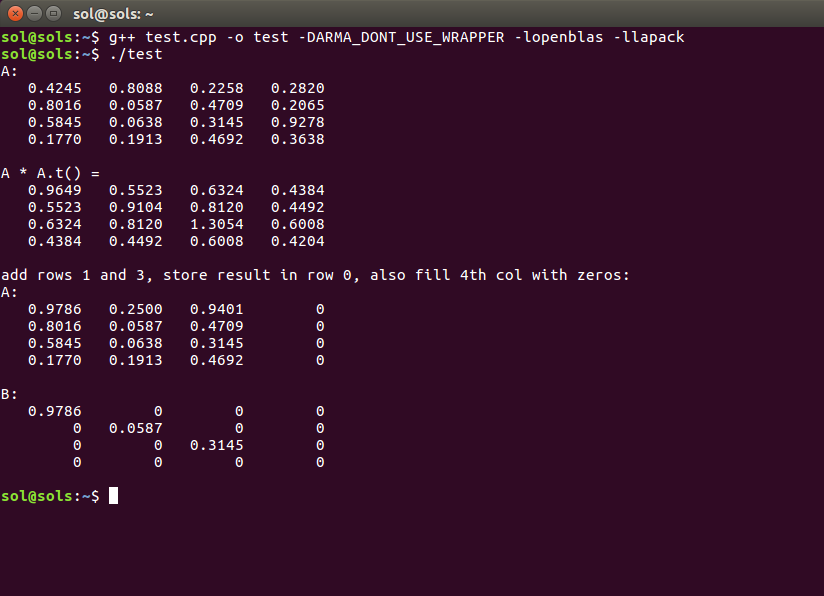
1 g++ test.cpp -o test -DARMA_DONT_USE_WRAPPER -lopenblas -llapack
2 ./test
Running the code on my system:
If you are interested to learn more about the new C++11/C++14 syntax, I would recommend reading The C++ Programming Language by Bjarne Stroustrup.
or, Professional C++ by M. Gregoire, N. A. Solter, S. J. Kleper: