Getting started with JOGL (OpenGL bindings for Java) in Eclipse
Posted on December 8, 2014 by Paul
Recently, a reader of my OpenGL 101 series emailed me about how to get started with OpenGL in Java. More specifically, he was interested in JOGL the Java bindings for OpenGL. I thought his question was general enough to write a small post about creating a Java OpenGL getting started project.
JOGL is a good fit for a Java programmer that wants to learn OpenGL, it is particularly useful if you follow some OpenGL intro book or article. If you are more interested in writing Java games, you should check a more game friendly library like LWJGL or, even better, libGDX.
In the first four sections of this tutorial I will show you how to install Java and Eclipse on your computer, feel free to skip forward if you are an experienced Java developer. The fifth section shows you how to configure JOGL as a user defined library in *Eclipse. The last section of the tutorial will exemplify how to create an OpenGL context and attach it to a window.
If you know how to do some to these steps, you can use the next table of contents to go to the sections that present interest for you:
- Installing the Java Development Kit
- Setting the JAVA_HOME environment variable on Windows
- Setting the JAVA_HOME environment variable on OS X
- Installing Eclipse
- Installing JOGL
- Minimal OpenGL project in Java
Installing the Java Development Kit:
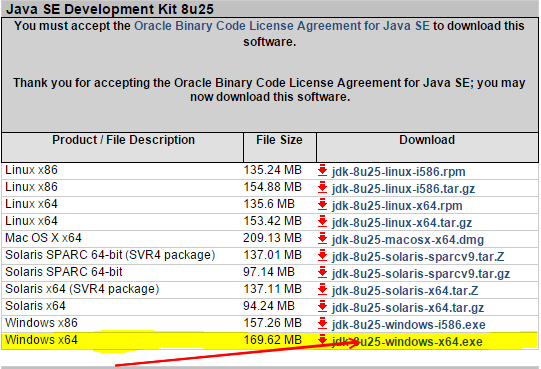
First thing that you need is to install JDK, the Java Development Kit, from Oracle. Use the above link to download the appropriate version of JDK for your machine:

After you confirm that you accept the license agreement for JDK, you can select which version of Java you need, for this tutorial I will use Java SE 8 64 bits for Windows (you can follow along on OS X, the procedure is essentially the same):
Once the download is completed, start the installer and accept all the default options.
Setting the JAVA_HOME environment variable on Windows:
It is advisable, but optional for the purposes of this tutorial, to create an environment variable named JAVA_HOME, where you store the location of the JDK. If you don’t want to setup JAVA_HOME, you can jump to the next section.
On Windows 8.1, right click on the Windows button and select System, after that chose Advanced system settings, you should now have the System Properties window open:
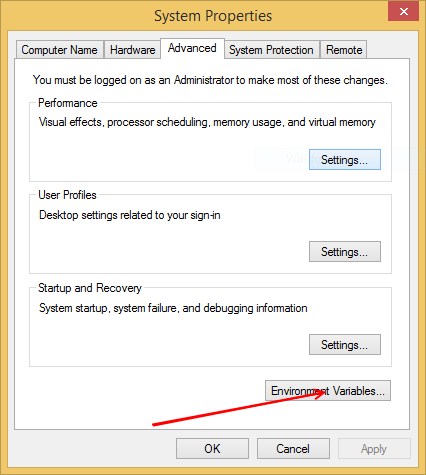
On older Windows systems, right click My Computer and select Properties, after that you should see the System Properties window, select the Advanced menu.
Select the Environment Variables button in the above window, this should open the Environment Variables editor:
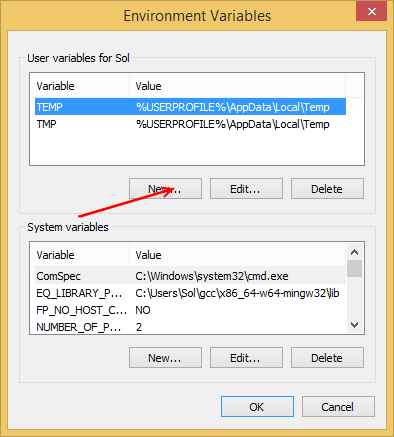
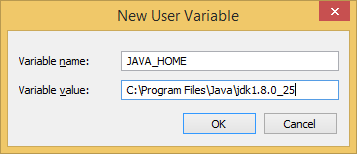
Press New in the upper side of the above window, this will let you create a New User Variable, you should write JAVA_HOME in the name text box and the path to your JDK installation in the value text box, in my case this was C:\Program Files\Java\jdk1.8.0_25, be sure to replace this with the JDK path for your machine:
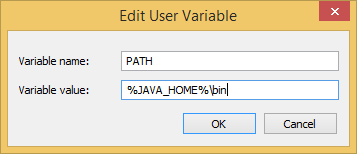
Repeat the above procedure and create a new environment variable named PATH, or, if this is already present, select Edit instead of New. For the value add %JAVA_HOME\bin% or ;%JAVA_HOME\bin% if the PATH variable was already defined:
Setting the JAVA_HOME environment variable on OS X:
On OS X, you can define the JAVA_HOME environment variable by simply adding the next line at the end of your .bash_profile file:
1 export JAVA_HOME=`/usr/libexec/java_home -v 1.8`Important be sure that the number from the above line matches the version of Java installed on your Mac.
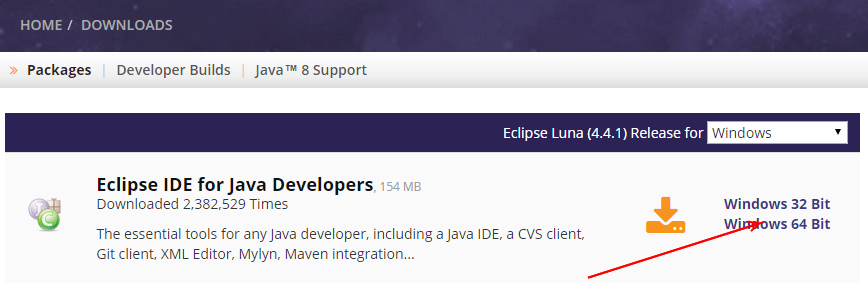
Next step is to install the Eclipse IDE, Eclipse IDE for Java Developers will work just fine, be sure to chose an Eclipse version that matches your JDK (if you’ve installed the 64 bits JDK chose the 64 bits Eclipse installer):
Once the download is completed, extract the archive, you should end up with a folder named eclipse. Now, Eclipse doesn’t come with an installer, you can simply copy the eclipse folder where you want on your computer and start Eclipse by double clicking the executable from the eclipse folder. Personally, I prefer to put the eclipse folder in C:\Program Files for Windows or in the Applications folder for OS X.
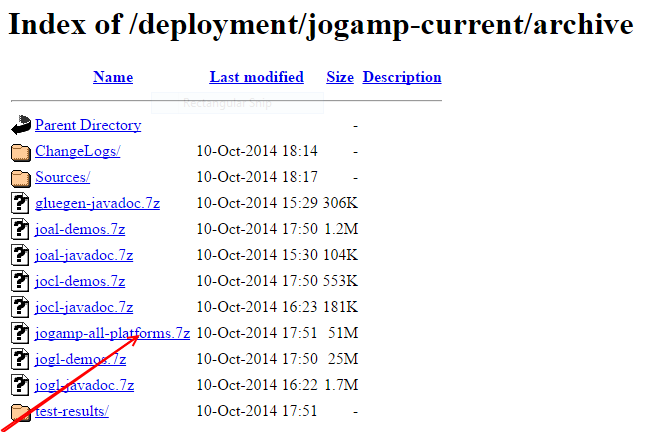
You can find the latest version of JOGL at http://jogamp.org/deployment/jogamp-current/archive/, download jogamp-all-platforms.7z from this page:
In order to be able to extract the downloaded archive on Windows you will need 7-Zip. For OS X, you can use Keka which can extract 7z archives.
Open Eclipse and create a new workspace for your JOGL projects (if this is the first time you use Eclipse you will be prompted to create a new workspace). For e.g., on my Windows machine I’ve created a new workspace in C:\Users\Sol\jogl_work. Where you keep your workspace is a question of personal preference, but I suggest to keep it in a path without empty spaces or you could get into trouble in the long run.
Next step is to copy/move the extracted jogamp-all-platforms folder to the Eclipse workspace.
Now, we need to inform Eclipse where to find the JOGL library files. In Eclipse, use the menu bar and go to Window → Preferences → Java → Build Path → User Libraries:
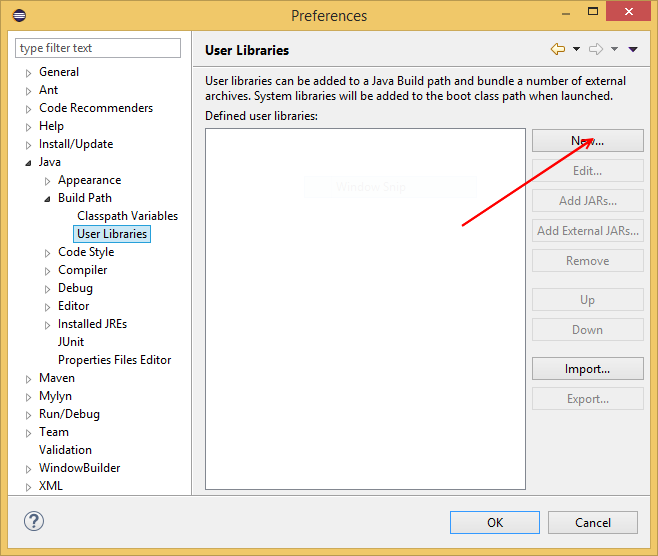
Press New in the above window, write JOGL for the library name and press OK. Next, select the JOGL entry from the User Libraries window and press Add External JARs:
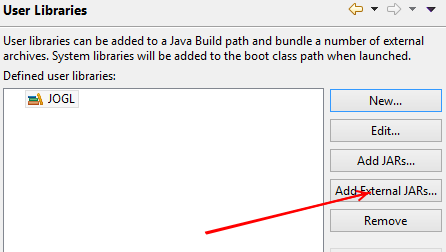
After that, you will be prompted to select the JAR files your library needs, navigate to your_workspace_path\jogamp-all-platforms\jar from the JAR Selection window, select gluegen-rt.jar and press Open. Repeat the above step for jogl-all.jar. You should see something like in the next figure:

Now, optionally but recommended, we can add the location of the documentation for JOGL. In the above window, double click the line Javadoc location: (None). This will open a new window were we can add the URL for the documentation http://jogamp.org/deployment/jogamp-next/javadoc/jogl/javadoc/:
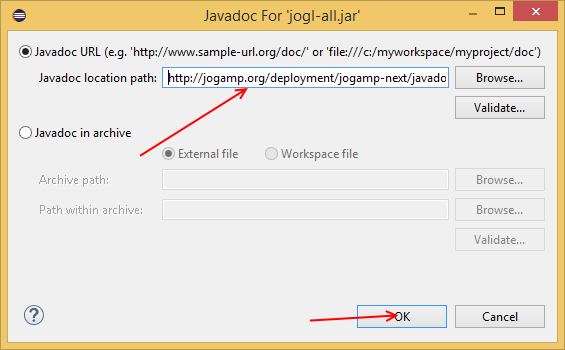
Press “OK”, this will close the User Libraries window.
Minimal OpenGL project in Java:
Now, we are ready to create a simple OpenGL project in Java.
Open Eclipse, close the Welcome page, and create a new Java project: File → New → Java Project:
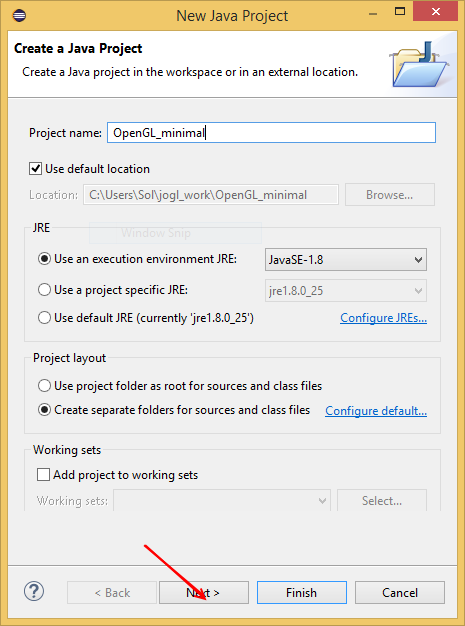
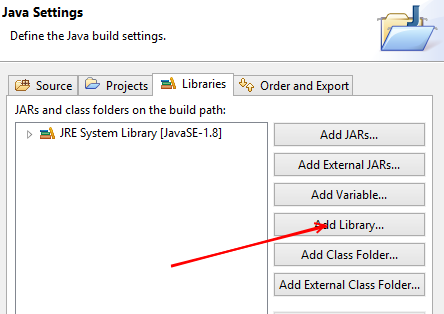
Press Next, select the Libraries tab and press Add Library:
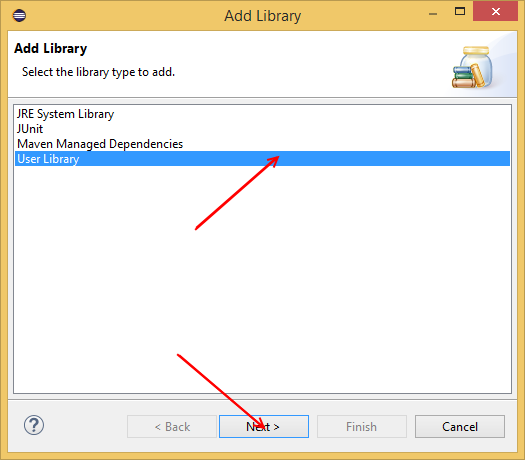
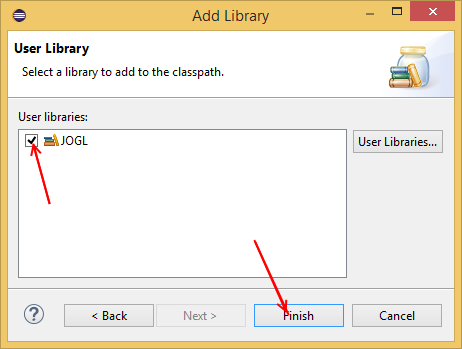
On the Add Library window, select User Library and press Next, on the next window select your JOGL library and press “Finish”:
You should end up with two entries in the Libraries tab: JOGL and JRE System Library, press Finish again:

Finally, we can code something … Right click on the src entry from the Package Explorer and select New → Class. Add a package name, a class name, make sure to check public static void main and press Finish:
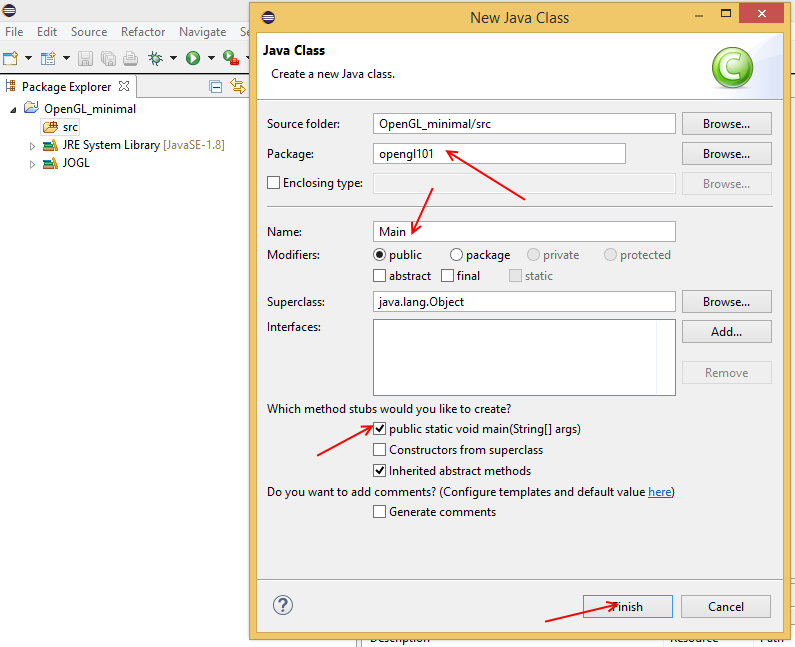
Now, we have the main entry point for the application and a containing class, named Main that resides in the opengl101 package. We can put all our code in the Main class, but it will quickly become a mess of static functions and variables. Instead, let’s create a new class named Game, that will be instantiated in the Main class.
Right click opengl101 and select New → Class, write Game for the class name and press Finish.
Now, we can create an instance of the Game class in Main:
1 public class Main {
2     public static void main(String[] args) {
3         Game game = new Game();
4         game.play();
5     }
6 }
just ignore for now, the error about the play method from the Game class reported by Eclipse, we will correct this in few moments.
In order to create a Java window for our application, we will extend the JFrame class from Swing. We can access the OpenGL functionality from JOGL by implementing the GLEventListener interface.
Open Game.java and copy the next piece of code:
 1 import com.jogamp.opengl.GLAutoDrawable;
 2 import com.jogamp.opengl.GLEventListener;
 3 import javax.swing.JFrame;
 4
 5 public class Game extends JFrame implements GLEventListener {
 6     private static final long serialVersionUID = 1L;
 7
 8     @Override
 9     public void display(GLAutoDrawable drawable) {
10     }
11
12     @Override
13     public void dispose(GLAutoDrawable drawable) {
14     }
15
16     @Override
17     public void init(GLAutoDrawable drawable) {
18     }
19
20     @Override
21     public void reshape(GLAutoDrawable drawable, int x, int y, int width,
22             int height) {
23     }
24 }
All the @Override methods from above were generated by Eclipse based on the declaration of the GLEventListener interface. If you’ve configured the JOGL documentation as advised earlier, you can hover with the mouse over a particular function and see a short description. For the purposes of this tutorial we will use only the display and the init methods.
Let’s make peace with Eclipse and add an empty play function to the above class, this is were I usually prefer to put the code that starts the game animation:
 1 ...
 2
 3 public class Game extends JFrame implements GLEventListener {
 4     private static final long serialVersionUID = 1L;
 5
 6     public void play() {
 7     }
 8
 9 ...
10 }
If you wish, you can run the above code, but you will see nothing, we first need to create a window, this can be done in the constructor of the Game class:
 1 ...
 2
 3     final private int width = 800;
 4     final private int height = 600;
 5
 6     public Game() {
 7         super("Minimal OpenGL");
 8
 9         this.setName("Minimal OpenGL");
10
11         this.setSize(width, height);
12         this.setLocationRelativeTo(null);
13         this.setDefaultCloseOperation(JFrame.EXIT_ON_CLOSE);
14         this.setVisible(true);
15         this.setResizable(false);
16     }
17 ...
In the above code we’ve defined two variables that will store the width and height of our window and we’ve created a Swing window named Minimal OpenGL. If you run the application you should see an empty gray window.
First step to enable OpenGL in our Java application is to define an OpenGL profile, e.g. we can enable all the OpenGL functions from OpenGL 1.x to 3.0 with:
1 GLProfile profile = GLProfile.get(GLProfile.GL2);this will let you use the fixed function pipeline from OpenGL which normally shouldn’t be used by any modern application, but it is still used by a large number of OpenGL courses usually for legacy and commodity reasons.
My recommendation, if you are interested in modern OpenGL for desktop, is to use GL4 or, if you have an older GPU, at least GL3. Another interesting profile is GL2ES2 that allows us to use the common functions available in both OpenGL 2.x desktop and OpenGL ES 2. For OpenGL ES 3 there is, of course, GL2ES3 or GL4ES3. For the purposes of this tutorial I will use GL4.
In order to enable the OpenGL 4.x on our machine, we can modify the constructor of the Game class:
 1 import com.jogamp.opengl.GL4;
 2 import com.jogamp.opengl.GLAutoDrawable;
 3 import com.jogamp.opengl.GLCapabilities;
 4 import com.jogamp.opengl.GLEventListener;
 5 import com.jogamp.opengl.GLProfile;
 6 import com.jogamp.opengl.awt.GLCanvas;
 7 import javax.swing.JFrame;
 8
 9 public class Game extends JFrame implements GLEventListener {
10     private static final long serialVersionUID = 1L;
11
12     final private int width = 800;
13     final private int height = 600;
14
15     public Game() {
16         super("Minimal OpenGL");
17         GLProfile profile = GLProfile.get(GLProfile.GL4);
18         GLCapabilities capabilities = new GLCapabilities(profile);
19
20         GLCanvas canvas = new GLCanvas(capabilities);
21         canvas.addGLEventListener(this);
22
23         this.setName("Minimal OpenGL");
24         this.getContentPane().add(canvas);
25
26         this.setSize(width, height);
27         this.setLocationRelativeTo(null);
28         this.setDefaultCloseOperation(JFrame.EXIT_ON_CLOSE);
29         this.setVisible(true);
30         this.setResizable(false);
31         canvas.requestFocusInWindow();
32     }
33
34 ...
35 }
Now, we have an OpenGL context attached to our window.
The actual draw commands needs to be called from the display function:
 1 ...
 2
 3     public void display(GLAutoDrawable drawable) {
 4         GL4 gl = drawable.getGL().getGL4();
 5         gl.glClear(GL4.GL_COLOR_BUFFER_BIT | GL4.GL_DEPTH_BUFFER_BIT);
 6
 7         // call your draw code here
 8
 9         gl.glFlush();
10     }
11 ...
12 }
If you run the above code, you should see a nice black window, OpenGL uses black as the default color for clearing the color buffer. We can change this, if necessary, in the init function:
1 ...
2
3     public void init(GLAutoDrawable drawable) {
4         GL4 gl = drawable.getGL().getGL4();
5         gl.glClearColor(0.392f, 0.584f, 0.929f, 1.0f);
6     }
7 ...
8 }
This is what you should see, if you run the above code:
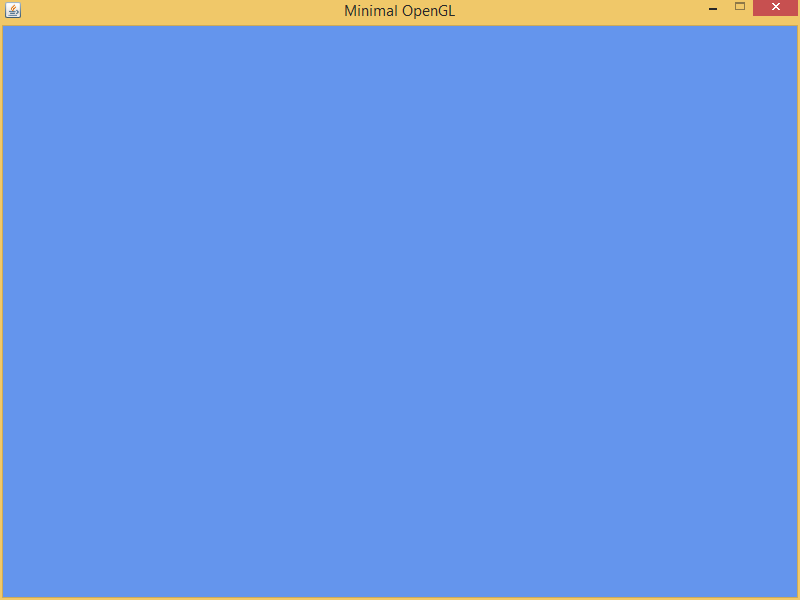
it may not look like much, but you now have a minimal OpenGL 4.x application.
A modern book about using Java with OpenGL is Computer Graphics Programming in OpenGL with Java by V. S. Gordon and J.Clevenger: