Getting started with OpenCV on the BeagleBone Black with Ubuntu 14.04 LTS
Posted on April 21, 2014 by Paul
18 December 2018
If you prefer to cross compile the latest version of OpenCV for your BeagleBone Black check this article that uses Debian Stretch.
I’ve recently bought a BeagleBone Black for some computer vision and home automation projects I intend to do sometime in the future. BeagleBone has Ångström Linux already installed on the 2GB eMMC card. I have nothing against Ångström, but I prefer to run Ubuntu headless on this tiny computer. Also, Ångström has g++-4.7.2 as the default C++ compiler and I want to be able to use a newer compiler, like the g++-4.8.2, for C++11 development.
As a side note, the next revision of the BeagleBone Black will support Debian Wheezy out of the box, which has an even older C++ compiler than Ångström.
If you want to be able to run Ubuntu and build OpenCV on the BeagleBone Black, you will need a micro SD card of at least 8GB, I recommend buying one of class 10. Personally, I bought a SanDisk micro SD card of 16 GB.
Ubuntu 14.04 for BeagleBone Black can be downloaded from https://rcn-ee.net/deb/microsd/trusty/, just be sure to chose the archive that starts with bone-, e.g. bone-ubuntu-14.04-2014-04-18-2gb.img.
Once you’ve downloaded and extracted the Ubuntu image, you will need to transfer it on the SD card. The exact procedure depends on your OS. I’ve used a Mac computer to transfer the image, so the next instructions applies to OSX only. If you use Windows, you can use the instructions from this page http://beagleboard.org/Getting%20Started#update to transfer the Ubuntu image to the SD card. Just be sure to replace all references to Ångström with Ubuntu.
Connect the SD card to your Mac and open a Terminal, first we need to know where the system has mounted the SD card:
1 diskutil listBe careful to correctly identify the location of your SD card, or you could damage your OS, in my case this was /dev/disk1. Next, you will need to unmount the SD card in order to be able to write on it:
1 diskutil unmountDisk /dev/disk1Assuming, you have the extracted Ubuntu image on your Desktop:
1 cd ~
2 cd Desktop
Now, you are ready to transfer the image to the SD card:
1 sudo dd if=ubuntu_image_name.img of=/dev/diskXIn my particular case, the above command was:
1 sudo dd if=bone-ubuntu-14.04-2014-04-18-2gb.img of=/dev/disk1After about 15 minutes (this could take more or less time if you have a different card) I’ve had a card with the Ubuntu image on it.
Next, you will need to insert the micro SD card in your BeagleBone. Press the Boot button on the device and connect it to your computer through the provided USB cable. Keep the Boot button pressed until you see all LEDs flashing on the device, after that you can release the button. The above procedure will ensure that the device will boot from the SD card instead of the included eMMC card.
Once the device is running you can connect to it through ssh. The recommended procedure is to connect your BeagleBone to the Internet through a network cable. If you use Windows, you will need to install PuTTY or another Windows ssh client.
The default user name is ubuntu and the password temppwd, you can connect to the BeagleBone with:
1 ssh ubuntu@192.168.x.xxxreplace the above blanks with your actual device IP. In my particular case the IP of the device was 192.168.0.111.
Once connected to the BeagleBone, you will need to expand the image to the entire SD card:
1 cd /opt/scripts/tools
2 git pull
3 sudo ./grow_partition.sh
4 sudo reboot
The grow_partition.sh will report an error, you can ignore it and reboot the device. Log in on the device through ssh and check the available free space with:
1 df -hNext, let’s make sure Ubuntu is updated:
1 sudo apt-get update
2 sudo apt-get upgrade
Let’s install the OpenCV preprequisites:
1 sudo apt-get install build-essential cmake pkg-config
2 sudo apt-get install libtiff4-dev libjpeg-dev libjasper-dev libpng12-dev
3 sudo apt-get install libavcodec-dev libavformat-dev libswscale-dev libv4l-dev
Next step is to download the latest OpenCV from GitHub:
1 git clone https://github.com/Itseez/opencv.gitNow, you are ready to build OpenCV, be warned that this could take a few hours:
1 cd opencv
2 mkdir build && cd build
3 cmake -D CMAKE_BUILD_TYPE=RELEASE -D CMAKE_INSTALL_PREFIX=/usr/local -D WITH_CUDA=OFF -D WITH_CUFFT=OFF -D WITH_CUBLAS=OFF -D WITH_NVCUVID=OFF -D WITH_OPENCL=OFF -D WITH_OPENCLAMDFFT=OFF -D WITH_OPENCLAMDBLAS=OFF -D BUILD_opencv_apps=OFF -D BUILD_DOCS=OFF -D BUILD_PERF_TESTS=OFF -D BUILD_TESTS=OFF -D ENABLE_NEON=on ..
4 make
5 sudo make install
6 sudo ldconfig
If you’ve managed to finalize the above without error, congratulations, now you have the latest OpenCV installed on your BeagleBone.
Time to write a small OpenCV test to check if everything works:
 1 // Test to check the OpenCV version
 2 // Build on Linux with:
 3 // g++ test_1.cpp -o test_1 -lopencv_core
 4
 5 #include <opencv2/opencv.hpp>
 6 #include <iostream>
 7
 8 int main() {
 9 	std::cout << "Hello, OpenCV version "<< CV_VERSION << std::endl;
10 	return 0;
11 }
Assuming you have saved the above code in your BeagleBone home folder under the name test_1.cpp, you can build and run the code with:
1 g++ test_1.cpp -o test_1 -lopencv_core
2 ./test_1
3 Hello, OpenCV version 3.0.0-dev
you should see something like:
1 Hello, OpenCV version 3.0.0-devIf you don’t know how to transfer files through ssh from your computer to the BeagleBone, this is an example of how I’ve transferred the above C++ code or you can use a ftp client like FileZilla:
1 scp test_1.cpp ubuntu@192.168.0.111:Let’s try a slightly more complex code that reads a color image file from the disk and converts the file to gray:
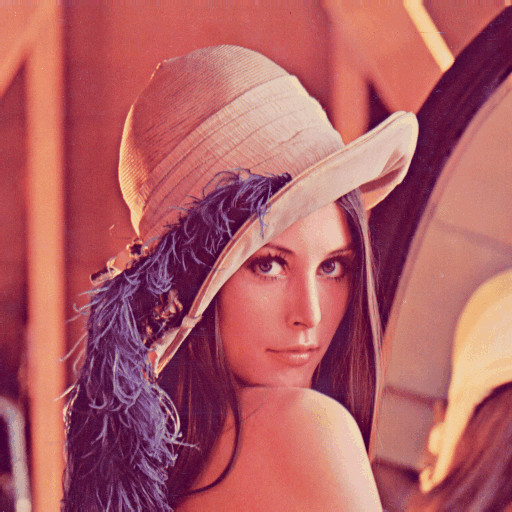
and the result, after running the code:

Save the next piece of code as test_2.cpp:
 1 // Test to convert a color image to gray
 2 // Build on Linux with:
 3 // g++ test_2.cpp -o test_2 -lopencv_core -lopencv_imgproc -lopencv_highgui
 4
 5 #include <opencv2/opencv.hpp>
 6 #include <iostream>
 7
 8 int main() {
 9     // Load the image file and check for success
10     cv::Mat input = cv::imread("lena.jpg", 1);
11     if(!input.data) {
12         std::cout << "Unable to open the image file" << std::endl;
13         return -1;
14     }
15
16     // Convert the input file to gray
17     cv::Mat gray_image;
18     cvtColor(input, gray_image, cv::COLOR_BGR2GRAY);
19
20     // Save the result
21     cv::imwrite("lena_gray.jpg", gray_image);
22
23 	return 0;
24 }
If, by any chance, you use an older version of OpenCV, you will need to change line 18 from above with:
1 ...
2
3     cvtColor(input, gray_image, CV_BGR2GRAY);
4
5 ...
You can compile the code with:
1 g++ test_2.cpp -o test_2 -lopencv_core -lopencv_imgproc -lopencv_highguiIf you are interested to learn more about OpenCV, I would recommend reading Learning OpenCV by A. Kaehler and G. Bradski:
or Practical OpenCV by S. Brahmbhatt: