OpenGL 101: Textures
Posted on May 17, 2013 by Paul
The code for this post is on GitHub: https://github.com/sol-prog/OpenGL-101.
This is the third article from my OpenGL 101 series. In the first two articles we’ve seen how we can open a window and draw OpenGL primitives: points, lines and triangles. We’ve also seen how we can assign a particular color to a vertex and use this to paint a two-dimensional surface with a smooth color.
Suppose now that we want to draw something more complex like the ruins of an ancient building, think a bit about how we can draw something as close as possible to what we can see in the real world. Theoretically, we can model everything with triangles and calculate the colors corresponding to each vertex, but this quickly gets out of hand - we are limited by the memory of our graphics card and by the speed of our graphics processor. A much practical approach to create the illusion of reality is to use textures that can be glued on the geometrical representation of our computer world.
In this article, we will concern ourselves only with two-dimensional textures, OpenGL can use other type of textures: 1D, 3D, cube textures etc … Technically a texture is just a container for data, you can store any numerical values in a texture, usually color values, and process this data in your shaders, usually in the fragment shader.
Let’s start with something simple like reading an image from a file in a 2D texture and using the color information from this to paint a simple 2D surface - the square from ex_9, see the last article if you need to refresh your memory:
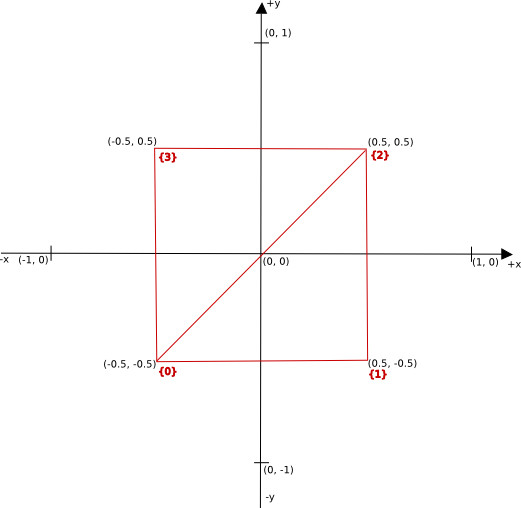
We say that a texture is composed of texels, for a 2D texture the texel space can be represented like in the next figure:
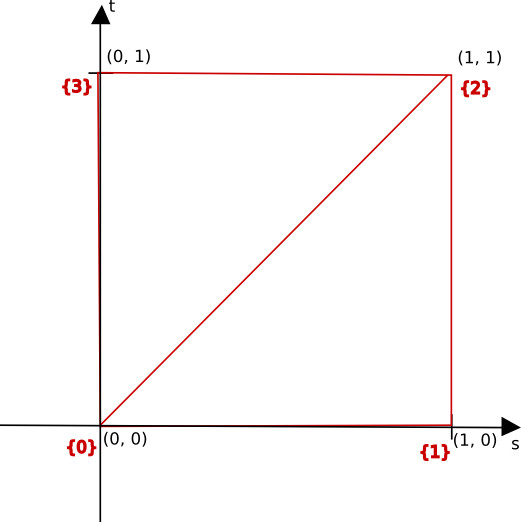
If we have an image data in our texture, the lower left corner of the image will be at (0, 0) and the upper right corner at (1, 1) in the (s, t) space. It is important to note that the image data, the pixel values, is layered in memory starting from the upper left corner to the right, and from the top to the bottom, using the C convention for storing an array in memory.
When we work with textures in OpenGL, we need to specify the texture coordinates, the position of the texture in the (s, t) space. If we want to map an image to a rectangle, we can use the next texture coordinates:
 1 	...
 2 	// 1 square (made by 2 triangles) to be rendered
 3 	GLfloat vertices_position[8] = {
 4 		-0.5, -0.5,
 5 		0.5, -0.5,
 6 		0.5, 0.5,
 7 		-0.5, 0.5,
 8 	};
 9
10 	GLfloat texture_coord[8] = {
11 		0.0, 0.0,
12 		1.0, 0.0,
13 		1.0, 1.0,
14 		0.0, 1.0,
15 	};
16
17 	GLuint indices[6] = {
18 		0, 1, 2,
19 		2, 3, 0
20 	};
21 	...
If you want to follow along, copy ex_9 from the previous article to ex_10 and add the texture_coord array in the intialize function, we’ll also need to remove/comment any code that uses the colors array.
We could store the texture_coord in the same VBO that stores the vertex_position array:
1 glBufferSubData(GL_ARRAY_BUFFER, sizeof(vertices_position), sizeof(texture_coord), texture_coord);In order to create a texture, we follow the same recipe as in the case of a buffer object. We start by asking OpenGL for a unique identifier for our texture:
1 	GLuint texture;
2 	glGenTextures(1, &texture);
Next step is to specify that we will work with a 2D texture:
1 glBindTexture(GL_TEXTURE_2D, texture);Now, we need to actually load an image from a file and initialize the texture with the the color data from the image, we can abstract this by calling a, to be discussed, function load_image, that takes as a parameter the path to the image file:
1 load_image("squirrel.jpg");At the end of the initialize function let’s enable the texture_coord attribute, we’ll need this as an entry point to the vertex shader:
1 	GLint texture_coord_attribute = glGetAttribLocation(shaderProgram, "texture_coord");
2 	glVertexAttribPointer(texture_coord_attribute, 2, GL_FLOAT, GL_FALSE, 0, (GLvoid *)sizeof(vertices_position));
3 	glEnableVertexAttribArray(texture_coord_attribute);
Now, we need to modify the vertex shader in order to accept as input the texture_coord data and send it, through the OpenGL pipeline, to the fragment shader:
 1 #version 150
 2
 3 in vec4 position;
 4 in vec2 texture_coord;
 5 out vec2 texture_coord_from_vshader;
 6
 7 void main() {
 8 	gl_Position = position;
 9 	texture_coord_from_vshader = texture_coord;
10 }
The fragment shader needs more modifications:
 1 #version 150
 2
 3 in vec2 texture_coord_from_vshader;
 4 out vec4 out_color;
 5
 6 uniform sampler2D texture_sampler;
 7
 8 void main() {
 9 	out_color = texture(texture_sampler, texture_coord_from_vshader);
10 }
Line 6 from the above shader defines a uniform shader variable, a 2D texture sampler - this is used internally by OpenGL to sample, or map, values from the continuous (s, t) space to the discrete color data stored in our texture. A uniform is a read-only variable for a shader and it is constant for all shaders, in other words it is a global variable for all shaders.
Line 9 will extract the color information for the current fragment based on the texture sampler and on the texture coordinates.
Now, we can discuss the load_image function. As mentioned in the first article from this series, OpenGL doesn’t include functionality for reading/writing image files. We could use the FreeImage library to read/write images. There are a number of other image processing libraries available, some free and open source like FreeImage, feel free to test other libraries if you don’t like FreeImage. I prefer to use FreeImage because it is a relatively small library, open source and portable on all major operating systems.
You can find the complete source code for load_image on the Github repository for this article, in ex_10. In the next chunk of code we omit the boilerplate code used to initialize FreeImage and other cleaning operations:
 1 	FIBITMAP *bitmap;
 2 	// Get the format of the image file
 3 	FREE_IMAGE_FORMAT fif =FreeImage_GetFileType(fname, 0);
 4
 5 	// If the format can't be determined, try to guess the format from the file name
 6 	if(fif == FIF_UNKNOWN) {
 7 		fif = FreeImage_GetFIFFromFilename(fname);
 8 	}
 9
10 	// Load the data in bitmap if possible
11 	if(fif != FIF_UNKNOWN && FreeImage_FIFSupportsReading(fif)) {
12 		bitmap = FreeImage_Load(fif, fname);
13 	}
14 	else {
15 		bitmap = NULL;
16 	}
17
18 	// PROCESS IMAGE if bitmap was successfully initialized
19 	if(bitmap) {
20 		unsigned int w = FreeImage_GetWidth(bitmap);
21 		unsigned int h = FreeImage_GetHeight(bitmap);
22 		unsigned pixel_size = FreeImage_GetBPP(bitmap);
23
24 		// Get a pointer to the pixel data
25 		BYTE *data = (BYTE*)FreeImage_GetBits(bitmap);
26
27 		// Process only RGB and RGBA images
28 		if(pixel_size == 24) {
29 			glTexImage2D(GL_TEXTURE_2D, 0, GL_RGB, w, h, 0, GL_BGR, GL_UNSIGNED_BYTE, (GLvoid*)data);
30 		}
31 		else if (pixel_size == 32) {
32 			glTexImage2D(GL_TEXTURE_2D, 0, GL_RGBA, w, h, 0, GL_BGRA, GL_UNSIGNED_BYTE, (GLvoid*)data);
33 		}
34 		else {
35 			std::cerr << "pixel size = " << pixel_size << " don't know how to process this case. I'm out!" << std::endl;
36 			exit(-1);
37 		}
38
39 		glTexParameteri(GL_TEXTURE_2D, GL_TEXTURE_MIN_FILTER, GL_LINEAR);
40 		glTexParameteri(GL_TEXTURE_2D, GL_TEXTURE_MAG_FILTER, GL_LINEAR);
41 	}
42 	else {
43 		...
44 	}
45 	...
Line 29, or 32 for RGBA images, allocates the necessary memory for storing the image data and fills the texture with the color data from the original image. glTexImage2D creates a mutable storage for our texture, this is useful if you plan to later resize the texture storage, perhaps to accommodate a larger or a smaller image. On the other hand, if you know that your texture storage will remain constant it is more efficient to use glTexStorage2D to allocate space and glTexSubImage2D to add data to the texture. glTexStorage2D will create an immutable storage for our texture. In both cases, mutable or immutable storage, we can modify the data stored in a texture.
Next two highlighted lines instructs OpenGL how to interpolate the image data when we scale up or down the original image, in this case we will use linear interpolation.
If you’ve installed FreeImage on OS X using my modified Makefile, as suggested in the first article, you will need to add an extra parameter stdlib=libc++ when you use FreeImage, specifically:
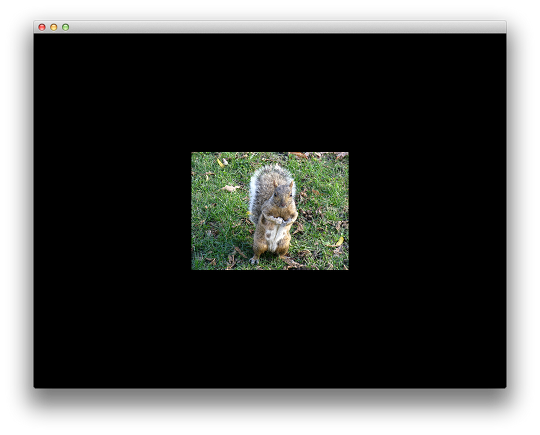
1 clang++ -Wall -stdlib=libc++ your_program_name.cpp -lglfw -framework Cocoa -framework OpenGL -framework IOKit -lGLEW -lfreeimageIf you run ex_10, this what you should see:
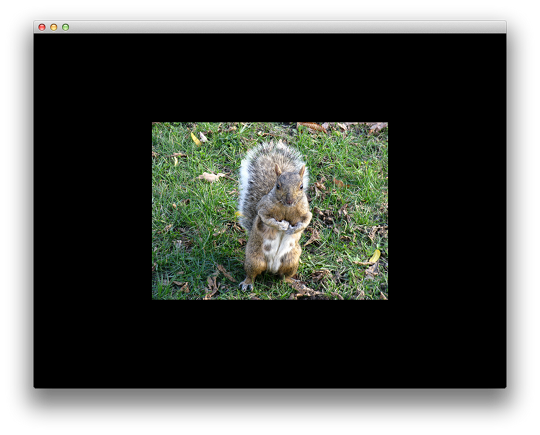
Please note that I’ve commented the line that sets the clear color to red, the default clear color for OpenGL is black.
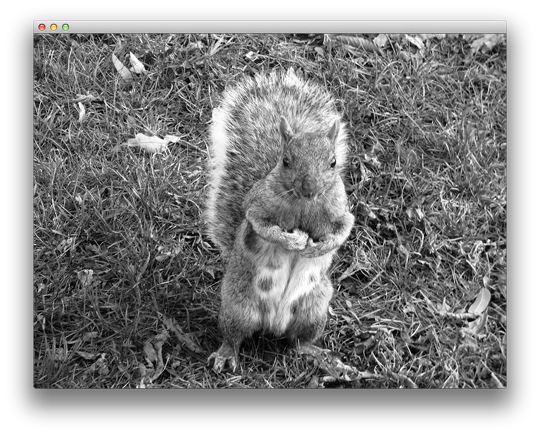
If you want to completely fill the available window surface you can change the vertices_position accordingly:
1 	GLfloat vertices_position[8] = {
2 		-1.0, -1.0,
3 		1.0, -1.0,
4 		1.0, 1.0,
5 		-1.0, 1.0,
6 	};
Say that you want to use tones of grey for the texture and not the original RGB colors, we can modify the fragment shader to average the red, green, blue from the original image and use this average color as the output color from the shader:
 1 #version 150
 2
 3 in vec2 texture_coord_from_vshader;
 4 out vec4 out_color;
 5
 6 uniform sampler2D texture_sampler;
 7
 8 void main() {
 9 	out_color = texture(texture_sampler, texture_coord_from_vshader);
10 	float average_color = (out_color.r + out_color.g + out_color.b)/3.0;
11 	out_color = vec4(average_color, average_color, average_color, 1.0);
12 }
If you run ex_11, this is what you should see:
We can get more interesting effects if we extend the texture coordinates outside the (s, t) space, which is defined as the unit square [0, 1] x [0, 1], the image will be wrapped on the missing values. We can control the wrapping mode with glTexParameteri.
First, let’s change the texture_coord array:
1 GLfloat texture_coord[8] = {
2 		-1.0, -1.0,
3 		2.0, -1.0,
4 		2.0, 2.0,
5 		-1.0, 2.0,
6 	};
If you run ex_12, this is what you should see:
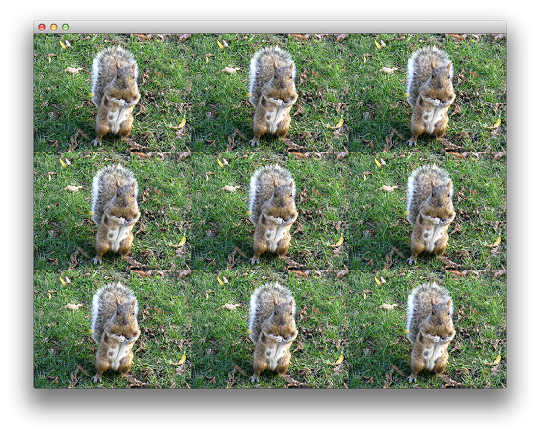
By default, OpenGL will repeat the image in both s and t directions for values outside of the unit square. Same effect can be obtained if we set (this is the default wrap mode):
1 glTexParameteri(GL_TEXTURE_2D, GL_TEXTURE_WRAP_S, GL_REPEAT);
2 glTexParameteri(GL_TEXTURE_2D, GL_TEXTURE_WRAP_T, GL_REPEAT);
Other possible value for the third parameter in the above function: GL_CLAMP_TO_EDGE, GL_CLAMP_TO_BORDER, GL_MIRRORED_REPEAT, if you press W while running ex_12 you can test all these wrap options:
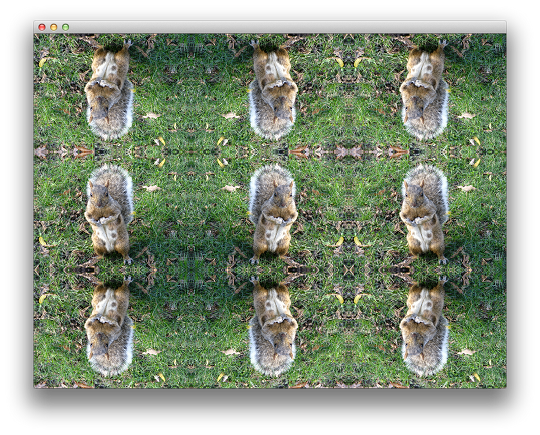
- GL_CLAMP_TO_EDGE
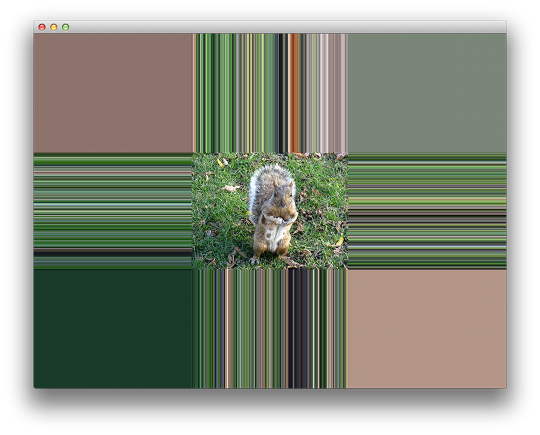
- GL_CLAMP_TO_BORDER
- GL_MIRRORED_REPEAT
In the next article, we are going to talk about geometrical transformations - translation, scaling, rotation, projection matrix and the camera model. If you don’t know what matrix multiplication means, or the inverse of a matrix is, you are going to have a hard time working with more complex models. Take your time and read a bit about basic matrix operations: addition, multiplication, inverse of a matrix, a simple Google search will do. You don’t need to be an expert, but you need to know what these operations means.
All posts from this series:
- OpenGL 101: Windows, OS X and Linux - Getting Started
- OpenGL 101: Drawing primitives - points, lines and triangles
- OpenGL 101: Textures
- OpenGL 101: Matrices - projection, view, model
If you are interested to learn more about OpenGL, I would recommend reading OpenGL SuperBible by G. Sellers, S Wright and N. Haemel:
or
OpenGL Programming Guide by D. Shreiner, G. Sellers, J. M. Kessenich, B. M. Licea-Kane: