OpenGL 101: Windows, OS X and Linux - Getting Started
Posted on May 10, 2013 by Paul
The code for this post is on GitHub: https://github.com/sol-prog/OpenGL-101.
This is the first in a series of articles that will get you up to speed with programming in modern OpenGL. I have no claim about being an expert in the area, this is an edited version of the notes I took working on various OpenGL projects in the last year. I think the best way to really understand a subject is to try to teach it to another person. Constructive comments are welcome and I will update this series based on your comments.
First step in creating an OpenGL code is the creation of a window, using the underlying OS, and to attach an OpenGL context to it, OpenGL by itself can’t open a window. Using a particular OS APIs to create a new window will make our code non-portable; the usual approach is to use a library that abstracts the process of creating/destroying windows on a given OS and also manages the user’s inputs through mouse, keyboard or touch. There are a number of libraries that can abstract the process of creating an window for us, like, in no particular order, GLUT, Freeglut, SDL, GLFW and many others.
In these notes, we are going to use GLFW because it is a small, flexible and modern library, portable on all major operating systems.
Other useful libraries that we are going to use are GLEW - this will let us use the latest OpenGL functions in a portable way, GLM - a small mathematical library and FreeImage for reading and writing images in various formats.
Let’s start by implementing the simplest possible OpenGL code, this will use GLFW to create a window, attach an OpenGL context to it and fill the window background with a nice red color :):
Create a GLFW window with a red background:
 1 #include <GL/glfw.h>
 2 #include <cstdlib>
 3 #include <iostream>
 4
 5
 6 int main () {
 7 	// Initialize GLFW
 8 	if ( !glfwInit()) {
 9 		std::cerr << "Failed to initialize GLFW! I'm out!" << std::endl;
10 		exit(-1);
11 	}
12
13 	// Open a window and attach an OpenGL rendering context to the window surface
14 	if( !glfwOpenWindow(800, 600, 8, 8, 8, 0, 0, 0, GLFW_WINDOW)) {
15 		std::cerr << "Failed to open a window! I'm out!" << std::endl;
16 		glfwTerminate();
17 		exit(-1);
18 	}
19
20 	// Use red to clear the screen
21 	glClearColor(1, 0, 0, 1);
22
23 	// Create a rendering loop
24 	int running = GL_TRUE;
25 	while(running) {
26 		glClear(GL_COLOR_BUFFER_BIT);
27
28 		// Swap front and back buffers
29 		glfwSwapBuffers();
30
31 		// Check if the window was closed
32 		running = glfwGetWindowParam(GLFW_OPENED);
33 	}
34
35 	// Terminate GLFW
36 	glfwTerminate();
37
38 	return 0;
39 }
It is interesting to note that only lines 21 and 26 from the above code are explicit OpenGL calls.
What we just did? The first line of the above code includes the GLFW header file. This will also, implicitly, include any OpenGL header file that we need. Next, in the main function, we start by initializing GLFW and also add a line to release the resources used by GLFW at the end of our program:
 1 	// Initialize GLFW
 2 	if ( !glfwInit()) {
 3 		std::cerr << "Failed to initialize GLFW! I'm out!" << std::endl;
 4 		exit(-1);
 5 	}
 6
 7 	...
 8
 9 	// Terminate GLFW
10 	glfwTerminate();
There is also some boilerplate code to test if GLFW was successfully initialized and alert the user.
Once GLFW was successfully initialized, we can actually open a window:
1 	if( !glfwOpenWindow(800, 600, 8, 8, 8, 0, 0, 0, GLFW_WINDOW)) {
2 		std::cerr << "Failed to open a window! I'm out!" << std::endl;
3 		glfwTerminate();
4 		exit(-1);
5 	}
The first two parameters from glfwOpenWindow represents the width and height of the window, next four numbers the number of bits used for coloring a pixel in the RGBA four-dimensional space, specifically we create a 24 bits color buffer with no alpha channel. Next two numbers represents the number of bits used by the depth and stencil buffers, zero bits means that we don’t use the particular buffer. The last parameter of the function creates a decorated window or a fullscreen window. In our case we’ve created a decorated window.
If the window was successfully open, GLFW will attach an OpenGL rendering context on the entire surface of the window. Consequently, we can call OpenGL functions only after a window is created.
The next line defines the color that OpenGL will use for clearing the screen, we use red in this particular case:
1 glClearColor(1, 0, 0, 1);Next, we create a rendering loop, the idea is that we want to keep the newly created window open in order to actually see it contents, otherwise the program will finish in a matter of seconds. In order to keep the window alive we create a while loop that will run until the user close the window.
The body of the while loop is the place where we are going to do all our rendering. Currently, all our code does is to clear the color buffer with the red color we’ve defined earlier:
1 glClear(GL_COLOR_BUFFER_BIT);The last line from the while loop swaps the back and the front buffers, using glfwSwapBuffers(), and the window surface is updated with the result of the rendering process.
Next, I’m going to present how to create a basic OpenGL project on Windows, OS X and Linux, feel free to skip any of these sections that are not relevant to you. If you already know how to compile and run C++ OpenGL code on your particular OS, you could safely jump to last section of this article Fine tunning the GLFW window code.
Typically, on Windows, we’ll use Visual Studio for compiling C++ programs. You can also use the GCC compilers under Cygwin or MingGW.
If you prefer to use MinGW on Windows you could jump at the end of the Visual Studio configuration procedure.
I’m going to exemplify the creation of an OpenGL project on Windows with Visual Studio Express 2012, which is free to use for non-commercial purposes. The procedure presented here can be used directly with the commercial version of Visual Studio 2012 or, with some minor modifications, with older versions VS, like VS 2008 or VS 2010.
Start by downloading the 32 bits binary versions of GLFW, GLEW and FreeImage. You can also download GLM, this is a header only library. Once you downloaded and unarchived the above packages, we need to decide where are you going to keep them. Theoretically, you can keep them in any folder on your machine, but I prefer to store them in the C++ project folder, this has the advantage that you can move the project on different Windows machines and, as long as you have VS installed, you can modify and recompile the code without changing the project settings.
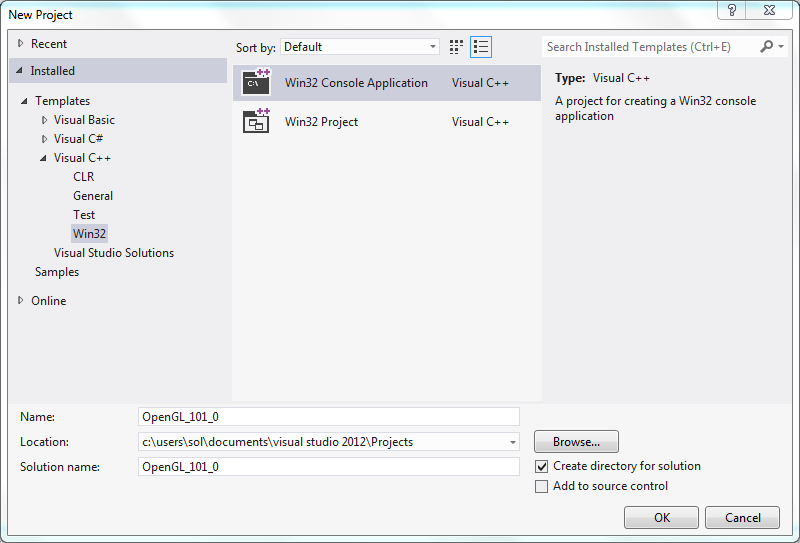
Open VS and create a new project, select Visual C++ −> Win32 −> Win32 Console Application, I’m going to name this project OpenGL_101_0:
press OK and then Next. On the Application Settings check the Empty Project box:
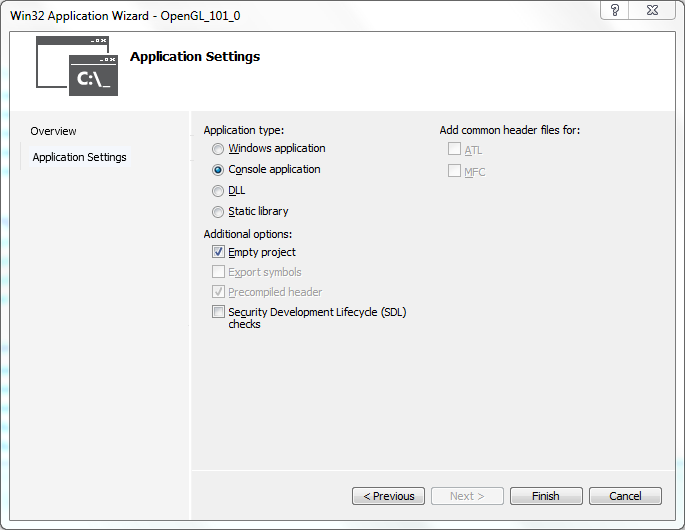
and press Finish.
Now, open your project folder, by default this should be located in Documents −> Visual Studio 2012 −> Projects −> OpenGL_101_0 and manually create a new folder named libraries. Copy GLFW, GLEW, FreeImage and GLM in this folder.
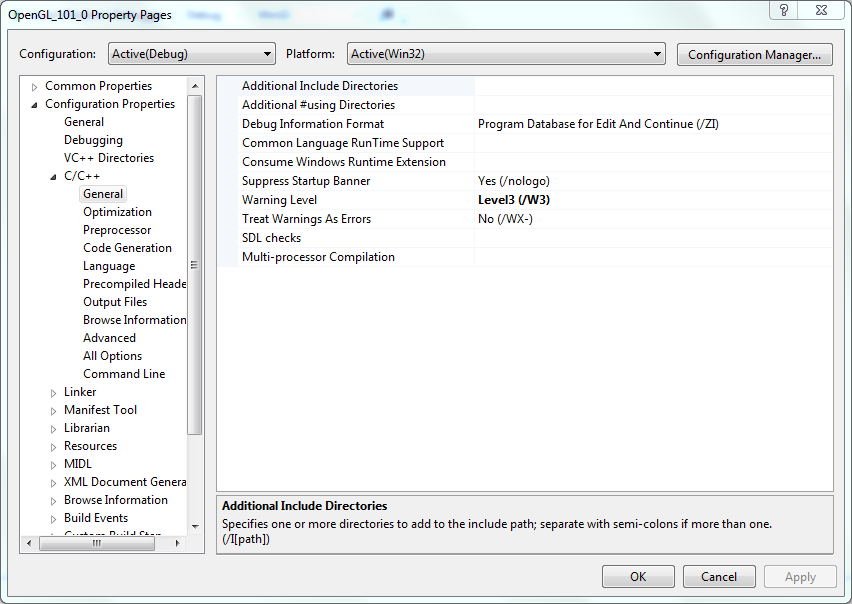
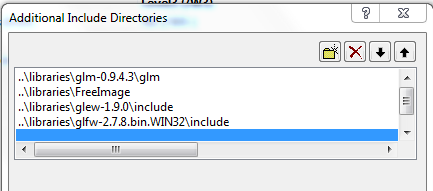
Back to VS now, right click on OpenGL_101_0 and select Properties. From the Configuration Properties select C/C++ −> General. We are going to add at the Additional Include Directories the header files of our four libraries:
Click on Additional Include Directories and select Edit. A new menu will pop that will allow you to insert the locations of the header files, press the New Line button and browse for the location of GLFW, click on the library folder and select include. Repeat for GLEW, FreeImage and GLM. At the end of this step you should see something like:
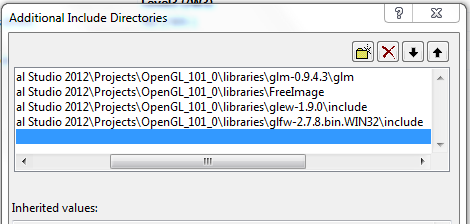
Any of these four lines are editable, click on them one by one and replace the path from the beginning of every line until the libraries with two dots. This is what you should see now:
Press OK and Apply.
Now, select Linker −> General −> Additional Library Directories, chose Edit and add, like before, the location of the binary libraries for GLFW, GLEW and FreeImage. Edit the resulting three lines like before, this is what you should see:
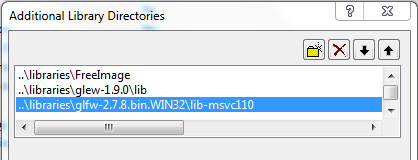
Press OK and Apply.
One last step, select Linker −> Input −> Additional Dependencies, chose Edit and add the names of the three binary libraries, one per lines: GLFW.lib, glew32.lib, FreeImage.lib and a library from Windows opengl32.lib. This is what you should see:
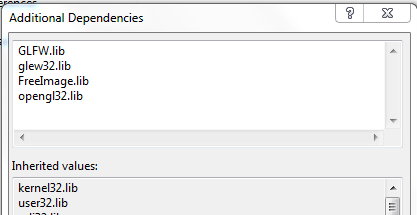
Press OK, Apply and OK.
Now, back to coding, add a new C++ source file to the project (right click on OpenGL_101_0 −> Source Files), you can give a name to this file, something like ex_0.cpp. Copy the above OpenGL code in ex_0.cpp.
You could press the F7 key or select BUILD −> Build Solution. If you’ve correctly executed the above steps the build should be successful.
Be sure to copy FreeImage.dll and glew32.dll in the Debug folder from your project folder.
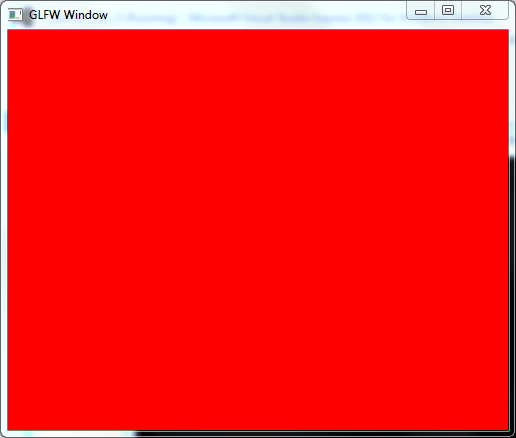
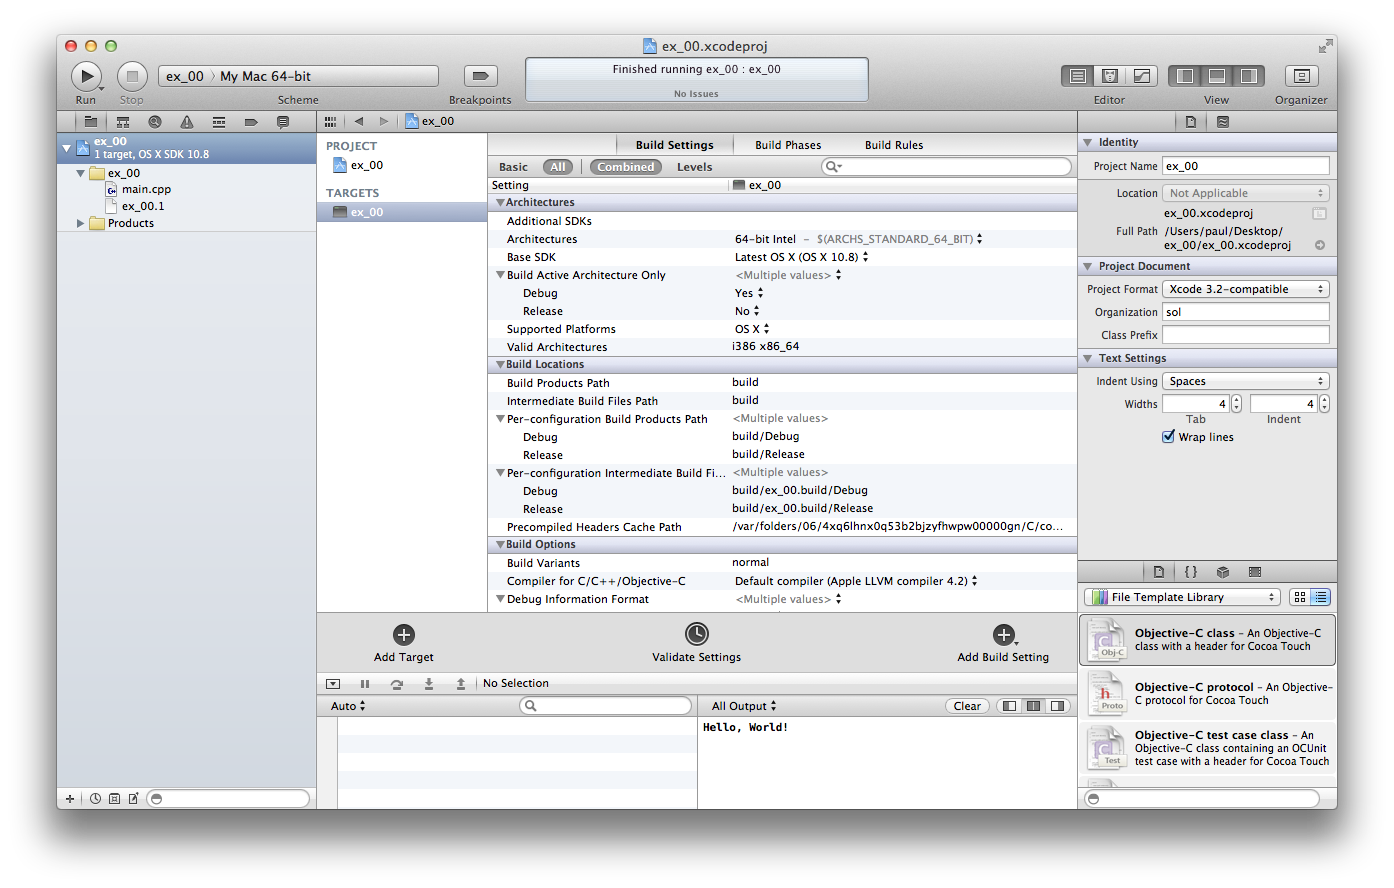
Finally, we can run the code, press CTRL+F5 or select Debug −> Start without debugging, you should see a nice, filled with red, window :):
Now, that you have a working project, you can simply copy the project folder, OpenGL_101_0, when you want to start a new project. You will need to change the name of the project, say OpenGL_101_1, and replace the source ex_0.cpp with new code.
Please note that we don’t actually need to link with GLEW and FreeImage for this simple code, I’ve included everything in the project for your convenience. This way, later, you won’t have link errors when your code will use functions from GLEW and FreeImage.
Jump to Fine tunning the GLFW window code.
Start by downloading the 32 bits binary versions of GLFW and FreeImage. We’ll need the source code for GLEW, download the zip source code from the above url. You can also download GLM, this is a header only library.
MinGW can be installed by following the next recipe:
-
Get the latest mingw-get-inst currently this is mingw-get-inst-20120426.exe. Start the installer.
-
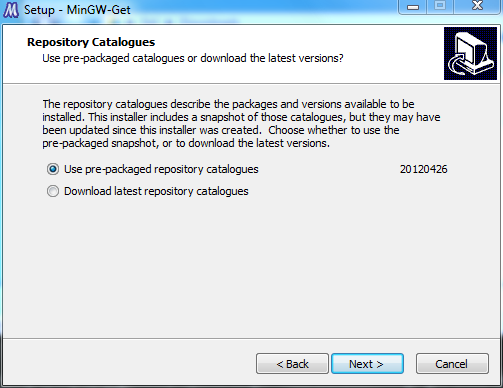
Select Download latest repository catalogues when asked:
-
next next …
-
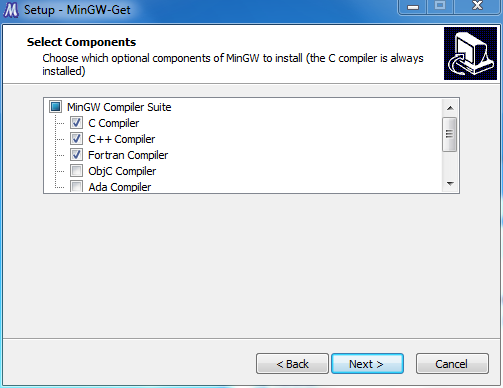
From the Select Components, select C Compiler, C++ Compiler, Fortran Compiler, MSYS Basic System, MinGW Developer ToolKit:
- next … next …
After a few minutes you should end up with MinGW installed in C:\MinGW.
-
Go to C:\MinGW\msys\1.0 and double click msys.bat, at the first run this will create a new folder in the home directory. On my machine the new folder is named Sol. This is the place where you will keep all your files, your home folder in Unix terminology.
-
For convenience you can create a shortcut to msys.bat on your Desktop.
Every time that you want to use MinGW, just double click the above msys.bat, this will open a Command Prompt window in which you will be able to compile your C, C++ or Fortran code with GCC.
Now we can install GLFW, GLEW and FreeImage downloaded at the first step, extract the archives.
Open GLFW and copy the content of the include\GL directory (glfw.h) to C:\MinGW\include\GL. You will also need to copy the content of the folder lib-mingw (libglfw.a, libglfwdll.a and glfw.dll) in C:\MinGW\lib. Copy glfw.dll to C:\MinGW\bin.
Open FreeImage and from the Dist folder copy FreeImage.h to C:\MinGW\include. Copy FreeImage.lib to C:\MinGW\lib and FreeImge.dll to C:\MinGW\bin.
Open GLM and copy the entire glm folder to C:\MinGW\include.
Extract the GLEW sources and copy the extracted folder in your MinGW home folder. We’ll need to compile GLEW on MinGW. Write the next two lines in your MinGW console window:
1 cd glew*
2 env CC=gcc GLEW_DEST=/c/mingw make install
Now, you should have everything properly installed.
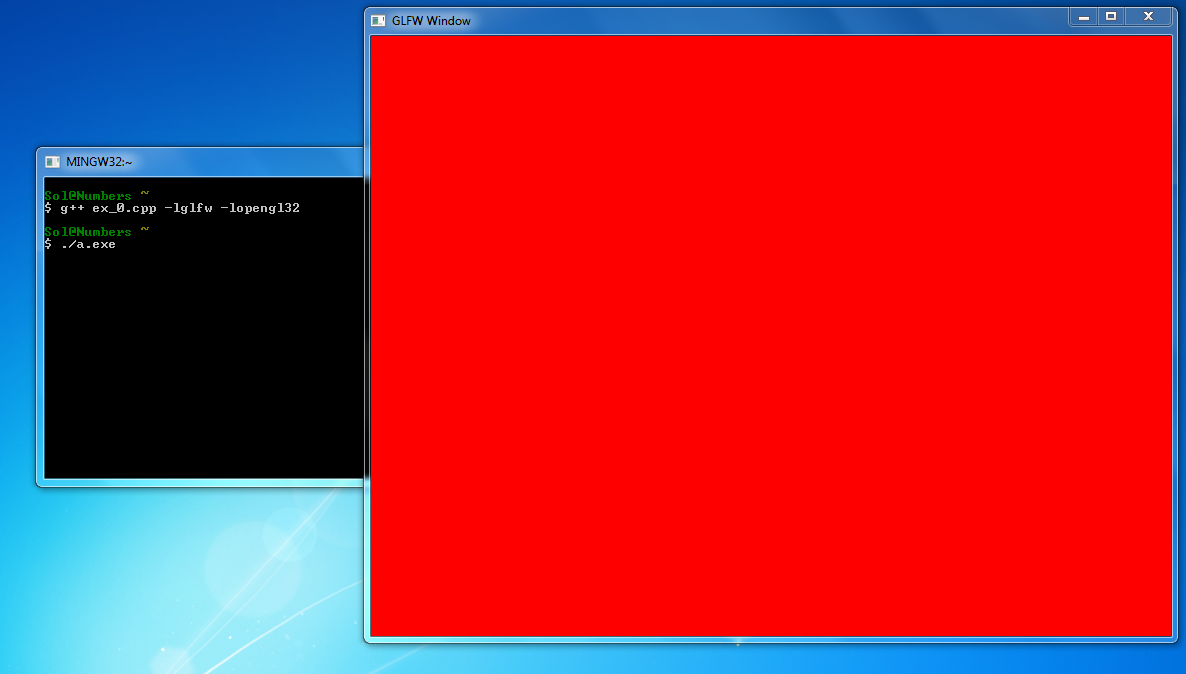
Let’s check if everything works as expected. Create a new file, ex_0.cpp, in your home folder and copy or paste the above C++ code, save the file.
Write in the MinGW console window:
1 g++ ex_0.cpp -lglfw -lopengl32and execute the code:
1 ./a.exeThis is what you should see:
If you need to link with GLEW and FreeImage use this command:
1 g++ your_program_name.cpp -lglfw -lglew32 -lfreeimage -lopengl32Jump to Fine tunning the GLFW window code.
I suppose that you have Xcode installed on your machine and the Command Line Tools. Download the source files for GLFW, GLEW and FreeImage. You can also download GLM, which is a header only library. Once you downloaded and unarchived the above packages, you will need to compile and install them. Alternatively, you could use a package manager like Homebrew or MacPorts. Personally, I like to have full control over what, and where, I install a library on my machine.
If you prefer to create a Xcode project go to the next section. First, I will show you how to use the Command Line Tools to compile a code that uses OpenGL.
The default place to install user libraries on OS X is /usr/local.
Open a Terminal and go to the folder where you have GLM, this is a header only library and all we have to do in order to install it is to copy the headers in the right place:
1 	cd glm-*
2 	sudo cp -r glm /usr/local/include
Go back one folder, enter in the GLEW folder, compile and install the library with:
1 	cd ..
2 	cd glew-*
3 	sudo env CC=clang SYSTEM=darwin-x86_64 GLEW_DEST=/usr/local make install
Now, we can compile and install GLFW:
1 	cd ..
2 	cd glfw-*
3 	env CC=clang make cocoa
4 	sudo make cocoa-install
See my Github repository for compiling FreeImage for OS X: https://github.com/sol-prog/FreeImage-OSX.
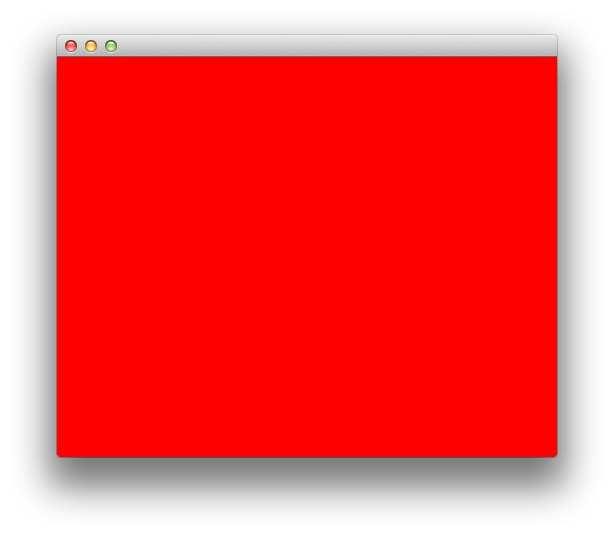
For compiling an OpenGL based code on OS X, we could simply use the Command Line Tools from Xcode. Copy the above code in a file named ex_0.cpp. If ex_0.cpp is in your Home folder you can compile and run the code with:
1 	cd ~
2 	clang++ -Wall ex_0.cpp -lglfw -framework Cocoa -framework OpenGL -framework IOKit
3 	./a.out
This is what you should see:
If your code needs to be linked with GLEW, add -lglew to the above line; for FreeImage you will need to add -lfreeimage.
Jump to Fine tunning the GLFW window code.
Let’s start by creating a new folder, third_party, on our Desktop, we’ll use this folder to store the third party libraries. Inside this folder create two other folders: include and lib.
Open a Terminal, go to the folder where you have GLFW and paste the next line:
1 env CC=clang make cocoaNow, open the GLFW folder in Finder and copy the content of the include folder in the third_party/include. Go back to the GLFW folder in lib/cocoa and copy libglfw.a to third_party/lib.
From your Terminal, go the location of the GLEW folder and write the next line:
1 env CC=clang SYSTEM=darwin-x86_64 makeOpen your GLEW folder and copy the content of include/GL to third_party/include/GL. You will also need to copy libGLEW.a from the lib folder to third_party/lib.
Compiling FreeImage is a bit more involved, you will need to copy the content of Makefile.osx from here and replace the content of the original file from your FreeImage folder. You will also need to add:
1 #include <string.h>to ImfAutoArray.h, this file is located in Source/OpenEXR/IlmImf/ in your FreeImage folder.
From your Terminal go to the location of your FreeImage folder and do make. After this, open the Dist folder, copy FreeImage.h to third_party/include and libreeimage.a to third_party/lib.
GLM is a header only library, no compilation is necessary, open your GLM folder and copy glm to third_party/include.
Start Xcode and create a new project, select OS X −> Application −> Command Line Tool and press Next. Be sure to chose C++ for Type on the next panel and uncheck Use Automatic Reference Counting, press Next. On the next panel chose Create, you should end up with something similar with:
If you find yourself in trouble creating a C++ Xcode project, see my previous article on this subject.
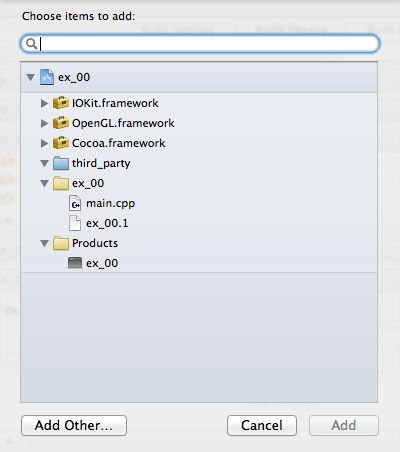
Now, let’s add the third_party library to our project. Right click on the name of your project, select Add files to ex_00 (obviously this will contain the name you chose for your project):

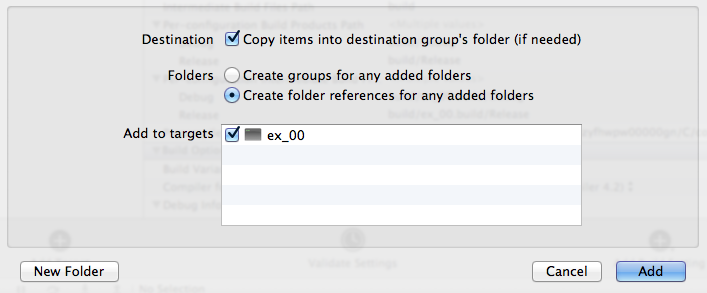
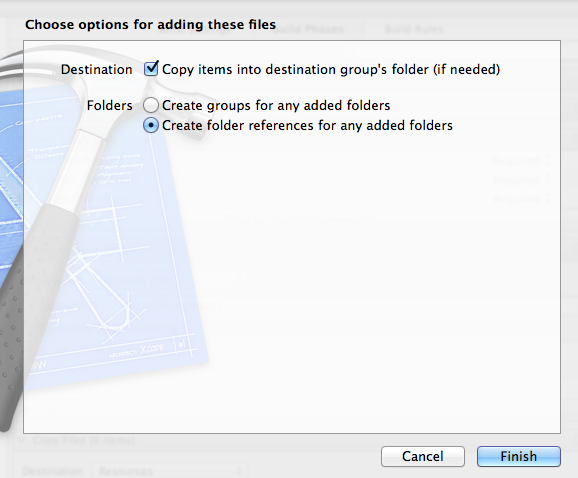
and browse for the location of the third_party folder, make sure you select Copy items into destination group’s folder (if needed) and Create folder references for any added folder and press Add:
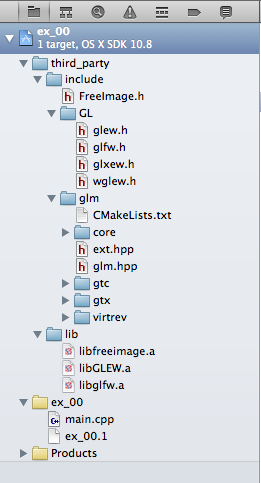
Now, the third_party folder should be added to your project. This is what you should see if you select all sub-folders from third_party in the left panel of the Xcode project:
Next step is to add the header files and libraries from third_party to the project search path. Click the name of your project and select Build Settings in the right panel:

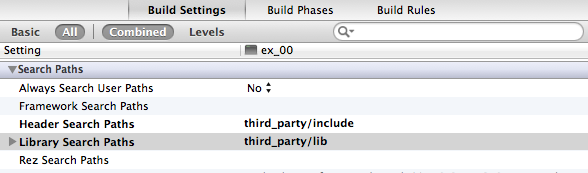
Scroll in the above right panel until you find the Search Paths tab, click on Header Search Paths and add third_party/include. Click on Library Search Paths and add third_party/lib. This is what you should see:
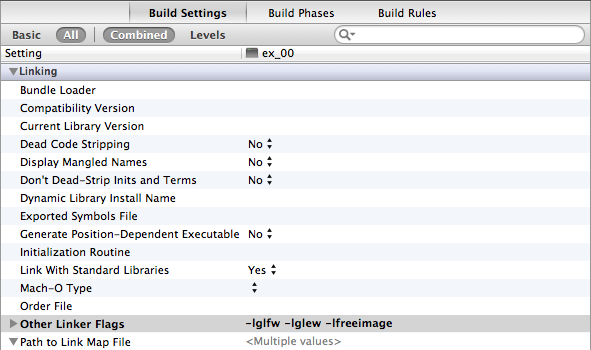
Now, scroll again in the Build Setings panel until you find Linking, select Other Linker Flags and add:
1 -lglfw -lglew -lfreeimageThis is what you should see:
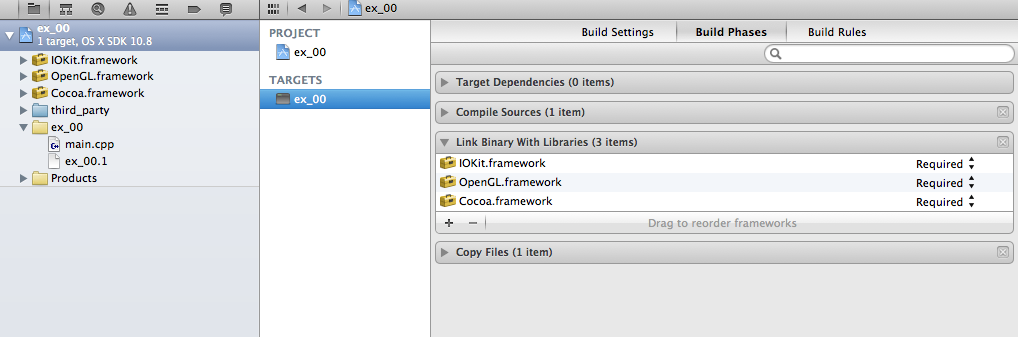
Now, select Build Phases and Link Binary With Libraries, use the + sign to add Cocoa.framework, OpenGL.framework and IOKit.framework:
Let’s add the code from the first part of this article. In the left panel of your project click on main.cpp and replace the default code with the code for opening a window with GLFW:

If you press Run, this is what you should see:

Next step is not required for this article, but you will need to know how to do this for the next tutorials. Say that you want to add some text files or images that your code will read at run time, if your assets are in a folder named … assets you can add them to the project with the next procedure:
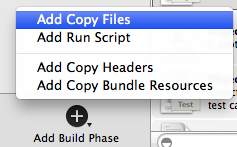
Click on the name of your project and select Build Phases, press Add Build Phase from the lower right corner (the big + sign) and select Add Copy Files:
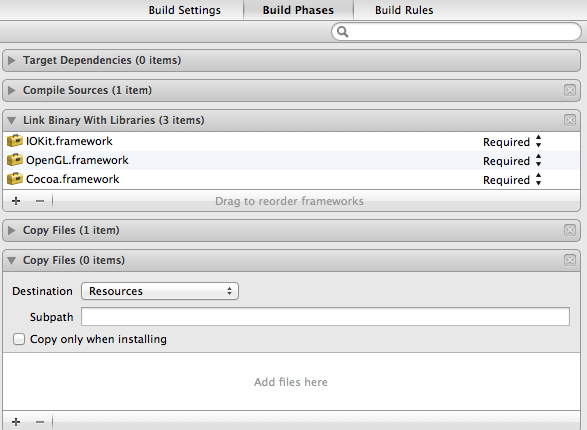
Now, select Copy Files, make sure that at Destination you have Resources selected and use the + button to add the assets folder. This will open a new window where you will select Add Other:
After you press Add Other, browse for the location of your assets folder and select Open. Make sure you select Copy items into destination group’s folder (if needed) and Create folder references for any added folder and press Finish:
This will copy assets to your project folder and will add the necessary references for your project.
Jump to Fine tunning the GLFW window code.
I suppose that you have working graphical drivers, gcc and g++ installed on your machine. In my case, I was forced to install the closed source drivers from NVIDIA in order to be able to use OpenGL for development.
Install GLFW, GLEW, GLM and FreeImage with:
1 sudo apt-get install libglfw-dev libglew-dev libglm-dev libfreeimage-devCreate a new C++ source file, ex_0.cpp, and copy the above OpenGL code in ex_0.cpp.
You can compile and run this code with:
1 	g++ -Wall ex_0.cpp -lglfw -lGL
2 	./a.out
Please note, that we don’t actually need to link with GLEW and FreeImage for this simple code. If you need to link with GLEW add -lGLEW, for FreeImage add -lfreeimage to the above command line.
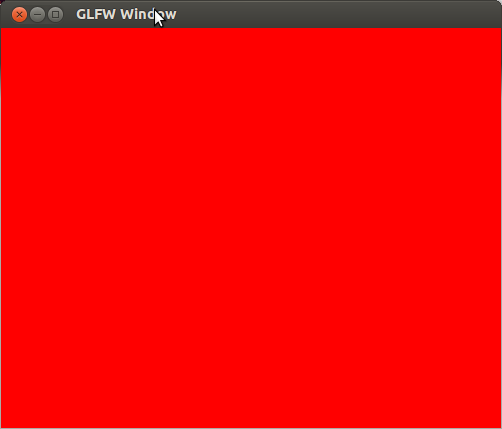
This is what you should see:
Fine tunning the GLFW window code
So, we have a window with a red background, how can we improve the code ? First thing that we need to do is to let the user close the application with a keyboard shortcut, say Q or q. How to do that ? GLFW lets us register callback functions that will be called when a certain event occur, like the user presses the Q or q key. We can pool for callbacks at the end of the while loop with glfwPollEvents().
We can register a callback function after a window is successfully open, see lines 11 and 19:
 1 	...
 2
 3 	// Open a window and attach an OpenGL rendering context to the window surface
 4 	if( !glfwOpenWindow(800, 600, 8, 8, 8, 0, 0, 0, GLFW_WINDOW)) {
 5 		std::cerr << "Failed to open a window! I'm out!" << std::endl;
 6 		glfwTerminate();
 7 		exit(-1);
 8 	}
 9
10 	// Register a callback function for keyboard pressed events
11 	glfwSetKeyCallback(keyboard);
12
13 	...
14
15 	while(running) {
16 		...
17
18 		// Pool for events
19 		glfwPollEvents();
20 		...
21 	}
22
23 	...
Where the callback function is:
1 void GLFWCALL keyboard(int key, int action) {
2 	if(key == 'Q' && action == GLFW_PRESS) {
3 		glfwTerminate();
4 		exit(0);
5 	}
6 }
Add the above piece of code to our first program, compile and run the code, see what is happening when you press Q or q.
Now, try another experiment, resize the window by using the resize button or by picking one of the window corners and dragging. Can you see the ugly effects of the window not being filled completely? Imagine what could happen if you’ve had an actual image drawn in the window. The problem is that the window background is not cleared during the resize event. We can register a callback function that will act when the window is resized with glfwSetWindowSizeCallback:
 1 	...
 2
 3 	// Open a window and attach an OpenGL rendering context to the window surface
 4 	if( !glfwOpenWindow(800, 600, 8, 8, 8, 0, 0, 0, GLFW_WINDOW)) {
 5 		...
 6 	}
 7
 8 	// Register a callback function for keyboard pressed events
 9 	glfwSetKeyCallback(keyboard);
10
11 	// Register a callback function for window resize events
12 	glfwSetWindowSizeCallback( window_resized );
13
14 	...
Where the callback function is:
1 void GLFWCALL window_resized(int width, int height) {
2 	glClearColor(1, 0, 0, 1);
3 	glClear(GL_COLOR_BUFFER_BIT);
4 	glfwSwapBuffers();
5 }
Add the above code to the latest version of our example, run the code and try to resize the window again.
GLFW also has a function, glfwGetGLVersion, that lets us check which version of OpenGL is the default version used on our machine:
1 	...
2 	// Print the OpenGL version
3 	int major, minor, rev;
4 	glfwGetGLVersion(&major, &minor, &rev);
5 	std::cout << "OpenGL - " << major << "." << minor << "." << rev << std::endl;
6 	...
In order for the above piece of code to work as expected, you need to use it after a window was successfully created.
The complete code with the two callback functions and the check for the default OpenGL version is on the Github repository for this article, saved as ex_1.cpp.
For e.g. on my old MacBook Pro with Mountain Lion the default version of OpenGL reported by the above code is 2.1 even if my machine fully supports OpenGL 3.2. On my Linux/Windows machine, the default version of OpenGL is 4.2.
We clearly need a way to check for a minimum supported version of OpenGL on the target machine. With GLFW we can use a set of hints that will try to get a context for a specific version of OpenGL. The next piece of code must be placed before opening a window, otherwise the default OpenGL version will be used:
1 	...
2 	// Use OpenGL 3.2 core profile
3 	glfwOpenWindowHint(GLFW_OPENGL_PROFILE, GLFW_OPENGL_CORE_PROFILE);
4 	glfwOpenWindowHint(GLFW_OPENGL_FORWARD_COMPAT, GL_TRUE);
5 	glfwOpenWindowHint(GLFW_OPENGL_VERSION_MAJOR, 3);
6 	glfwOpenWindowHint(GLFW_OPENGL_VERSION_MINOR, 2);
7
8 	// Open a window and attach an OpenGL rendering context to the window surface
9 	...
The above piece of code asks for minimum version of OpenGL on the target machine and it also asks only for functions from the core profile of OpenGL to be available. OpenGL currently has a compatibility profile that contains the latest OpenGL improvements and the functionality that was marked as deprecated and it is not recommended to be used anymore, like the fixed function pipeline. The above code ensures that we won’t be able to use, by accident, any of the deprecated functionality.
Unfortunately, removing the deprecated functionality is not enough. We need a way to call the new functions from OpenGL. On Windows and Linux we can’t access in a simple way these new functions, simple in this context means that we can’t access the new OpenGL functions if we include only the <glfw.h> header in our code. In order to be able to access the new OpenGL functions in a simple and portable way we could use GLEW which will map for us the standard names for the new OpenGL functions to the names used by the OS implementation.
The <glew.h> header must be included before the <glfw.h> header, GLEW needs to be initialized after the window was created:
 1 #include <GL/glew.h>
 2 #include <GL/glfw.h>
 3 #include <cstdlib>
 4 #include <iostream>
 5
 6 ...
 7
 8 	// Use OpenGL 3.2 core profile
 9 	glfwOpenWindowHint(GLFW_OPENGL_PROFILE, GLFW_OPENGL_CORE_PROFILE);
10 	glfwOpenWindowHint(GLFW_OPENGL_FORWARD_COMPAT, GL_TRUE);
11 	glfwOpenWindowHint(GLFW_OPENGL_VERSION_MAJOR, 3);
12 	glfwOpenWindowHint(GLFW_OPENGL_VERSION_MINOR, 2);
13
14 	// Open a window and attach an OpenGL rendering context to the window surface
15 	if( !glfwOpenWindow(800, 600, 8, 8, 8, 0, 0, 0, GLFW_WINDOW)) {
16 		std::cerr << "Failed to open a window! I'm out!" << std::endl;
17 		glfwTerminate();
18 		exit(-1);
19 	}
20
21 	...
22
23 	// Initialize GLEW
24 	glewExperimental = GL_TRUE;
25 	if(glewInit() != GLEW_OK) {
26 		glfwTerminate();
27 		exit(EXIT_FAILURE);
28 	}
29
30 	// Create a rendering loop
31 	...
Let’s check if GLEW actually allow us to use one of the new OpenGL functions like glGenBuffers, this function is not accessible by default on Windows and Linux. The next piece of code must be added after GLEW was initialized:
1 	GLuint buffer;
2 	glGenBuffers(1, &buffer);
You can find the complete code, with GLEW initialization, as ex_3.cpp on the Github repository. The code will run similarly on Windows, Linux and OS X.
For the sake of argument ex_3B.cpp tries to use glGenBuffers without initializing GLEW first, on Windows and Linux the code won’t even compile.
In the next article we are going to actually draw something on the screen.
All posts from this series:
- OpenGL 101: Windows, OS X and Linux - Getting Started
- OpenGL 101: Drawing primitives - points, lines and triangles
- OpenGL 101: Textures
- OpenGL 101: Matrices - projection, view, model
If you are interested to learn more about OpenGL, I would recommend reading OpenGL SuperBible by G. Sellers, S Wright and N. Haemel:

or
OpenGL Programming Guide by D. Shreiner, G. Sellers, J. M. Kessenich, B. M. Licea-Kane: