C++17 - Draw a Valentine's Day heart shape
Posted on February 14, 2019 by Paul
What could be more romantic than to generate a heart shape with C++17 on Valentine’s Day ?
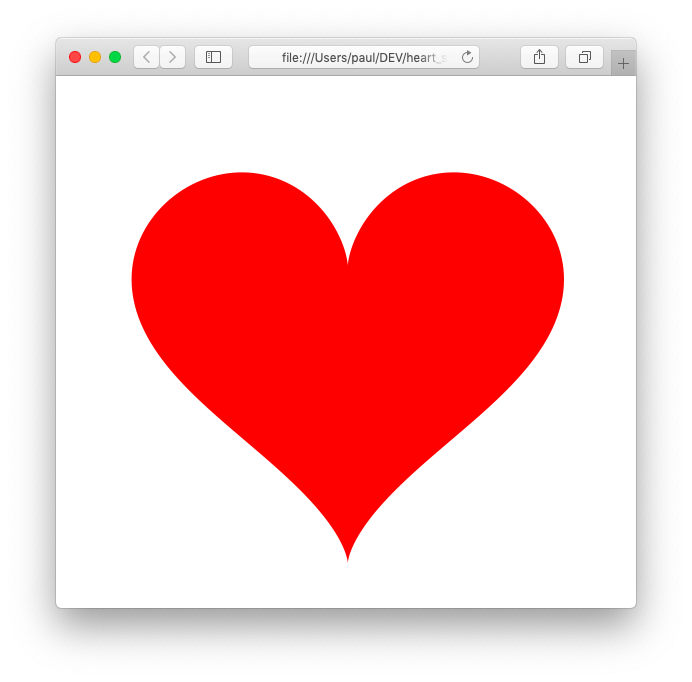
In order to generate the above shape we can use the parametric form of the outer curve:
\[x(t) = 16 \cdot sin(t)^3;\] \[y(t) = 13 \cdot cos(t) - 5 \cdot cos(2 \cdot t) - 2 \cdot cos(3 \cdot t) - cos(4 \cdot t);\]where
\[t \in [0, 2 \cdot \pi]\]Using the above equations, we can generate the x, y points of the heart curve. In order to actually draw the points, we can use a third party graphics library or, if we want a simpler, self-contained code, we can write the points as an image. In this article, I will show you how to write the points as an SVG image embedded in a html page. The advantage of this approach is that you will be able to see the generated shape in any modern web browser. If you prefer to generate a BMP image check my previous article.
We want to be able to write something like this:
 1 #include <iostream>
 2 #include <vector>
 3 #include <algorithm>
 4 #include <cmath>
 5 #include <tuple>
 6
 7 std::tuple<std::vector<double>, std::vector<double>> generate_points(const int no_pieces) {
 8     // ...
 9 }
10
11 void write_html_svg(/* ... */) {
12     // ...
13 }
14
15 int main() {
16     // Generate the heart curve points
17     int no_pieces = 300;
18     auto [vx, vy] = generate_points(no_pieces);
19
20     // ...
21
22     // Write the output to stdout
23     write_html_svg(/* ... */);
24 }
Please note, that line 18 from the above code uses structured bindings declaration that requires a C++17 compatible compiler. Basically, we use the vx and vy references as aliases instead of the more clunky std::tuple syntax.
Let’s write the code that generates the curve points. We’ll divide the \([0, 2 \cdot \pi]\) interval in equal \(2 \cdot \pi / no\_pieces\) pieces.
 1 // ...
 2
 3 std::tuple<std::vector<double>, std::vector<double>> generate_points(const int no_pieces) {
 4     std::vector<double> vx, vy;
 5
 6     constexpr double PI = 3.14159265358979323846264338327950288;
 7     double dt = 2.0 * PI / no_pieces;
 8
 9     for(double t = 0.0; t <= 2.0 * PI ; t += dt) {
10         vx.emplace_back(16.0 * sin(t) * sin(t) * sin(t));
11         vy.emplace_back(13.0 * cos(t) - 5.0 * cos(2.0 * t) - 2.0 * cos(3.0 * t) - cos(4.0 * t));
12     }
13
14     return std::make_tuple(vx, vy);
15 }
16
17 // ...
Once we’ve generated the curve points, we need to flip the Y coordinates because, like most image formats, SVG has the Y axis pointing down. We can do this in the main function:
 1 // ...
 2
 3 int main() {
 4     // Generate the heart curve points
 5     int no_pieces = 300;
 6     auto [vx, vy] = generate_points(no_pieces);
 7
 8     // Reverse Y axis direction
 9     std::for_each(std::begin(vy), std::end(vy), [](double &y){ y = -y; });
10
11     // Write the output to stdout
12     write_html_svg(/* ... */);
13 }
Next, we’ll write the function that will save the shape as an SVG image embedded in a html page. I’ve commented the function to make it easier to understand. If you want to learn more about generating SVG shapes check this MDN tutorial.
 1 // ...
 2
 3 void write_html_svg(std::ostream &out, const std::vector<double> &vx, const std::vector<double> &vy, const int width, const int height) {
 4     // Get the heart bounding box
 5     const auto [xmin, xmax] = std::minmax_element(std::begin(vx), std::end(vx));
 6     const auto [ymin, ymax] = std::minmax_element(std::begin(vy), std::end(vy));
 7
 8     // HTML boilerplate
 9     out << "<!DOCTYPE html>\n" << "<html>\n" << "<body>\n\n";
10
11     // Write the data in SVG format:
12     // define a width x height area  and zoom in the data points using the data bounding box to fill the SVG vewBox
13     out << "<svg height=\"" << height << "\" width=\"" << width << "\" viewBox=\"";
14
15     // Use the "offset" variable to add some extra space around the shape
16     const double offset = 5.0;
17
18     out << *xmin - offset << ' ' << *ymin - offset << ' ' << (*xmax - *xmin) + offset << ' ' << (*ymax - *ymin) + offset;
19     out << "\">\n";
20
21     // Write the points in pairs and draw a SVG polyline
22     out << "<polyline points=\"";
23
24     for(size_t i = 0, no_points = vx.size(); i < no_points; ++i) {
25         out << vx[i] << ',' << vy[i] << ' ';
26     }
27
28     // fill the polyline with red
29     out << "\" style=\"fill:red;stroke:none;\" />\n";
30
31     out << "</svg>\n";
32
33     // HTML boilerplate
34     out << "\n</body>\n" << "</html>\n";
35 }
36
37 // ...
The above function will write something like this, please note that the numeric output was truncated in order to fit on the page:
 1 <!DOCTYPE html>
 2 <html>
 3 <body>
 4
 5 <svg height="500" width="500" viewBox="-21 -16.922 37 33.922">
 6 <polyline points="0,-5 ... -1.11092e-39,-5 " style="fill:red;stroke:none;" />
 7 </svg>
 8
 9 </body>
10 </html>
Finally, we can call the write_html_svg from main like this:
1 // ...
2
3 int main() {
4     // ...
5
6     // Write the output to stdout
7     write_html_svg(std::cout, vx, vy, 500, 500);
8 }
I’ve tested the code with GCC 8, Clang 7 and MSVC 2017. Here is how you can compile the code with the above compilers (use the command that matches your compiler):
1 g++ -std=c++17 -Wall -pedantic -O2 -march=native heart.cpp -o heart
2 clang++ -std=c++17 -Wall -pedantic -O2 -march=native heart.cpp -o heart
3 cl /std:c++17 /EHsc /W4 /permissive- /O2 heart.cpp /link /out:heart.exe
This is how you can compile and run the code on macOS (or Linux):
1 ~ $ clang++ -std=c++17 -Wall -pedantic -O2 -march=native heart.cpp -o heart
2 ~ $ ./heart > heart.html
3 ~ $
On Windows, with Visual Studio installed, open a Visual Studio Command Prompt and do something like this (I assume that the code is in the C:\Tests folder):
1 C:\Tests>cl /std:c++17 /EHsc /W4 /permissive- /O2 heart.cpp /link /out:heart.exe
2 C:\Tests>heart.exe > heart.html
3 C:\Tests>
Once the heart.html file is generated, open it in your browser and you should see something similar with the image from the beginning of this article.
You can find the complete source code on the GitHub repository for this article.
If you are interested to learn more about modern C++ I would recommend reading A tour of C++ by Bjarne Stroustrup.
or Effective Modern C++ by Scott Meyers.