Raspberry Pi Zero Internet connection through USB
Posted on December 7, 2018 by Paul
This is a short article about sharing your Internet connection through USB with a Raspberry Pi Zero. The procedure presented here will work with all versions of Raspberry Pi Zero (with or without onboard WiFi). You will need a Raspberry Pi Zero, a micro SD card and a USB to micro USB data cable.
Start by downloading the latest Raspbian image, I’ve used Raspbian Stretch Lite. Once the download is finished, extract the archive and flash it to your micro SD card. The Etcher flasher app works on macOS, Windows and Linux.
After you’ve flashed the SD card you will need to edit two files on this. I strongly suggest to use a proper text editor, e.g. Sublime Text, VS Code, Notepad++, Vim, Emacs and so on. Reinsert the SD card if it was ejected after was flashed and open config.txt, add the next line to the end of the file:
1 dtoverlay=dwc2save and close the file.
Open cmdline.txt, this file has all parameters on a single line, separated by a single space, make sure to not add extra line endings or more than one space. Find the rootwait parameter and add a new parameter after it:
1 modules-load=dwc2,g_etherplease note that in the above there is no space. Save and close the file.
Create an empty file named ssh on the SD card.
Note, if you are on Windows, you will need to install Bonjour Print Services.
Next, connect Raspberry Pi Zero to your computer through the USB cable, make sure this is inserted in the USB data port of your Pi and not in the power port. Wait about a minute and open a Terminal or, if you are on Windows, a Command Prompt and write:
1 ping -c 5 raspberrypi.localor, if you are on Windows:
1 ping -n 5 raspberrypi.localThis is what I see on my Mac:
 1 ~ $ ping -c 5 raspberrypi.local
 2 PING raspberrypi.local (169.254.197.105): 56 data bytes
 3 64 bytes from 169.254.197.105: icmp_seq=0 ttl=64 time=0.492 ms
 4 64 bytes from 169.254.197.105: icmp_seq=1 ttl=64 time=0.439 ms
 5 64 bytes from 169.254.197.105: icmp_seq=2 ttl=64 time=0.482 ms
 6 64 bytes from 169.254.197.105: icmp_seq=3 ttl=64 time=0.436 ms
 7 64 bytes from 169.254.197.105: icmp_seq=4 ttl=64 time=0.544 ms
 8
 9 --- raspberrypi.local ping statistics ---
10 5 packets transmitted, 5 packets received, 0.0% packet loss
11 round-trip min/avg/max/stddev = 0.436/0.479/0.544/0.040 ms
12 ~ $
This is the result of pinging the Pi Zero on a Windows machine:
 1 C:\Users\pauls>ping -n 5 raspberrypi.local
 2
 3 Pinging raspberrypi.local [fe80::8200:2e6d:9cfa:9be5%53] with 32 bytes of data:
 4 Reply from fe80::8200:2e6d:9cfa:9be5%53: time<1ms
 5 Reply from fe80::8200:2e6d:9cfa:9be5%53: time<1ms
 6 Reply from fe80::8200:2e6d:9cfa:9be5%53: time<1ms
 7 Reply from fe80::8200:2e6d:9cfa:9be5%53: time<1ms
 8 Reply from fe80::8200:2e6d:9cfa:9be5%53: time<1ms
 9
10 Ping statistics for fe80::8200:2e6d:9cfa:9be5%53:
11     Packets: Sent = 5, Received = 5, Lost = 0 (0% loss),
12 Approximate round trip times in milli-seconds:
13     Minimum = 0ms, Maximum = 0ms, Average = 0ms
14
15 C:\Users\pauls>
At this point, you should be able to use ssh to connect to your Pi Zero:
1 ssh pi@raspberrypi.localthe default password is raspberry.
Note, if you are on Windows 10 1803 or newer you should be able to use directly ssh in a Command Prompt. For older versions of Windows you can install PuTTY or other ssh client.
Next, I will show you how to share your computer Internet connection with the Pi Zero.
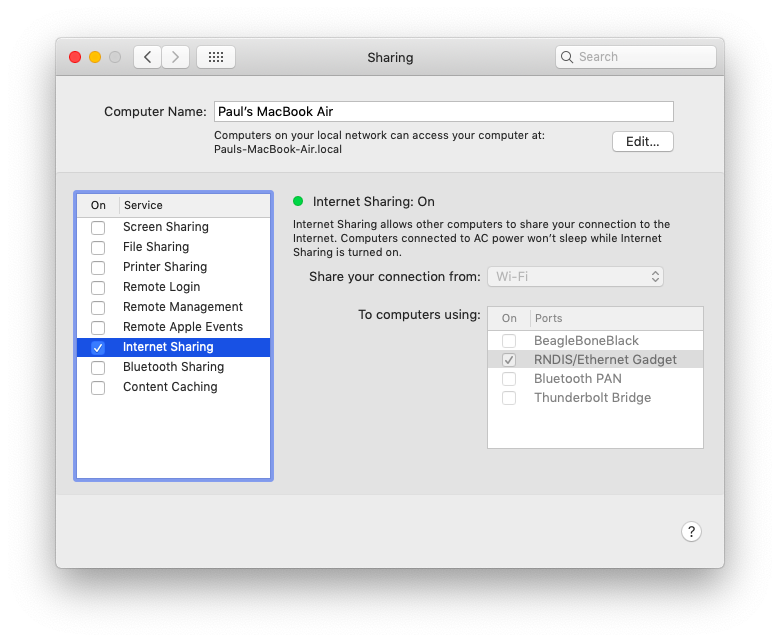
If you are on macOS, open System Preferences, go to Sharing and check RNDIS/Ethernet Gadget and Internet Sharing:

Answer Yes when asked if you want to start sharing the Internet.
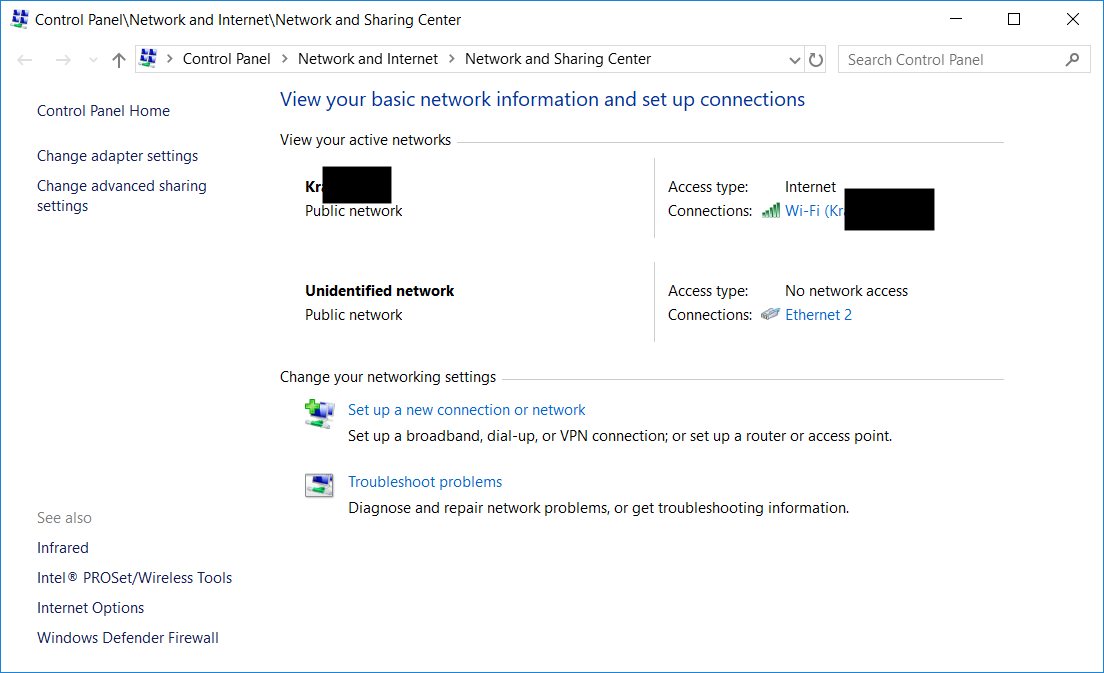
If you are on Windows, go to Settings, Network & Internet and select Network and Sharing Center. Next, click on your main Internet connection:

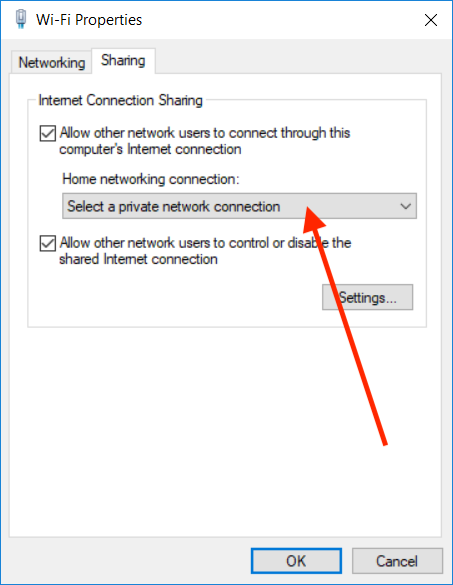
and go to Properties, Sharing. Select Allow other network users to connect through this computer’s Internet connection and from the drop down menu select one of the Ethernet options:

in my case Pi Zero was connected to Ethernet 2. Press OK.
Next, on your Pi Zero, check if you can access the Internet, e.g.:
1 ping -c 5 www.google.comThis is what I see on my device:
 1 pi@raspberrypi:~ $ ping -c 5 www.google.com
 2 PING www.google.com (172.217.10.68) 56(84) bytes of data.
 3 64 bytes from lga34s14-in-f4.1e100.net (172.217.10.68): icmp_seq=1 ttl=56 time=20.8 ms
 4 64 bytes from lga34s14-in-f4.1e100.net (172.217.10.68): icmp_seq=2 ttl=56 time=21.6 ms
 5 64 bytes from lga34s14-in-f4.1e100.net (172.217.10.68): icmp_seq=3 ttl=56 time=23.2 ms
 6 64 bytes from lga34s14-in-f4.1e100.net (172.217.10.68): icmp_seq=4 ttl=56 time=21.9 ms
 7 64 bytes from lga34s14-in-f4.1e100.net (172.217.10.68): icmp_seq=5 ttl=56 time=36.2 ms
 8
 9 --- www.google.com ping statistics ---
10 5 packets transmitted, 5 received, 0% packet loss, time 4004ms
11 rtt min/avg/max/mdev = 20.871/24.804/36.276/5.790 ms
12 pi@raspberrypi:~ $
If you want to learn more about Raspberry Pi, a very good book is Exploring Raspberry Pi by Derek Molloy:
