Python OpenCV - show a video in a Tkinter window
Posted on April 21, 2018 by Paul
In my last tutorial I’ve shown you how to create a minimal Tkinter application: load an image with OpenCV, plot the image on a Tkinter window and apply a blur filter when the user presses a button. Another interesting application is to show a camera feed or an exiting video on a Tkinter window.
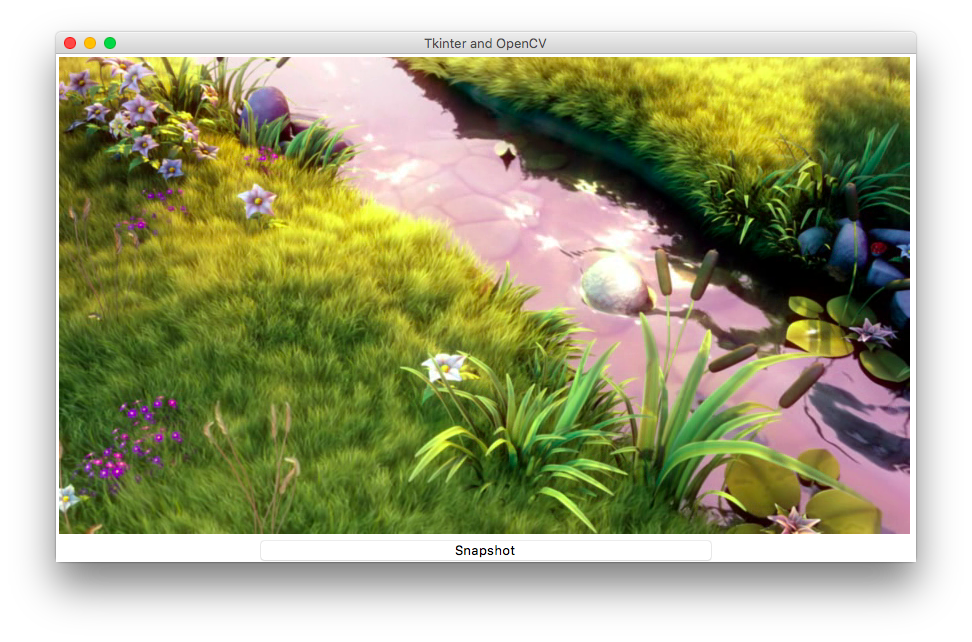
Please note that the video from the above screenshot is (c) copyright 2008, Blender Foundation www.bigbuckbunny.org, you can find it at this address, if you want to use it for tests.
We are going to start with a clean version of the last example from our previous tutorial:
 1 import tkinter
 2 import cv2
 3
 4 class App:
 5     def __init__(self, window, window_title):
 6         self.window = window
 7         self.window.title(window_title)
 8
 9         self.window.mainloop()
10
11 # Create a window and pass it to the Application object
12 App(tkinter.Tk(), "Tkinter and OpenCV")
the above code will show an empty Tkinter window.
Next, we’ll use the VideoCapture class from OpenCV to open a video, get the video width and height, and make sure that the video source is released when the object is destroyed:
 1 class MyVideoCapture:
 2     def __init__(self, video_source=0):
 3         # Open the video source
 4         self.vid = cv2.VideoCapture(video_source)
 5         if not self.vid.isOpened():
 6             raise ValueError("Unable to open video source", video_source)
 7
 8         # Get video source width and height
 9         self.width = self.vid.get(cv2.CAP_PROP_FRAME_WIDTH)
10         self.height = self.vid.get(cv2.CAP_PROP_FRAME_HEIGHT)
11
12     # Release the video source when the object is destroyed
13     def __del__(self):
14         if self.vid.isOpened():
15             self.vid.release()
16         self.window.mainloop()
We can use the read method of the VideoCapture class to get a frame from the video source:
 1 class MyVideoCapture:
 2     # ...
 3
 4     def get_frame(self):
 5         if self.vid.isOpened():
 6             ret, frame = self.vid.read()
 7             if ret:
 8                 # Return a boolean success flag and the current frame converted to BGR
 9                 return (ret, cv2.cvtColor(frame, cv2.COLOR_BGR2RGB))
10             else:
11                 return (ret, None)
12         else:
13             return (ret, None)
Now, we can create a MyVideoCapture object inside the App class and using the video source width, height create a Canvas big enough to show the entire video:
 1 import tkinter
 2 import cv2
 3
 4 class App:
 5     def __init__(self, window, window_title, video_source=0):
 6         self.window = window
 7         self.window.title(window_title)
 8         self.video_source = video_source
 9
10         # open video source
11         self.vid = MyVideoCapture(video_source)
12
13         # Create a canvas that can fit the above video source size
14         self.canvas = tkinter.Canvas(window, width = self.vid.width, height = self.vid.height)
15         self.canvas.pack()
16
17
18         self.window.mainloop()
19
20 # ...
If you run the above code, you should see an empty white window, big enough to show your webcam output. Closing the window will cleanly stop the webcam.
In order to actually see the camera output, we need to continuously get frames from the camera and plot these on the Canvas object. In a typical OpenCV application, you could write an infinite loop and get frames from the camera until the user closes the window. This is not advisable when mixing Tkinter with OpenCV! Tkinter, like most GUI libraries, has his own infinite loop that processes events and redraws the application window. A clean solution, that integrates well with Tkinter is to add an update method for the App class that is also passed to the after method of a Tkinter widget. In our case, we’ll use the window widget for this:
 1 import tkinter
 2 import cv2
 3
 4 class App:
 5 # ...
 6     def update(self):
 7         # ...
 8         # Do work here ...
 9         # ...
10
11         self.window.after(self.delay, self.update)
12 # ...
If you call the update method once, it will be registered as a callback function, by the window widget after method, and will be called every delay milliseconds. We can call the update method in the init method before starting the mainloop:
 1 import tkinter
 2 import cv2
 3
 4 class App:
 5     def __init__(self, window, window_title, video_source=0):
 6         # ...
 7
 8         # After it is called once, the update method will be automatically called every delay milliseconds
 9         self.delay = 15
10         self.update()
11
12         self.window.mainloop()
13
14 # ...
Now, that we have an update mechanism in place, we can get frames from the video source in the update method and plot these on the Canvas:
 1 import tkinter
 2 import cv2
 3 import PIL.Image, PIL.ImageTk
 4
 5 class App:
 6     # ...
 7
 8     def update(self):
 9         # Get a frame from the video source
10         ret, frame = self.vid.get_frame()
11
12         if ret:
13             self.photo = PIL.ImageTk.PhotoImage(image = PIL.Image.fromarray(frame))
14             self.canvas.create_image(0, 0, image = self.photo, anchor = tkinter.NW)
15
16         self.window.after(self.delay, self.update)
17
18 # ...
At this point, if you run the code, you should see the camera output drawn in the Tkinter window.
Like in our previous tutorial, let’s add a button that when pressed will do something with the video output. We can save the current video frame when the user presses this button. Add the button initialization code just before calling the update method:
 1 import tkinter
 2 import cv2
 3 import PIL.Image, PIL.ImageTk
 4
 5 class App:
 6     def __init__(self, window, window_title, video_source=0):
 7         # ...
 8
 9         # Button that lets the user take a snapshot
10         self.btn_snapshot=tkinter.Button(window, text="Snapshot", width=50, command=self.snapshot)
11         self.btn_snapshot.pack(anchor=tkinter.CENTER, expand=True)
12
13         # After it is called once, the update method will be automatically called every delay milliseconds
14         self.delay = 15
15         self.update()
16
17         self.window.mainloop()
18
19 # ...
When the Snapshot button is pressed, the snapshot method will be called. Let’s write the code for the snapshot method:
 1 import tkinter
 2 import cv2
 3 import PIL.Image, PIL.ImageTk
 4 import time
 5
 6 class App:
 7     # ...
 8
 9     def snapshot(self):
10         # Get a frame from the video source
11         ret, frame = self.vid.get_frame()
12
13         if ret:
14             cv2.imwrite("frame-" + time.strftime("%d-%m-%Y-%H-%M-%S") + ".jpg", cv2.cvtColor(frame, cv2.COLOR_RGB2BGR))
15
16
17 # ...
By default, the snapshots will be saved in the current directory with a time stamp.
If you pass the path to a video to the App object, you will see the video in the Tkinter window, instead of your webcam. E.g., I have a video named big_buck_bunny_480p_surround-fix.avi on my system, if I pass this to the App:
1 # ...
2
3 App(tkinter.Tk(), "Tkinter and OpenCV", "big_buck_bunny_480p_surround-fix.avi")
you should see an image like the one from the beginning of this article.
Here is the full source code for this example:
 1 import tkinter
 2 import cv2
 3 import PIL.Image, PIL.ImageTk
 4 import time
 5
 6 class App:
 7     def __init__(self, window, window_title, video_source=0):
 8         self.window = window
 9         self.window.title(window_title)
10         self.video_source = video_source
11
12         # open video source (by default this will try to open the computer webcam)
13         self.vid = MyVideoCapture(self.video_source)
14
15         # Create a canvas that can fit the above video source size
16         self.canvas = tkinter.Canvas(window, width = self.vid.width, height = self.vid.height)
17         self.canvas.pack()
18
19         # Button that lets the user take a snapshot
20         self.btn_snapshot=tkinter.Button(window, text="Snapshot", width=50, command=self.snapshot)
21         self.btn_snapshot.pack(anchor=tkinter.CENTER, expand=True)
22
23         # After it is called once, the update method will be automatically called every delay milliseconds
24         self.delay = 15
25         self.update()
26
27         self.window.mainloop()
28
29     def snapshot(self):
30         # Get a frame from the video source
31         ret, frame = self.vid.get_frame()
32
33         if ret:
34             cv2.imwrite("frame-" + time.strftime("%d-%m-%Y-%H-%M-%S") + ".jpg", cv2.cvtColor(frame, cv2.COLOR_RGB2BGR))
35
36     def update(self):
37         # Get a frame from the video source
38         ret, frame = self.vid.get_frame()
39
40         if ret:
41             self.photo = PIL.ImageTk.PhotoImage(image = PIL.Image.fromarray(frame))
42             self.canvas.create_image(0, 0, image = self.photo, anchor = tkinter.NW)
43
44         self.window.after(self.delay, self.update)
45
46
47 class MyVideoCapture:
48     def __init__(self, video_source=0):
49         # Open the video source
50         self.vid = cv2.VideoCapture(video_source)
51         if not self.vid.isOpened():
52             raise ValueError("Unable to open video source", video_source)
53
54         # Get video source width and height
55         self.width = self.vid.get(cv2.CAP_PROP_FRAME_WIDTH)
56         self.height = self.vid.get(cv2.CAP_PROP_FRAME_HEIGHT)
57
58     def get_frame(self):
59         if self.vid.isOpened():
60             ret, frame = self.vid.read()
61             if ret:
62                 # Return a boolean success flag and the current frame converted to BGR
63                 return (ret, cv2.cvtColor(frame, cv2.COLOR_BGR2RGB))
64             else:
65                 return (ret, None)
66         else:
67             return (ret, None)
68
69     # Release the video source when the object is destroyed
70     def __del__(self):
71         if self.vid.isOpened():
72             self.vid.release()
73
74 # Create a window and pass it to the Application object
75 App(tkinter.Tk(), "Tkinter and OpenCV")
As an exercise, you can add the capability to save the video in a separate file. This could be useful if you want to record the output of your webcam.
If you want to learn more about OpenCV and Python I would recommend reading OpenCV with Python Blueprints by M. Beyeler:
or, for OpenCV C++, OpenCV By Example by P. Joshi: