PPM image from scratch in Python 3
Posted on October 25, 2017 by Paul
Someone asked me if it is possible to write image files in pure Python, without any libraries. The answer is, of course, you can implement any image format in pure Python, as long as you have a clear description of the image format and you know how to write binary files.
In this article, I will show you how to write binary PPM images in pure Python. Linux and recent versions of macOS have native support for PPM files, so you can open a PPM image using the default OS image viewer. For Windows, you can use a program like IrfanView. The PPM file format can store uncompressed RGB images in binary or human readable, ASCII format. As a side note, the PPM format is not an efficient format to store images, however it is relatively easy to implement and use, from a programming point of view.
A PPM image starts with a header that consists of:
- A magic number P3 or P6. P3 means that the file is stored in ASCII format, P6 means the file is stored in binary.
- Whitespace character.
- The width and height of the image, formatted as two ASCII decimal characters, separated by a whitespace character.
- Whitespace character.
- The maximum color value, ASCII decimal characters, larger than zero and smaller than 65536. Typically, the maximum value is 255.
- Whitespace character. Usually the LF character.
Please note, that in the above whitespace could be blank, TAB, CR, LF.
Next, we store the actual image data starting from the top left corner of the image, in row-major mode, were each pixel consists of an (R, G, B) color triplet. If the max color value is less than 256, each color value is stored as an unsigned integer of one byte length in binary. For max color value larger than 256 we use two bytes for the color data. You can read more about the PPM format at http://netpbm.sourceforge.net/doc/ppm.html.
In order to store the image data efficiently, in Python, we will use the array module. Arrays in Python are similar to lists but they can store only a single data type.
This is how you create an eight elements array of unsigned characters in Python:
1 import array
2
3 my_array = array.array('B', [0] * 8)
4
5 print("my_array has", len(my_array), "elements")
6 print("The size of one element of my_array is", my_array.itemsize, "bytes")
7 print("my_array =", my_array)
This is what I see, on my machine, if I run the above code:
1 ~ $ python test.py
2 my_array has 8 elements
3 The size of one element of my_array is 1 bytes
4 my_array = array('B', [0, 0, 0, 0, 0, 0, 0, 0])
5 ~ $
Please note, that the type of my_array in the above example corresponds to uint8_t in recent versions of C and C++.
If you want to allocate space for an RGB image of (width x height) pixels, in Python, we can use:
1 import array
2
3 width = 256
4 height = 128
5
6 image = array.array('B', [0, 0, 0] * width * height)
We can fill the header of a PPM image with:
1 width = 256
2 height = 128
3 maxval = 255
4
5 # PPM header
6 ppm_header = f'P6 {width} {height} {maxval}\n'
The last line from the above code snippet will raise an error, if your version of Python is older than 3.6. Here is an alternative for older Python versions:
1 # PPM header
2 ppm_header = 'P6 ' + str(width) + ' ' + str(height) + ' ' + str(maxval) + '\n'
Once you have the image data and the PPM header prepared, you can save them in a binary file. Here is a complete example that will create a PPM image of 256x128 pixels filled with the blue color:
 1 import array
 2
 3 # PPM header
 4 width = 256
 5 height = 128
 6 maxval = 255
 7 ppm_header = f'P6 {width} {height} {maxval}\n'
 8
 9 # PPM image data (filled with blue)
10 image = array.array('B', [0, 0, 255] * width * height)
11
12 # Save the PPM image as a binary file
13 with open('blue_example.ppm', 'wb') as f:
14 	f.write(bytearray(ppm_header, 'ascii'))
15 	image.tofile(f)
If you want to modify a particular pixel value (x, y) in the above image, you can access it with something like:
1 # Change the (x, y) pixel color to red
2 index = 3 * (y * width + x)
3 image[index] = 255           # red channel
4 image[index + 1] = 0         # green channel
5 image[index + 2] = 0         # blue channel
Please note, that x goes from left to right and y goes from top to bottom. To illustrate, here is how you can fill with red a rectangle with the origin at (10, 10), a width of 50 pixels and a height of 80 pixels:
 1 import array
 2
 3 # PPM header
 4 width = 256
 5 height = 128
 6 maxval = 255
 7 ppm_header = f'P6 {width} {height} {maxval}\n'
 8
 9 # PPM image data (filled with blue)
10 image = array.array('B', [0, 0, 255] * width * height)
11
12 # Fill with red the rectangle with origin at (10, 10) and width x height = 50 x 80 pixels
13 for y in range(10, 90):
14 	for x in range(10, 60):
15 		index = 3 * (y * width + x)
16 		image[index] = 255           # red channel
17 		image[index + 1] = 0         # green channel
18 		image[index + 2] = 0         # blue channel
19
20 # Save the PPM image as a binary file
21 with open('blue_red_example.ppm', 'wb') as f:
22 	f.write(bytearray(ppm_header, 'ascii'))
23 	image.tofile(f)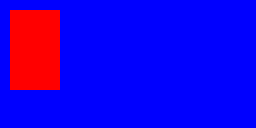
Encapsulating the above functionality in a PPM class is left as an exercise for the reader.
If you want to learn more about Python, I recommend reading Python Crash Course by Eric Matthes:

Another good Python book, for more advanced users, is Python Playground by Mahesh Venkitachalam: