Swift Alamofire tutorial uploading and downloading images
Posted on May 2, 2017 by Paul
This is a short tutorial about uploading and downloading images with Alamofire from an iOS, Swift 3, application.
I assume that you have the latest Xcode installed on your Mac, and that you know how to code small iOS applications in Swift 3.
I also assume that you have access to a server, ideally you have your own server with a domain name and a SSL certificate installed. If this is not the case, you can use a local Apache or NGINX web server. Personally, I use the free version of MAMPP which allows me to easily switch between Apache and NGINX if necessary. A good alternative to MAMPP is XAMPP. As a side note, macOS comes with an old version of Apache and PHP 5.3 already installed.
First, you need to install Alamofire. I found that the easiest approach to get started with Alamofire for iOS projects is to use CocoaPods. Open a Terminal and install CocoaPods:
1 sudo gem install cocoapodsThe above command will use the outdated Ruby 2.0 that comes with macOS.
Optionally, if you want to use a more modern Ruby, you can use the Homebrew package manager:
1 /usr/bin/ruby -e "$(curl -fsSL https://raw.githubusercontent.com/Homebrew/install/master/install)"
2 brew install rbenv ruby-build
3 echo 'if which rbenv > /dev/null; then eval "$(rbenv init -)"; fi' >> ~/.bash_profile
4 source ~/.bash_profile
5 rbenv install 2.4.1
6 rbenv global 2.4.1
Check if you can use the latest Ruby version with:
1 ruby -vNow, you can install CocoaPods:
1 gem install cocoapodsOnce you have CocoPods installed, open Xcode and create a new project, select Single View Application and be sure to select Swift in the language drop down list:
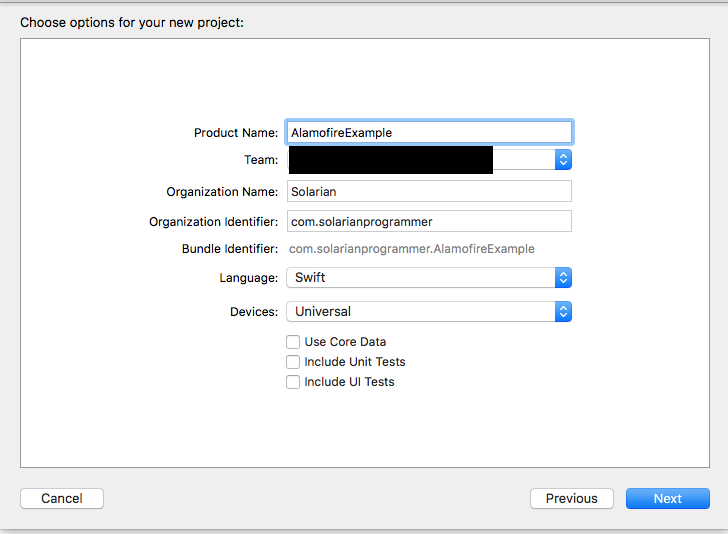
Close the Xcode project and, from a Terminal, go to the project folder. Assuming you’ve named your project “AlamofireExample” and that you’ve saved it on your Desktop:
1 cd ~/Desktop
2 cd AlamofireExample
Now, create a new Podfile and open this in your preferred text editor:
1 pod init
2 open Podfile
Change the content of the file from:
 1 # Uncomment the next line to define a global platform for your project
 2 # platform :ios, '9.0'
 3
 4 target 'AlamofireExample' do
 5   # Comment the next line if you're not using Swift and don't want to use dynamic frameworks
 6   use_frameworks!
 7
 8   # Pods for AlamofireExample
 9
10 end
to (see lines 2 and 9):
 1 # Uncomment the next line to define a global platform for your project
 2 platform :ios, '10.0'
 3
 4 target 'AlamofireExample' do
 5   # Comment the next line if you're not using Swift and don't want to use dynamic frameworks
 6   use_frameworks!
 7
 8   # Pods for AlamofireExample
 9   pod 'Alamofire', '~>4.4'
10 end
save and close the file.
Now, execute the next command in Terminal:
1 pod installFrom now on, you will use AlamofireExample.xcworkspace instead of the usual AlamofireExample.xcodeproj. Just double click on AlamofireExample.xcworkspace and it will open in Xcode.
Drag an image from your computer to the AlamoFireExample project and be sure to check Copy items if needed. You can use the same image as me, tree.png, if you wish. I will use this image to exemplify uploading an image from our iOS application.
For the download image test, you can use any image from the web, or you can use same image as me https://solarianprogrammer.com/images/2013/02/28/mandelbrot_piece_Z2.png. You will need the link of the above image in your iOS app.
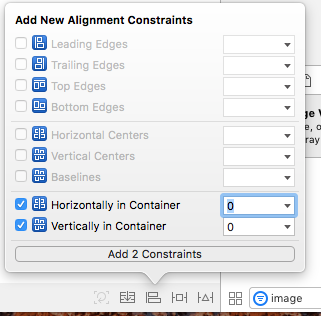
In Xcode, select the Main.storyboard and drag an Image View to the center of the View Controller. I suggest to add some constraints to the Image View. First make sure it is aligned horizontally and vertically:
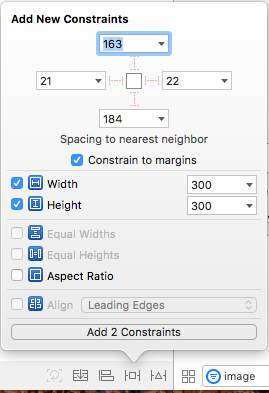
Next, set the image view to be 300x300 points:
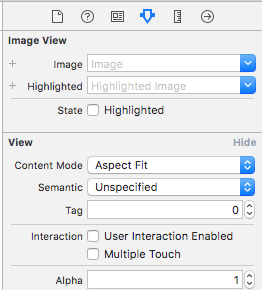
Set the content mode of the image to Aspect Fit:
Next, we’ll need to get a reference to the image view from the Main.storyboard in our code. Select the view controller from the Main.storyboard and click on the double circle symbol in the top right corner of Xcode. This should open ViewController.swift in a second window to the right.
Now, click on the UIImageView, press CTRL and drag the line toward ViewController.swift. Leave it just above the viewDidLoad(). Chose a descriptive name, something like downloadImage and press Connect:
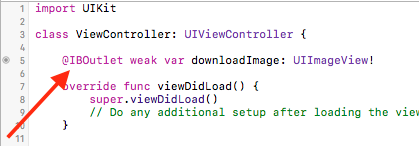
Import the Alamofire module in ViewController.swift:
1 import UIKit
2 import Alamofire
If you see an error, simply build the project, after which Xcode will recognize the Alamofire module.
Next, let’s write some code to download an image from a given URL:
 1     override func viewDidLoad() {
 2         super.viewDidLoad()
 3
 4         // The image to dowload
 5         let remoteImageURL = URL(string: "https://solarianprogrammer.com/images/2013/02/28/mandelbrot_piece_Z2.png")!
 6
 7         // Use Alamofire to download the image
 8         Alamofire.request(remoteImageURL).responseData { (response) in
 9             if response.error == nil {
10                 print(response.result)
11
12                 // Show the downloaded image:
13                 if let data = response.data {
14                     self.downloadImage.image = UIImage(data: data)
15                 }
16             }
17         }
18     }
If you run the above code in the iPhone Simulator, this is what you should see:

Next, let’s write the image upload example. For simplicity we will use an image bundled with our application, the tree.png we’ve added earlier to our project. The same technique we’ll present here can be employed if you, for example, use an image from your device photos, you just need to add some boilerplate code.
First, we can get the URL of our bundled image with:
1 let imageURL = Bundle.main.url(forResource: "tree", withExtension: "png")Usually, no server will let you upload an image without some form of authentication. For our example we’ll use a dummy user name and password:
1 let parameters = ["user":"Sol", "password":"secret1234"]By default, iOS (the App Transport Security policy) won’t let you send HTTP requests to a server without a valid SSL certificate. If you use a local Apache or NGINX server for development, you usually don’t have a SSL certificate. In order to be able to use this local server, we need to add an exception for our localhost.
In Xcode, right click on Info.plist and select Open As source code. Copy the next lines just before the last closing dict tag:
 1 <key>NSAppTransportSecurity</key>
 2 <dict>
 3     <key>NSAllowsArbitraryLoads</key>
 4     <true/>
 5     <key>NSExceptionDomains</key>
 6     <dict>
 7         <key>localhost</key>
 8         <string></string>
 9     </dict>
10 </dict>
You should see something like this:
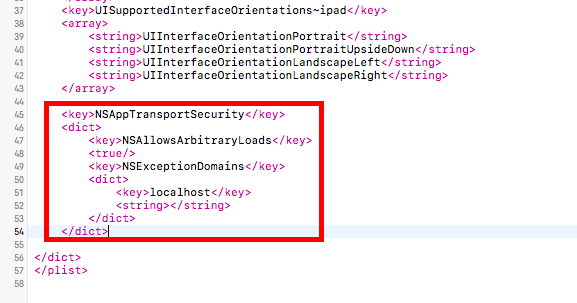
For my machine, I have an Apache server running at http://localhost:8888 and I’ll save the PHP script that will receive the uploaded image in a file named upload_image.php. So, I will send the upload request to http://localhost:8888/upload_image.php. Be sure that you have write rights on your target server, otherwise the upload will fail.
Here is the simple PHP script that I will use as an example:
 1 <?php
 2 // Get the user credentials
 3 $user = $_POST["user"];
 4 $password = $_POST["password"];
 5
 6 // Verify if the user is authorized to upload files to the server
 7 // ...
 8
 9 // Assume the authorization test is passed:
10 $authorization_test = TRUE;
11
12 if($authorization_test === FALSE) {
13 	die();
14 }
15
16 // Save the image file
17 move_uploaded_file($_FILES["image"]["tmp_name"], $_FILES["image"]["name"]);
18
19 // Send some dummy result back to the iOS app
20 $result = array();
21 $result["user"] = $user;
22 $result["message"] = "Success!";
23 $result["files"] = $_FILES;
24 $result["post"] = $_POST;
25 echo json_encode($result);
Please note, that I don’t check for errors in the above PHP code. For illustration purposes, the code will send back the content of the $_FILES and $_POST PHP superglobals. Don’t use the above code on a production server!
Now, let’s write the Swift code that will upload the image bundled with the application:
 1 override func viewDidLoad() {
 2     super.viewDidLoad()
 3
 4     // User "authentication":
 5     let parameters = ["user":"Sol", "password":"secret1234"]
 6
 7     // Image to upload:
 8     let imageToUploadURL = Bundle.main.url(forResource: "tree", withExtension: "png")
 9
10     // Server address (replace this with the address of your own server):
11     let url = "http://localhost:8888/upload_image.php"
12
13     // Use Alamofire to upload the image
14     Alamofire.upload(
15         multipartFormData: { multipartFormData in
16             // On the PHP side you can retrive the image using $_FILES["image"]["tmp_name"]
17             multipartFormData.append(imageToUploadURL!, withName: "image")
18             for (key, val) in parameters {
19                 multipartFormData.append(val.data(using: String.Encoding.utf8)!, withName: key)
20             }
21     },
22         to: url,
23         encodingCompletion: { encodingResult in
24             switch encodingResult {
25             case .success(let upload, _, _):
26                 upload.responseJSON { response in
27                     if let jsonResponse = response.result.value as? [String: Any] {
28                         print(jsonResponse)
29                     }
30                 }
31             case .failure(let encodingError):
32                 print(encodingError)
33             }
34     }
35     )
36 }
Here is the response from the server, the jsonResponse variable from the Swift code, as seen in the output window of Xcode:
 1 ["files": {
 2     image =     {
 3         error = 0;
 4         name = "tree.png";
 5         size = 1097894;
 6         "tmp_name" = "/Applications/MAMP/tmp/php/phpEKNQxE";
 7         type = "image/png";
 8     };
 9 }, "user": Sol, "message": Success!, "post": {
10     password = secret1234;
11     user = Sol;
12 }]
If you want to learn more about Swift and iOS programming I would recommend reading Swift Programming by Matthew Mathias and John Gallagher:
or iOS Programming by Christian Keur and Aaron Hillegass:
